3D Animation Workshop: Lesson 65: Basic MAX NURBS Surfaces | 2
|
|
Lesson 65 - Basic MAX NURBS Surfaces - Part 3
The next image shows how an isoparametric curve is created right off the surface of the object.
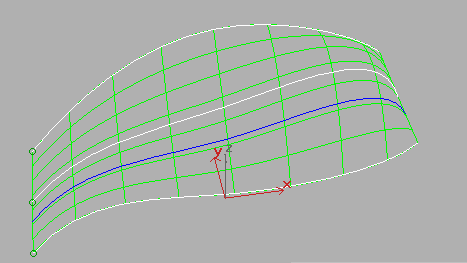
We can add this curve to the loft in two ways. The obvious way is to select and delete the surface, and then skin all four curves together to make a new surface.


But MAX allows you to simply add the new curve to the loft directly, which produces the same result. This is an important convenience in itself, but it points us in an even more interesting direction. MAX can sample curves off the surface automatically and the replace the current loft surface with a new surface lofted from the sample curves. For example, let's say we needed curves running in the other direction. With the surface selected, we can use the Make Loft command. A dialog box asks us which direction the curves should run and how many should be sampled off the surface. The direction along the path of the longer curves defines the u direction. In this example, we sample nine isoparametric ucurves and delete the original loft curves. We can see a preview of where the new loft curves will be placed.
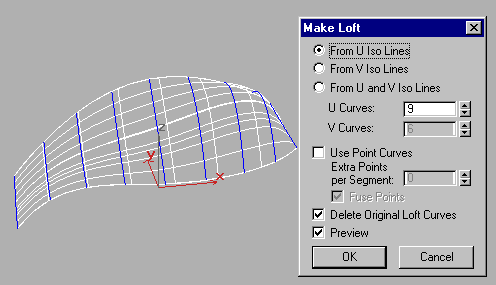
The next image shows the result. The loft is now defined by nine curves running in the opposite direction as the original version, and editing the CVs of these curves changes the shape of the surface.
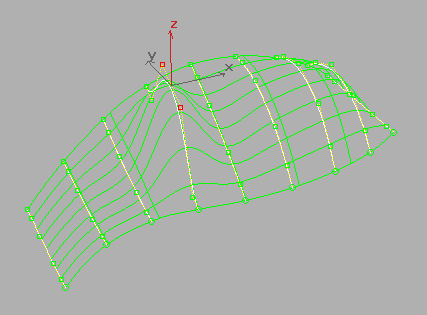
Now we'll make the surface independent of its generator curves so that it is a true NURBS surface controlled directly by its surface CVs. A dependent loft surface, like all dependent surfaces is an interface to control the true surface. A true CV surface underlies a loft or a sweep or a lathe surface, but is hidden because you want to use the generator curves to control the contours. With the surface made independent, we can both see and edit the NURBS surface CVs.
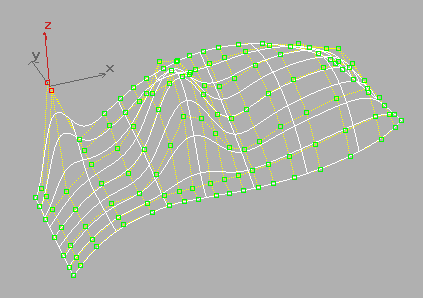
But note how much more complex the network of CVs has become to edit. The loft surface was defined by nine curves with six CVs apiece, for a total of 54 CVs on the surface. The independent CV surface has seven columns of nineteen CVs each. This means 133 CVs to define the same shape. This gives us more control to be sure, but the surface might be too difficult to edit if each CV has only very localized influence. So, after making some precision edits at the surface CV level, it might be better to make a loft surface again. We could extract selected curves from the surface and skin them, but we can also use the Make Loft command. Last time we used the Make Loft command to change an existing loft surface. This time, we use it to make a loft surface out of an independent CV surface.

Note how the procedure makes an initial decision as to the ideal number of curves, in this case, 13. We added an additional contour at the surface CV level, so more than the original nine curves are needed to define the surface. The curves are placed adaptively, rather than at equal distances, to better define areas of tighter curvature. Notice also how the u and v directions got reversed in the process. The Delete Original Curves option is grayed-out because we are not starting from a loft surface anymore. Here's a look at the new loft surface, with the curve CVs visible.
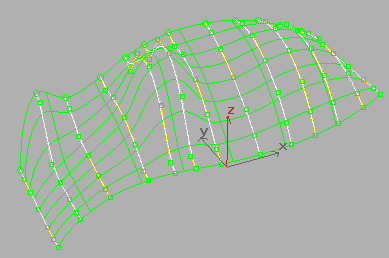
The new loft surface is controlled by a total of 91 curve CVs, about one-third fewer than the former 133 surface CVs. The power to automatically jump back and forth between loft surfaces and independent CV surfaces is a unique aspect of the MAX NURBS toolset. You are always able to decide where a surface is better managed from its true CVs or from the CVs of controlling curves sampled out of the surface.
| To Return to Parts 1 and 2, Use Arrow Buttons |
|
Created: Apr. 28, 1999
Revised: Apr. 28, 1999
URL: https://webreference.com/3d/lesson65/part3.html


 Find a programming school near you