3D Animation Workshop: Lesson 63: Puppet Master Plus | 2
|
|
Lesson 63 - Puppet Master Plus - Part 3

This looks pretty good, really, even in a grainy GIF animation. It looks so much more like real musculature than the results we were getting with bones in the previous lessons. I won't kid you. It took a long time to work out even this basic example, but the promise is there to solve some of the most difficult problems in 3D character animation.
Puppet Master is great for the arms because they are sharply articulated at the shoulders and elbows and wrists. And if we developed the fingers on the hand, it would perfect for them as well. But some parts of the human body are a struggle with Puppet Master because they curve in soft ways. The human torso bends flexibly because of the many vertebrae in the spine. It doesn't make sense to cut this region up into little strips for Puppet Master sections. Bones are a much better tool for the job. The same is true for the hips. Bones are perfect in this area because, as the thigh lifts to step, there is a soft muscular pull all the way through the buttocks and the stomach. I've found it very difficult to divide this region of a character model up effectively for Puppet Master because there are no clear lines on which to carve up sections.
Fortunately, you can use bones and Puppet Master together. Individual sections can have bones in them. I've been playing with the theory that the best human character setup may be one in which Puppet Master is used on the arms and head, and the rest of the body is controlled with bones.
Let me show you what I've worked out thus far. It's a long way from being finished, but it's going in the right direction.
The following image shows a full figure in Lightwave Layout. The sections are distinguished by color-coding, and each is surrounded by a bounding box. There are separate sections for the upper arm, forearm and hand on each side, a section for the head, and section for the rest of the body. Every part of the mesh must be included in a section. One of the forearm sections is selected for posing, as you can see from the yellow highlighting of its bounding box.

The body section, from the feet to the shoulders is then boned in the conventional way. Inverse Kinematics goals are set for the feet. But there's a big problem. The body section is deformed by its bones. How are the arm and head sections to stay together with the body? The answer is to parent the upper arm and head sections to bones that reach into these sections. That way, the sections ride along when these bones rotate.
Take a look at this wireframe view of the setup.
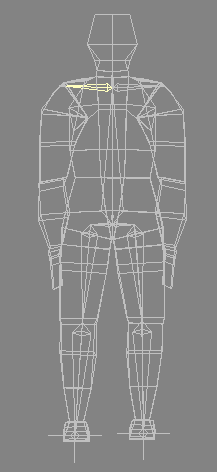
The bones have deforming efffect only within the body section, but they are extended out to touch the pivot points of the sections in the head and upper arms. Those sections are parented to those bones (or more precisely, to tiny bones added to the ends of them). This is the same concept used in Lightwave to keep eyes (which are typically separate objects) attached to a head when it's boned.
I hope that an important truth about character animation has come through in this series of lessons. This is a very difficult, demanding and often frustrating endeavor that is only for those that love it.
| To Return to Parts 1 and 2, Use Arrow Buttons |
|
Created: Mar. 30, 1999
Revised: Mar. 30, 1999
URL: https://webreference.com/3d/lesson63/part3.html
 Find a programming school near you