3D Animation Workshop: Lesson 62: Puppet Master | 2
|
|
Lesson 62 - Puppet Master - Part 3
I''l leave aside the technical details so that we can get gist of the operation. The entire arm model is saved under the name of "anchor." The meaning of an anchor object will become clear in a moment. Then, each section (each group of polygons representing a separately rotatable unit) is saved as an object. Thus we have objects named anchor, upper arm, forearm, and hand. A special program is run that establishes the relationship between all the units, and then they are loaded into Lightwave Layout.
Puppet Master works by passing information from the sections to the anchor object. The sections are rotated and keyframed, but they are hidden so that they do not render. When a section is rotated, its vertices necessarily move. The new locations of these points are passed back to the anchor object, and the corresponding points on the anchor object move accordingly. This is the main concept of Puppet Master, and its ramifications are very broad. It's not a question of reconnecting up the sections (as you might think) to make a single object. The anchor object remains a single, contiguous mesh all along. The sections are used only to control the points on the anchor.
The following image shows Puppet Master in action.
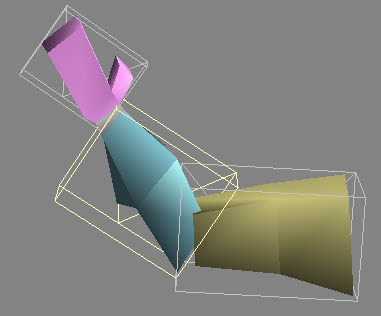
The anchor object is visible, and all the sections are seen only as bounding boxes. After parenting the section objects into a hierarchy and moving their pivot points to appropriate locations, rotating the sections will rotate the corresponding part of the anchor. In the picture, the forearm section is selected and has been rotated to bend the arm. The anchor object goes along for the ride.
Of course, what we really need in the end is the smoothed version. After setting up MetaMation, the same arm looks like this.

This, by itself, would be very impressive. But let's touch on one other thing. Morphing is an important method of animating mesh deformation. In morphing, two or more versions of the same model are interpolated. The simplest example is for breathing. The main model might have the character's chest in a neutral position. Another version of the model is made with the chest puffed out. By "morphing" between the main model and it's "morph target", the character appears to breathe. Morphing is the primary method of facial animation.
Puppet Master allows us to create separate morph targets for each section, and as the section morphs, the corresponding points on the anchor model morph as well. This is incredibly flexible, but it gets better. We can create automatic morphs, in which a section morphs as it (or some other section) rotates.
Check this out. I created a morph target for the upper arm with the points pulled so the muscle seems to bulge. The morph target is loaded into the Puppet Master setup, along with the original upper arm section.

The morph is then set to follow the angle of the forearm. As the forearm is rotated to bend the arm, the upper arm morphs into the muscle bulge. Incredible!

Puppet Master is something completely new. We'll continue with it next time.
| To Return to Parts 1 and 2, Use Arrow Buttons |
|
Created: Mar. 15, 1999
Revised: Mar. 15, 1999
URL: https://webreference.com/3d/lesson62/part3.html
 Find a programming school near you