3D Animation Workshop: Lesson 58: Using Inverse Kinematics
|
|
Lesson 58 - Using Inverse Kinematics - Part 2
Inverse kinematics, generally called IK, is a shortcut that allows you to animate an entire chain of bones at one time, working from the end. Once again, let me stress that the concept is the same in all applications, even though the precise methods of implementing inverse kinematics can differ quite substantially.
In Lightwave, we apply inverse kinematics to a chain by creating a null object, called a goal, and then by "goaling" the bone at the end of the IK chain to the null. It may feel peculiar to speak of "goaling" a bone, but it's no more peculiar than speaking of "parenting" an object to a parent object. In any case, before goaling, we move the goal object into position, in this case at the heel.
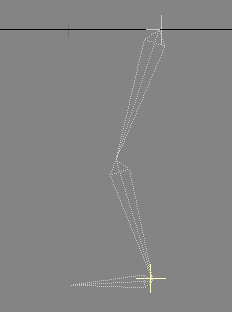
Next we select the foot bone and goal it to the goal object. Once we do this, we can no longer rotate the bones directly. But if we move the goal object, watch what happens.

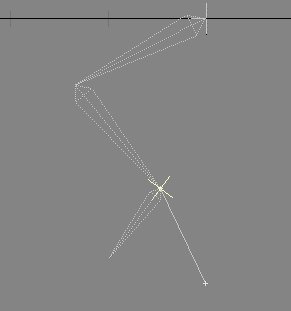
Translating the goal accomplishes two rotations at once. The thigh rotates up and the knee rotates back. The curved line shows the motion path of the goal in the leg lift motion. This is another important advantage of IK. It is much more convenient to think of a stepping action as the motion path of the heel, rather than as rotations of the individual bones in the leg. When we step we instinctively feel that we are lifting our foot, rather than rotating our bones at the hips and knees. IK permits us to work in this more intuitive way.
Take a moment to consider one of the most important, and rather subtle, aspects of inverse kinematicsÂone that causes confusion in every application. Even though we goaled the foot bone, it is not really part of the chain. The inverse kinematics affects only the bones above the foot, and we placed the goal object at the end of the calf bone, not at the end of the foot bone. This is because IK necessarily must operate along a chain of pivot points, and in a bones system, the pivot point of every child bone is at the tip of its parent bone. There is no pivot point at the end of the foot. Thus if we wanted to include the foot in the IK chain, we need to add a tiny accessory bone to the end of the foot and move the goal to it. But this, at least by itself, is not very workable. Think about it. How easy would it be to control a real human's stepping motion by grabbing him or her by the toes?
So we still have to rotate the foot separately, but Lightwave has a special tool that makes it easy. We can go back to the foot and use "Match Goal Orientation." This locks the rotation of the foot to the rotation of the goal object. Now we can simply rotate the goal to rotate the foot.
The foot rotations are slight, and might be hard to see in static views. But in animation, the slight dipping of the toe is quite noticeableÂor rather, it's noticeable when it's missing.
By the way, you may have noticed how we built our bones chain with a bend at the knee. This bend tells the Lightwave IK system that this is the preferred direction of the bend. If we had simply drawn the thigh and calf bones in straight vertical line, IK would not know which direction was preferred and the knee could bend backwards in a way that's painful even to think about.
But this is only half of what inverse kinematics can do.
| To Continue to Part 3, or Return to Part 1, Use Arrow Buttons |
|
Created: Jan. 19, 1999
Revised: Jan. 19, 1999
URL: https://webreference.com/3d/lesson58/part2.html
 Find a programming school near you