3D Animation Workshop: Lesson 54: Texture Mapping Basics | 2
|
|
Lesson 54 - Texture Mapping Basics - Part 3
We'll dig a lot deeper in the following lessons, but let's get an overview of the basic mapping techniques. I'm going to jump to 3D Studio MAX to demonstrate this material because MAX has an outstanding toolset for texture mapping. Lightwave, whatever it's other considerable merits, lacks some critical features in this regards, and even Softimage does not have all the tools that MAX does. We'll make very clear, as we go along on this subject, how the different programs compare.
How do we get a map onto a surface? More precisely, how do we "map" the bitmap to the surface by creating associations between the vertices on the model and the pixels on the bitmap? There are two fundamental methods.
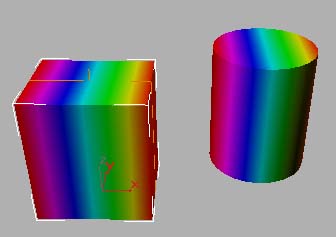
The best known and most generally applicable method is texture projection. The image is mathematically projected on the object, and the mapping coordinates are assigned accordingly. Imagine standing in a dark room in front of a slide projector. The projector is turned on, and the image is projected on your body. Then the projector is turned off, the lights are turned on, but the image is still stuck to your skin. That's pretty much the idea with projection mapping, except that are a number of different projection methods. A planar projection is much like our projector example. In the following image, a screen shot from MAX, our spectrum bitmap is projected on both a box and a cylinder from the front, using the planar (flat) method. Notice how the projection affects every surface, including the back sides we can't see. This is perfect for a flat surface, and even the projection on the cylinder makes some sense. As a human body is a lot like a cylinder that's been flattened from front to back, we can see how a planer projection can be used to make maps for characters. The planer projection is the most often used projection method.
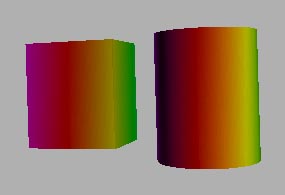
The only other projection method worth our notice right now is the cylindrical method. The image is effectively curled into a closed tube and projected on the object aligned inside the tube. This is how the spectrum was projected on the cone we used before. This method is obviously most applicable to objects with a circular structure (flower pots, rockets, arms and legs, etc.)
But projections are not the only method for getting a image mapped to an object. The surfaces of a model may be defined by parameters that are inherent in their structure. The most obvious example is win NURBS surfaces. All locations on a NURBS surface can be specified as the intersection of curves running in the u direction and in the v direction, in precisely the same way that any point on the earth can be specified by the intersection of curves of longitude and latitude. If we make the uv coordinates of our bitmap image correspond to the uv coordinates already in the surface, the mapping will follow the curvature of the surface without smearing or distortion.
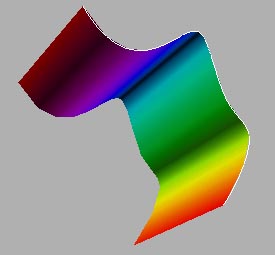
Here is a curving NURBS surface based on the curve at the edge (highlighted in white). The curve (and therefore the surface) increases in the u dimension from the top to the bottom. When the bitmap is applied directly to this existing coordinate system, it follows the surface perfectly.
This is a good start on this big subject. We'll keep going in the next lesson.
| To Return to Parts 1 and 2, Use Arrow Buttons |
|
Created: Nov. 24, 1998
Revised: Nov. 24, 1998
URL: https://webreference.com/3d/lesson54/part3.html
 Find a programming school near you