3D Animation Workshop: Lesson 54: Texture Mapping Basics
|
|
Lesson 54 - Texture Mapping Basics - Part 2
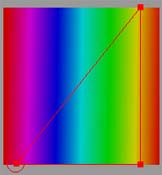
Cosmo Worlds (the VRML development package) has some of the best (and easiest) texture mapping tools, and let's use it to understand the concept of "texture coordinates." I created a bitmap of a spectrum to help us see the mapping process clearly. All bitmaps used for texture maps are defined using the two coordinates u and v.
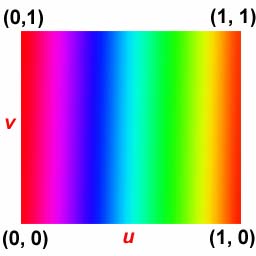
The u coordinates run from left to right and the v coordinates run from bottom to top. All values are between 0 and 1, which is the equivalent of 0 to 100 percent. It doesn't matter whether the bitmap is square or rectangular--the bottom left corner is (0,0) and the top right is (1,1). Every pixel on the bitmap is located at a given u and v pair.
A bitmap is "mapped" to a model when each of the faces of the model can be assigned a certain region of the map. In this following image, the spectrum bitmap has been mapped to a polygonal cone. Notice how the selected triangular face on the cone is associated with a specific region of the bitmap.
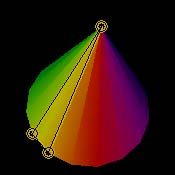
Thus every vertex of every face on a model is given corresponding (u,v) coordinates on the bitmap. These are called texture coordinates. In our selected triangle, the vertex at the tip of the cone is associated with the point on the map at (.9, 1). Make sure you understand this before going on. The yellow pixel assigned to the top of the cone is about 90 percent across the bitmap in the u direction, and 100 percent up in the v direction. The other vertices are at (.9,0) and (.85, 0). There is therefore a triangle in u,v space that will be applied to the triangle on our model. If you get this idea, you've got the basics.
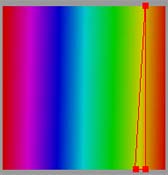
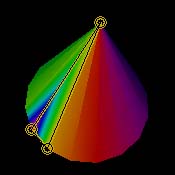
The reason the spectrum image appeared evenly distributed around the image was because the shape of each triangle on the model corresponded fairly well with its associated triangular space on the map. If a large polygon area gets a disproportionate small area of the map, or vice versa, the mapping will look cramped or smeared. Look what happens if, using the texture mapping editor in Cosmo Worlds, we assign a much larger portion of the image to the selected triangle.
There are some very subtle ideas here that can take a while to sink it. The expert texture mapper is someone who is very comfortable with concepts of texture coordinates and the correspondence between polygons on a model and their associated texture spaces. With this background in mind, we can begin to look at how practical mapping is accomplished.
| To Continue to Part 3, or Return to Part 1, Use Arrow Buttons |
|
Created: Nov. 24, 1998
Revised: Nov. 24, 1998
URL: https://webreference.com/3d/lesson54/part2.html
 Find a programming school near you