3D Animation Workshop: Lesson 46: The Natural Magic of Radiosity
|
|
Lesson 46 - The Natural Magic of Radiosity - Part 3
One of the remarkable features of Lightscape is the ability to simply drop a window in on top of a wall and let light in through it. We don't have to go back to the model of the walls and cut a window into the geometry. Instead we place a window panel on the wall, just like a painting, but define it as a window. There's bit more to it than this--Lightscape is not any easy program to learn or use. But once you get the hang of it, you have the freedom to open up windows wherever you want.
The following image is lit only with daylight. The bulb has been turned off. The window is facing west and we are at the latitude of New York City on June 21, at high noon. The color of the floor has been changed to a pinkish terra-cotta that blushes off the white walls. Now this is summertime!
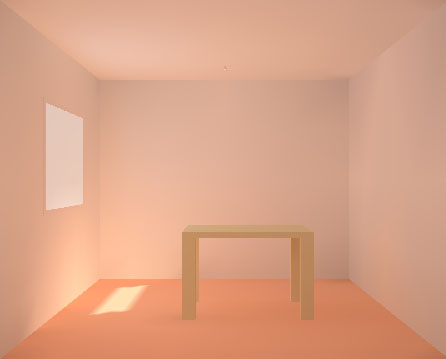
Notice how the hotspot of direct light on the floor reflects back on the wall beneath the window, and even a bit on the ceiling directly above. A mesh view of the solution will be instructive.

The mesh is subdivided to a finer extent on the floor about the hot spot, and to a somewhat lesser extent on the ceiling above. Compare the meshing of the wall with the window with the opposite wall. The sharper lighting gradients on the former require finer meshing (more color vertices) than do the gentle gradients on the latter. The art of using Lightscape requires a sensitivity to the relationship between mesh density and color gradients. The application provides very extensive (and sometimes intimidating) tools for controlling mesh density, but you have to understand the principles. It takes hundreds of test solutions, to develop a feel for this kind of rendering.
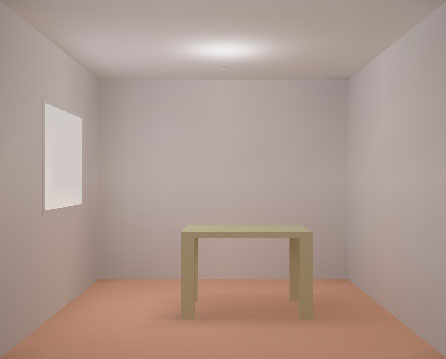
Let's move the clock ahead to 4:00 P.M. and build another solution.

Without the direct light on the floor, there is much less diffuse reflection on the walls, and we can see that they really are painted white. The window pane itself is a bit of a trick. In order to create a satisfactory effect, I made the "glass" a self-luminous white and allowed the surface to reflect back color from the room. Thus the window pain appears pinkish (maybe too pinkish) in the noontime render, but white in the 4:00 o'clock solution.
It's dark enough to want to turn the light back on. Here's a solution with the same window light, but with the interior lighting added in.
The subtle interaction of daylight and lamps is perhaps the ultimate piece of Lightscape magic. We'll continue with this subject next time.
| To Return to Parts 1 and 2, Use Arrow Buttons |
|
Created: August 4, 1998
Revised: August 4, 1998
URL: https://webreference.com/3d/lesson46/part3.html
 Find a programming school near you