3D Animation Workshop: Lesson 46: VRML - The Natural Magic of Radiosity
|
|
Lesson 46 - The Natural Magic of Radiosity - Part 1
3-D graphics is the magic business. And a new tool is quickly finding its way into our bag of tricks.
Conventional lighting technologies in 3-D graphics--scanline rendering and ray tracing--can produce some remarkable results. But they operate in ways that are fundamentally different than physical reality. A few years ago, a much more advanced approach to lighting was developed by university researchers. I remember seeing early experimental renderings and being shocked by their stunning beauty and realism. I stress both the beauty and the realism because, when it comes to light, these two virtues are inseparable. To the human eye, light is inherently beautiful, and thus physically accurate lighting in computer graphics is pleasing and satisfying beyond mere fidelity.
Radiosity is now arriving on our desktops, and the most important tool is undoubtedly Lightscape. Lightscape is a rendering tool. Models are created in other applications, and after being imported into Lightscape, they can be laid out to create a scene, assigned material surfaces (including textures), and most importantly, lit with physically accurate light sources. The scene thus composed is then rendered, or rather, a radiosity solution is computed. Unlike a traditional render, this solution is not a single view from a camera. It is computation of the colors of all surfaces in the entire scene. This opens up some very significant possibilities, which we will be exploring.
Let's make a room. I created a simple cube in a modeling program (although I could have used one right out of Lightscape's own model libraries). The surface normals of the cube are flipped so that we see the inside surfaces, rather than the outside ones. I assigned a different surface name and color definition to the floor than to the walls and ceiling. And, finally, I placed a light bulb slightly below the ceiling.
Here's a pre-rendered view of the geometry, looking into the room from the front. Note the light bulb at the top.
Now we run the radiosity solution, to get this.

This simplest of examples is already remarkably impressive. Notice the gentle shadowing in the corners of the walls, and the soft disk of light on the ceiling. But what are we really looking at?
Take a good long look at the wireframe view of the solution (and pardon the degradation in this highly compressed JPEG image.)
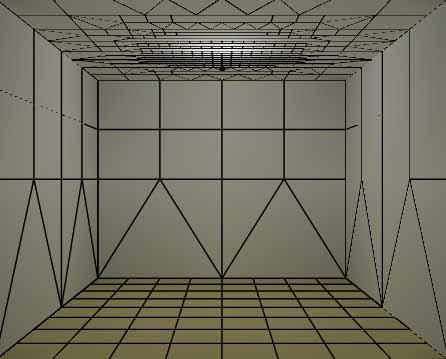
A radiosity solution is a "vertex color" file. Colors are assigned to vertices in the geometry of the file, and when viewed through an appropriate rendering engine, colors are averaged between the vertices to create gentle gradients. Vertex color is an important tool in games and interactive 3-D, where the colors are assigned by hand. But Lightscape creates the vertex colors automatically, by subdividing the original simple geometry. The mesh is made finer on the ceiling in order to capture the sharper lighting gradient.
But the most amazing feature of radiosity is in the way it handles reflected light.
| To Continue to Parts 2 and 3, Use Arrow Buttons |
|
Created: August 4, 1998
Revised: August 4, 1998
URL: https://webreference.com/3d/lesson46/
 Find a programming school near you