3D Animation Workshop: Lesson 37: Softimage--Introducing NURBS Surfaces | 2
|
|
Lesson 37 - Softimage--Introducing NURBS Surfaces - Part 3
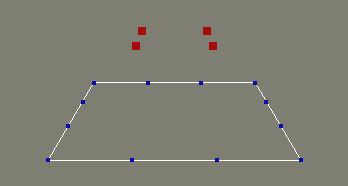
Here's another look at our basic NURBS patch with the four interior control points tagged in red.

Tagging, by the way, is a basic editing and animation feature in Softimage. If the user is in TAG mode, user actions only affect the currently tagged points, if any. Selection sets of tagged points can be saved as "clusters" and recalled whenever necessary. This is a very powerful feature, but it can be frustrating to the inexperienced Softimage user. When you're trying to do something and nothing seems to be happening, it's often because you're in TAG mode and didn't notice it.
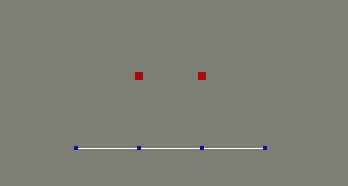
The interior control points have every bit as much effect on the curvature as the ones along the border, just as though there were visible curves running through them. For example, let's translate all four points up together in the y direction. This is vertical because Softimage uses a standard right-handed coordinate system.
This is definitely hard to visualize in the perspective view. A front orthographic view will help.
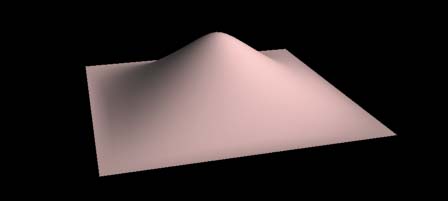
Because there are no visible interior curves along these control points, we need a shaded view to discover whether anything happened. Here's a render.

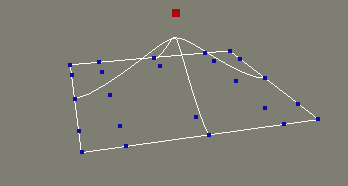
We can see the basic problem presented by the absence of visible curves along the interior control points. The interior control points are necessary to fully edit the surface, but are hard to manage in a wireframe view. Thus it may be necessary to subdivide our patch--not because we need more control points, but only because the subdivision creates new NURBS segments, and therefore visible curves in wireframe.
By subdividing our border curves in halves, visible lines appear at the knots. Each border NURBS curve has changed from a single segment into a two-segment spline joined at a knot. More control points have necessarily been added, even though we may not need them.

Now we can tag the point in the center and pull it up. With the additional visible segments, the wireframe view helps us to define the shape.
Here's a couple of screen shots and a render.

In the next lesson, we'll turn our NURBS surfaces into closed objects.
| To Return to Parts 1 and 2, Use Arrow Buttons |
|
Created: March 30, 1998
Revised: March 30, 1998
URL: https://webreference.com/3d/lesson37/part3.html
 Find a programming school near you