3D Animation Workshop: Lesson 32: VRML 97--Using Authoring Tools
|
|
Lesson 32 - VRML 97--Using Authoring Tools - Part 2
Lately, it seems that every 3D modeling package has added a VRML export feature. I've experimented with Lightwave's and it seems to work fairly well. 3D Studio MAX 2 has some very sophisticated VRML tools--not just for modeling and scene assembly, but also to create sensors and other VRML 2 specific features. If you already have MAX 2 and are interested in VRML, these new features are definitely worth your attention. But MAX is a rather expensive program and, in any case, the design of VRML worlds is more easily achieved in applications that are specialized for the task.
The leading professional tool for VRML development is unquestionably Cosmo Worlds, produced by Cosmo Software at Silicon Graphics Inc. (SGI). This is an extremely impressive high-end application, but is currently available only for Silicon Graphics workstations running the IRIX (UNIX) operating system. A Windows NT version of Cosmo Worlds is promised for release this spring and will be a watershed event in the VRML world because it will bring the definitive professional tool to the PC platform. But it will not be cheap.
There are already a number of reasonably-priced VRML authoring packages, and more will appear rapidly. But I'd like to call your attention to Cosmo's Home Space Designer 2.5. At a suggested retail price of $129.00, this package is very inexpensive--cheap enough for those with any serious interest in VRML development to jump in and get started. Home Space Designer is the former Internet3D Space Builder from Paragraph International. SGI recently acquired ParaGraph International and renamed the product, but the new name is a little misleading. SGI, of course, wishes to continue to position Cosmo Worlds as the premier professional VRML authoring tool, and so it has contrasted the lower priced program as a "home" tool with amateurish connotations. But Home Space Designer is extremely impressive, especially as a way of learning VRML development. I can't tell you how much I've learned just from playing with this program and examining the VRML code it produces.
VRML models, like all models intended for real-time interactivity, must have the lowest polygon counts possible. Lightwave and Studio MAX can be used to produce these models, which can be imported into Home Space Designer. But Home Space Designer has its own modeling tools that are extremely well suited to creating low-polygon model spaces. A wide range of primitive 3D shapes can be overlapped and then added and subtracted from each other using Boolean operations. For example, a room is created by subtracting out a smaller cube from a larger one. Doors and passageways can be built the same way.
A screen shot of the interface gives a good sense of the range of tools offered.
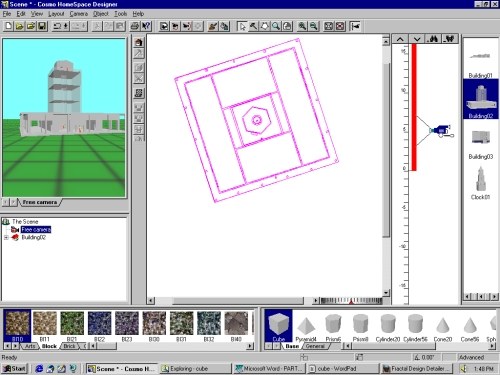
In contrast with the layout environment typical of standard 3D tools, this VRML authoring environment emphasizes a top-down plan view of the scene with an attached elevation tool. This is very useful because the author is designing a world for interactive navigation and therefore the whole approach must be architectural. The left side of the screen displays the scene as seen through the active camera, and although not seen in this screen shot, a movable icon represents the camera in the plan view. By pulling this icon around and rotating it, the author manipulates the position of the view through the scene.
Beneath the camera view is a scene graph that lists all the elements in the file and their hierarchical relationships. At the bottom left is a row of textures--bitmap images of wood and grass and other surfaces that can be interactively applied to the surfaces of the models. At bottom right are the primitive shapes that can be combined with Boolean operations, as already noted. And along the right side of the screen are completed models ready to be pulled into the scene.
Let's look into one of these models because it can give us so many good ideas.
| To Continue to Part 3, or Return to Part 1, Use Arrow Buttons |
|
Created: January 19, 1998
Revised: January 19, 1998
URL: https://webreference.com/3d/lesson32/part2.html
 Find a programming school near you