3D Animation Workshop: Lesson 31: VRML 97--Magical Mystery Tour
|
|
Lesson 31 - VRML 97--Magical Mystery Tour - Part 2
The following code has added two named Viewpoint nodes.
-
#VRML V2.0 utf8
DEF Front Viewpoint {
  position 0, 0, 30
  description "Front"
}
DEF Slant Viewpoint {
  position -10, 0, 30
  orientation 0 1 0 -.5
  description "Slant"
}
DEF World Transform {
  translation 0 0 0
  children  [
    DEF Center Transform {
      translation 0 0 0
      children  [
        Shape  {
          geometry Sphere {}
          appearance Appearance {
            material Material { diffuseColor 1 1 1 }
          }
        }
      ]
    }# end of Center transform--white
    DEF Right Transform {
      translation 10 0 0
      children  [
        Shape  {
          geometry Box {}
          appearance Appearance {
            material Material { diffuseColor 0 1 0 }
          }
        }
      ]
    }# end of Right transform--green
    DEF Left Transform {
      translation -10 0 0
      children  [
        Shape  {
          geometry Box {}
          appearance Appearance {
            material Material { diffuseColor 1 0 0 }
          }
        }
      ]
    }# end of Left transform--red
    DEF Front Transform {
      translation 0 0 10
      children  [
        Shape  {
          geometry Box {}
          appearance Appearance {
            material Material { diffuseColor 1 0 1 }
          }
        }
      ]
    }# end of Front transform--magenta
    DEF Back Transform {
      translation 0 0 -10
      children  [
        Shape  {
          geometry Box {}
          appearance Appearance {
            material Material { diffuseColor 0 1 1 }
          }
        }
      ]
    }# end of Back transform--cyan
    DEF Top Transform {
      translation 0 10 0
      children  [
        Shape  {
          geometry Box {}
          appearance Appearance {
            material Material { diffuseColor 1 1 0 }
          }
        }
      ]
    }# end of Top transform--yellow
    DEF Bottom Transform {
      translation 0 -10 0
      children  [
        Shape  {
          geometry Box {}
          appearance Appearance {
            material Material { diffuseColor 0 0 1 }
          }
        }
      ]
    }# end of Bottom transform--blue
  ]
}# end of World Transform
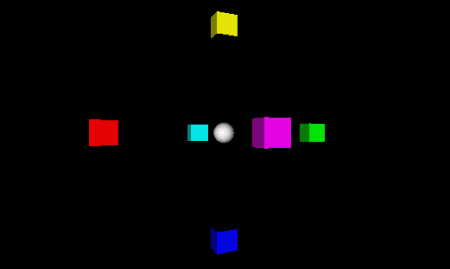
In previous lessons, we saw how naming nodes using the DEF tag allows us to both instance them for multiple use and to reference them in ROUTE statements. Here we name the two Viewpoint nodes for a different reason. When the browser reads the file, the first Viewpoint node it encounters is "bound." That means it's sent to the top of the stack of Viewpoints kept by the browser and used as the viewer's interface. Thus, in our file, the Viewpoint named Front is first presented to the viewer. This is the same face-on view we used in the first example. But now the browser presents a list of Viewpoints on the control panel. If we select the Slant view from this list, we move to the new location. Like so!

CLICK HERE to view example if you have a VRML browser.
Bounce back and forth between the views in your VRML browser. Now this is really fun! Even the simplest scene is exciting when we get the feeling of motion. Creating different Viewpoints introduces your viewer to the space and invites exploration. In some large spaces, many different Viewpoints can be essential. Movement between Viewpoints is halfway toward interactive navigation with the browser controls. Now try navigating using the browser controls, and then reselecting the Viewpoint to return to your starting point. Neat, huh?
Notice in the code how the Slant Viewpoint has both a new location and a new orientation. It's moved 10 meters to the left (in front of the red cube), but has also been rotated so that it is facing toward the center of the world. The code for this is undoubtedly confusing. The rotation value 0 1 0 .5 means that the rotation is around the vertical axis (y) and that the angle of rotation is .5 radians (about 29 degrees). This rotation keeps the viewer facing roughly toward the world origin.
| To Continue to Part 3, or Return to Part 1, Use Arrow Buttons |
|
Created: January 5, 1997
Revised: January 5, 1997
URL: https://webreference.com/3d/lesson31/part2.html


 Find a programming school near you