3D Animation Workshop: Lesson 24: 3D Studio MAX | 2
|
|
Lesson 24 - 3D Studio MAX - Part 2
Using 3D Studio MAX, we create a 10-sided regular polygon (a flat 2-D object) and extrude it out along a straight path to create the following object.
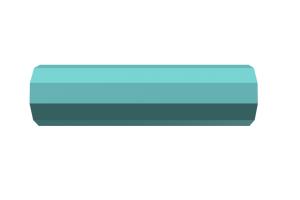
Right from this very simple start we can exploit the special powers of MAX and begin to understand the modifier stack concept.
MAX preserved this logical two-step process for us in a stack. The first step was creating the flat polygon and the second step was extruding it. During the first step, we could choose whatever number of sides we needed. We chose ten. But after we extrude, we might come to the conclusion that we need 16 sides. Without the modifier stack concept, we would have to back up by undoing the extrusion to get back to the original flat polygon, change the number of sides to 12 and then extrude the new 16-sided polygon. (In Lightwave, we would actually have to delete the original polygon and create a new one with 16 sides.) With the stack concept, however, we can jump underneath the extrusion and just change the number of sides of the polygon. The extruded object will then change to 16 sides.

This approach gives us tremendous power to play and experiment without disassembling our models. It is premised on the notion that a model is the outcome of a process, and if each step in that sequential process is preserved, each step can remain separately editable. It takes a while to come fully to grips with this ambitious idea.
The original object, in this case the flat polygon, is said to be "parametric." This is to say that is has yet to be frozen into the definite polygonal mesh that all models must ultimately become in order to render. In this "parametric" state, it yet remains possible to change basic values without damaging the model. In our case, we increased the number of sides of the polygon, and the extruded 3-D version followed perfectly.
Let's take the idea a step further.
We'll add a simple twist to the object, along its extrusion axis, as follows:

At this point our stack looks as follows, reading from the bottom to the top.
TWIST
EXTRUDE
POLYGON (16 sides)
Now, keeping this stack just as it is, we can jump back into the extrusion step and make it shorter than it originally was, and the same twist step will be applied to the shorter object.

This may not seem like such an exciting result because, of course, we could have just scaled down the completed longer objects, but the principle is profound, and must be demonstrated in the simplest terms to be grasped correctly. In the stack concept, the application is "evaluating" the model by taking it through defined modification steps that remain separately editable and reviewable.
Let's take it a step further.
| To Continue to Part 3, or Return to Part 1, Use Arrow Buttons |
|
Created: October 7, 1997
Revised: October 7, 1997
URL: https://webreference.com/3d/lesson24/part2.html
 Find a programming school near you