3D Animation Workshop: Lesson 17: Photorealism 101
|
|
Lesson 17 - Photorealism 101 - Part 1
Photorealism.
I can pretty much identify the moment that I became obsessed with 3-D graphics. Browsing in a bookstore in Berkeley, California five years ago, I pulled a thick volume, quite obviously a university textbook. I don't know how long I spent staring at the image on the cover, but it may have been a quarter of an hour.
The book was "Computer Graphics--Principles and Practice" by Foley and Van Dam, then in its second edition. Those who have studied computer graphics at the college level are certainly familiar with this imposing treatise filled with code and the most intimidating mathematical concepts. But the cover bore an image of an indoor scene mimicking the style of the great Seventeenth Century painter, Jan Vermeer. The resemblance of this computer-generated image to the work of the great Dutch master was uncanny--it seemed to me, at first, impossible. A chair and table in the foreground, a virginal (a small sort of harpsichord) against a back wall, and everything lit, gently and softly, from a large window. Vermeer is justly revered for his unparalleled mastery of a quiet indoor lighting that imparts a richness to even the simplest objects. But this image had been done on a computer! It was not only realistic--it was beautiful.
I bought the book (almost $70) and spent unnumbered hours over a set of interior color plates, a series of renders of a single scene demonstrating a cumulative effort toward photorealism. The earlier images were unconvincing, but with each successive render, new elements were added such that the final versions were extraordinary. I showed them to everyone who would look at them, and my enthusiasm was no doubt irritating to some.
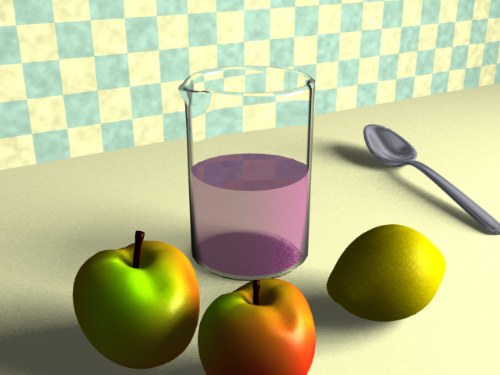
For the next few lessons, we are going to explore photorealism in 3-D graphics in a similar way, although from the perspective of the graphic artist rather than that of a software engineer. A single scene--the one shown above--will serve as our vehicle. This final render was the product of literally hundreds of trials in which lighting, shadows, object surfacing, and ray tracing effects (such as reflection and refraction) were all varied.
Working on a photorealistic scene demands the instincts and discipline of a scientist. The artist must fashion hypotheses and then test them in a careful and rigorous way. Why, for example, does a certain shadow seem unconvincing? Is it the type of light? Its intensity? Its color? Or perhaps it's the surface the shadow is being cast upon. Each possibility must be explored and each new render is, quite simply, a scientific experiment. There are no mistakes. There are only opportunities to learn. If the glass beaker comes up looking more like clear plastic, take some notes. You've just learned how to make clear plastic! And thank God this is so much fun. Because otherwise, the frustration of chasing that fleeting horizon of photorealism will drive you to a therapist.
So let's get started.
| To Continue to Parts 2 and 3, Use Arrow Buttons |
|
Created: August 19, 1997
Revised: August 19, 1997
URL: https://webreference.com/3d/lesson17/
 Find a programming school near you