3D Animation Workshop: Lesson 13: More About Surfacing | 2
|
|
Lesson 13 - More About Surfacing - Part 2
We'll start without any texture at all.
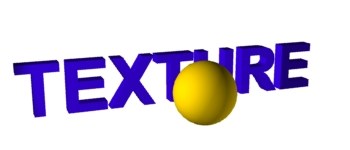
Take a good look at this render to get oriented. The text has been assigned a single diffuse value of royal blue (RGB=47,0,190). There is no luminosity and so the entire color effect is due to the diffuse color interacting with the light. The same is true for the golden ball with a single diffuse color value (RGB=229,189,0). There is no specularity in either the blue or the yellow surface, as is most evident from the ball. Get a sense of the lighting. There are two spot lights in the scene, a more prominent one from above and left, and a less prominent one from the right side and below, filling in the back of the ball and brightening up the text. Both lights are at acute angles to the face of the objects, and this is deliberate. Surface texture is most evident when the direction of light skims across the surface of an object, as opposed to shining head on.
To begin to give these objects texture we can use what we have already defined as a "texture map." In other words, we can vary the diffuse color over the surface.
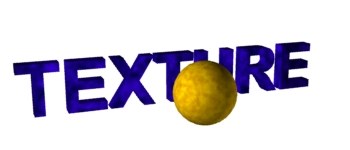
Both surfaces now have texture maps for their diffuse color components instead of single diffuse color values. The maps were created as procedural textures, each combining the original color with a somewhat darker color. The procedural texture used is called "fractal noise" in Lightwave 3D (the application I used here), but every application will have some kind of procedural mapping function that creates random splotches of controllable size and density. This is a true "texture map" because it varies the diffuse color, but its effect on what we commonly consider texture is vague. The variations in color could just as easily be interpreted as a kind of marbled color pattern on a smooth surface, rather than roughness.
Let's try something else. You may remember how, in Lesson 12, we used a luminosity value in conjunction with a diffuse color value to lighten up the shadowed area of a sphere. This little trick allowed us to avoid adding a fill light. But we can also use luminosity to add texture.
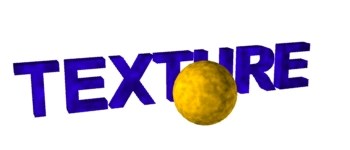
Compare this image carefully with the one before it, because there's a lot to learn here.
In the first image, the original diffuse color of each object was randomly combined in a procedural map with a darker color. The original color remained the true diffuse color of the object and the darker color represented the shadows cast by the relief in the surface. In the new image, the diffuse color has been darkened to constitute the shadow color, and the same kind of procedural map has been used to add a random pattern of luminosity. We have, in effect, lightened the shadow color randomly over the object to create the apparent diffuse color. The result is extremely similar to the first image, but is the precise logical opposite.
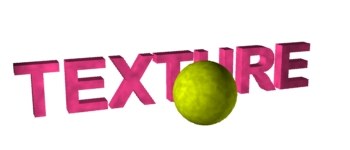
This kind of thinking is typical of all areas of 3-D graphics, in part because the various tools have come together from so many different directions and have been collected into packages, often without regard to overlap and inconsistency. The manufacturers of 3-D packages tend to think of their products in terms of "features" and are often in a hasty rush to cram as many things into an application as possible. In the current infancy of 3-D, this is to be expected, and has some advantages because there is so much to explore. But the new 3-D artist must learn to be creative with tools and to always be alert to new possibilities that were not necessarily anticipated by the developer. This use of luminosity to "negatively" create shadows by is a classic example.To make the point further, here's yet another approach to creating the same effect. Some applications provide a direct control over the degree of diffuse color response. This is effectively the same thing as removing light from the surface of a specific object without reducing the intensity of the light itself. Sounds confusing? This is just one more thing that is possible in 3-D that is impossible in the real world. Just as we have used luminosity to brighten shaded areas without changing the lighting, we can use the diffusion control to darken areas as if they were shaded. If we map this diffusion control (using the same procedural map as before) over a brighter diffuse color, we get the same kind of effect again. I have changed the underlying diffuse colors here for a little variety.
| To Continue to Part 3, or Return to Part 1, Use Arrow Buttons |
|
Created: June 30, 1997
Revised: June 30, 1997
URL: https://webreference.com/3d/lesson13/part2.html
 Find a programming school near you