3D Animation Workshop: Lesson 101: MAX Character Modeling
|
|
Lesson 101 - MAX Character Modeling -Part 3
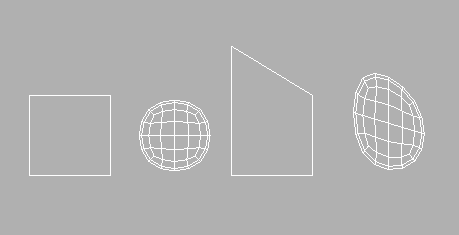
The second major improvement to the MeshSmooth modifier is what really creates the parallels with NURBS and justifies the appellation "subdivision surfaces." In prior versions of MAX, the smoothed state of the mesh was distinct from the base state, and you had to jump back and forth between the two. You had to edit the underlying mesh, and then leap up the Modifier Stack to see the effect. The following image suggests the sequence. Start with a box. Check it out after smoothing. Go back to the underlying box and move some vertices. Check the edited result after smoothing.

The ideal subdivision surface approach, as established in Lightwave MetaNURBS, allows the user to edit the base geometry (the "cage" as it is often called) in wireframe while viewing the smoothed result at the same time. MAX 3 implemented this critical feature as the Display Control Mesh option. You can edit the underlying mesh at the Editable Mesh level, but see the effect of the MeshSmooth modifier as you work.

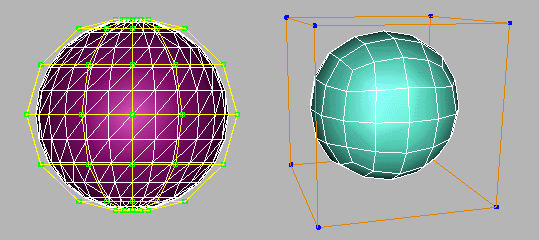
In this way, you feel as though you are working directly on the "subdivision surface" (the smoothed version) rather than just smoothing the underlying mesh. The vertices of the base mesh begin to resemble control vertices of a true NURBS surface. The following image is basic. It compares a true NURBS sphere on the left with the subdivision surface on the right. Until you understand the distinction, you can't even begin to think seriously about organic modeling.

Both objects are smooth spheres, and their tessellated geometry is shown to stress that, in the final analysis, all smooth surfaces (including NURBS) must be approximated by a polygon mesh in order to render. You can ignore the differences in the fineness of these meshes because this is adjustable for both objects, but note that the subdivision surface is all in quadrangles (as opposed to triangles). The main distinction is in the structure of the control meshes. The control vertices of the NURBS surface really describe a sphere. They follow lines of longitude and latitude. But the "control vertices" of the subdivision surface describe a cube.
Thus the basic unit of geometric thought in subdivision surface modeling is a box composed of quadrangular faces. We always start with a box-shaped mesh and develop the model by adding vertices. The process comes down to dividing up the base mesh and extruding out its faces. As you can see, building the branching architecture characteristic of human and animal forms is an easy matter.

We'll turn to building the character next time. I think you'll be interested a new idea I'll be presenting.
| To Return to Parts 1 and 2, Use Arrow Buttons |
|
Created: September 12, 2000
Revised: September 12, 2000
URL: https://webreference.com/3d/lesson101/3.html


 Find a programming school near you