Camtasia Studio Video Tutorials: Part 3
[previous] [next]
Camtasia Studio Video Tutorials: Part 3
Picture In Picture
As mentioned at the beginning of this tutorial, to use PIP you need a recording by Camtasia Studio that includes both a screen video and camera video. Another option is to use two separate videos, which is the approach we're using here.

Above is a screen recording which is on the timeline.
![]()
What we need to do now is import the camera video. To do so, click on the Import Media Files icon above the Task List, select the video clip from the dialog box and click on open.

The video is now in the Clip Bin.

The next step is to place the seek bar on the timeline where we want to add the camera video (the green triangle), right-click on the clip and in the popup menu select "Add to PIP."

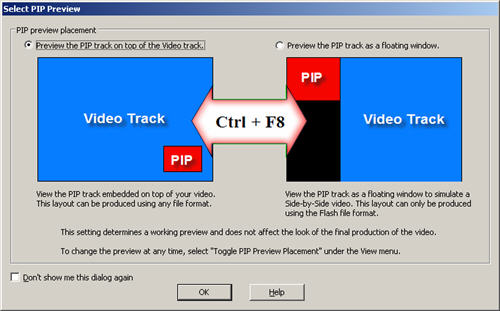
When you first embed a video clip to the PIP track, you'll see the above dialog box. This dialog box gives you two options, to embed the video (in the left pane) or use a side-by-side layout. Either option gives you a preview of how the produced video will appear. Both processes are similar, but the embed video choice gives you additional editing options. You would use the option on the right if your PIP covers important information that you want your viewers to see. Note: If you use the first option, your video layout can be produced with any file format. If you choose the side by side layout, you'll need to produce your video with a Flash format and use a Picture in Picture template. (More on this in the next tutorial, about Producing your Videos.)

In this tutorial, we're using the embedded view option. When you click on OK, the Select PIP Preview dialog box disappears and and the video clip appears in the video preview window at the right of the working area.

Note: You can toggle between different views of the camera video and frame by clicking on View: Toggle PIP Preview Placement (which places the image to the left of the preview box or by pressing CTRL + F8 on your keyboard).

Here's what the other view looks like.

Once the PIP is on the timeline, it can be moved left or right as necessary by clicking on the clip and moving it to a new position.

If you want to adjust the PIP or its properties, right click on the clip and from the popup, choose Modify PIP.

When this happens, you'll notice two things, the left pane of the working area has been replaced with the Modify Picture-In-Picture (PIP) dialog box above, and

the preview of the camera clip has a green box around it, meaning that you can reposition the video and resize it manually.
Briefly, the options in the Modify Picture-In-Picture (PIP) dialog box allow you to control the opacity of your video, include a border around the image (with the color of your choice), fade the PIP video in and out (when the clip begins and ends), add a drop shadow and direction, numerically resize the clip and hide portions of the PIP as it plays back (in case the PIP is covering important information that you want your view to see).
In the next section, we'll take a look as some basic editing options.
[previous] [next]
Created: June 5, 2003
Revised: May 24, 2007
URL: https://webreference.com/video/column3/1


 Find a programming school near you