Stock Photography for Web Developers: Part 8
Stock Photography for Web Developers: Part 8
By Nathan Segal
This week we look at methods of using stock photography for web layouts, more image compression options, how many images to use on a page, image slicing and more.
When looking at creating web layouts, consider the following tips:
1. Plot Layouts on Paper First
When planning the layout of a Web site, build the entire structure on paper first. That way, you can plan every step in detail. The process of planning the site out on paper is similar to the process of storyboarding for movies and animation. On paper, it's much easier to fix problems, rather than encountering a major difficulty when building a Web site and having to fix it that way.
2. Format Considerations
To simplify the design process and appeal to the most users, build your Web pages based on a monitor size of 800 x 600. Although you could use a larger format such as 1024 x 600, users with 800 X 600 monitors will have to scroll to see all portions of your Web pages.
3. Consistency with Templates
Lack of continuity within a site is a common design mistake. To avoid it, consider using templates to build your Web site. This type of continuity will make your site more user-friendly. A couple of vendors I recommend are Goldenpinecone.com and Template Monster.
4. About Bandwidth
Bandwidth is one of the great challenges online. It often prevents Web pages and images from loading quickly. According to some reports, if a Web page takes longer than 20 seconds to load, you will lose your audience. Be aware that many users still work with dial-up modems, so keep your site's image file sizes small.
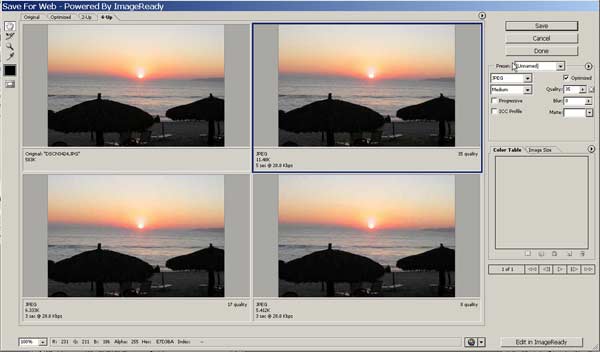
As an additional method of determining image size, use the Save for Web option in Photoshop. To elaborate, consider the sunset shot below, an image size of 365 x 545 pixels and shown in the Save for Web dialog box.

Using the Save for Web option under the file menu, you can choose how many images you want to display. Photoshop will also show you several settings and you'll be able to see the image quality.
In this case, I've chosen to display 4 images that are optimized for the JPEG file format. On the left is the original and then three different quality settings, 35, 17 and 8, respectively. In addition, each image also has loading time information, which is important, not only for fast loading, but also when determining how many images you want to display on a page. Having a lot of images on a page will dramatically affect page loading times. Here's an example of the information you'll find here; the image with a quality setting of 35 will be saved as a JPEG and will be 11.48K when saved. Using a 28.8 Kbps modem, it will load in 5 seconds. This is crucial information.
As mentioned above, each quality setting creates a smaller image, but eventually you encounter a tradeoff between quality and image size. Generally, I recommend a quality setting of 30, but there is a fine line here. If you cross it, you can run into problems with dithering (mixing colors) and banding (characterized by noticeable flaws such as vertical or horizontal lines).
5. Weighted Optimization
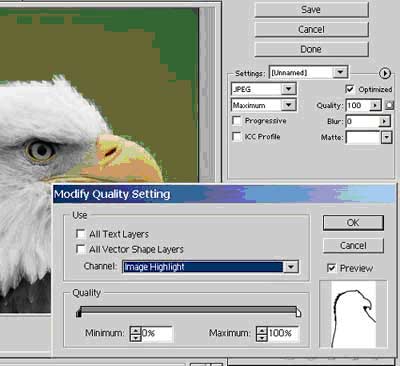
One compression innovation that was released with Photoshop 6 and ImageReady 3 (available in Photoshop 7 and CS1/2) is Weighted Optimization which appears in the Save for Web dialog box. Both Photoshop and ImageReady generate masks when you create a type or shape layer. Another option is to manually create masks which can be stored in alpha channels.

To access Weighted Optimization, you need to click on the Mask button in the Optimize panel. This accesses the Weighted Optimization dialog box. When the mask is activated, the white areas define the greatest amount of image quality, while the black areas define the lowest level of image quality. In this image, Weighted Optimization uses a mask that was generated to mask the eagle's head from the background.
With Weighted Optimization, you can control the optimization settings in an image without sacrificing file size and can produce high quality web page graphics while preserving the quality in important sections of the image. Weighted Optimization can be applied to GIF, PNG-8, and WBMP dithering, lossy GIF settings, and JPEG compression.
6. Thumbnail Advantages
If you must place several images on one Web page, use thumbnails (small versions of images). Thumbnails give users a preview of what is to come, without slowing down the process of loading images. If users want to see one of the full-sized images on-screen, they can simply click the appropriate thumbnail. (It's also useful to indicate how big the larger image is so the user will have some idea of how long it will take to load.)
7. The Value of Comps
"Comps" are low resolution image that you can download from a stock photography web site and use as part of the layout and design process. This will help determine if your design "works," or if you need to choose another approach or image. It's an excellent sales tool.
8. Image Slicing
In Photoshop and ImageReady, slicing allows you divide a single image into multiple smaller files, where each slice is an independent file. These individual files contain their own settings, such as optimization, rollovers, etc. For more information on the subject, have a look at the Photoshop for the Web excerpt, which was posted earlier this week.
In the next article we'll look at photographic techniques to create your own stock images. Some of the topics we'll cover are the rule of thirds, the importance of image placement, designing for type, verticals vs. horizontals, repetition, patterns, opposition and more.
About the Author
Nathan Segal is an Associate Editor for WebReference.com. He is an Artist and Writer who has been writing for computer and photographic magazines for 8+ years. His specialty is taking complex methods and explaining them in clear, easy-to-understand terms. To learn more about his work and background, click here.
Created: March 27, 2003
Revised: January 13, 2006
URL: https://webreference.com/stock8/1


 Find a programming school near you