How to Use Photoshop for the Web
How to Use Photoshop for the Web
Excerpted from Sams Teach Yourself Photoshop CS2 in 24 Hours by Carla Rose. ISBN 0672327554, Copyright © 2005. Used with the permission of Que & Sams Publishing.
What You'll Learn in This Hour:
|
You've surfed the Web with Safari, Firefox, Internet Explorer, or one of the lesser-known programs. You have email and probably even your own home page. But do you know what's really going on out there in cyberspace? First of all, although the Web is what you might call a virtual space, it also exists in a physical space. It is composed of computers called servers that serve files across networks that stretch around the world. The computers can be anything from supercharged SPARC stations to minis and mainframesÂor machines not unlike the one sitting on your desktop. These machines run software that can talk with your computer via what are known as protocols.
Thus, when you type a URL (Uniform Resource Locator) into your browser to access a website, a message, made up of electronic chunks of information called packets, goes out to these remote computers. These machines then send back the files for which you have asked. The files that make up all the sounds, pictures, and text of the Web then have to travel across phone lines or down a cable TV line.
This creates a problem that you have to keep in mind as you create graphics for your website. Phone lines are slow, and only so much information can travel at a time. If you are lucky enough to have a cable modem, DSL, or T1 connection, you have all the speed you need. Dial-up connections, in which you use a regular phone line, are slower. We used to be satisfied with 2400bps modems, but those were the pre-Web days, when we used our modems only for email and perhaps accessing chats on CompuServe or America Online.
The most popular language used to publish documents on the Web is still HTML (Hypertext Markup Language). HTML isn't really a computer programming language, so relax. It is, as its name suggests, a markup language. A series of relatively simple tags enables you to specify how text appears in the browser, images, and links to other sites. HTML isn't difficult to learn, but you really don't need to. (If you decide to get into it, look for Sams Teach Yourself HTML and XHTML in 24 Hours. It's an excellent reference.)
There are programs, including desktop publishing programs, web browsers, and word processors you might already own, that can translate your pages into HTML with just a couple of mouse clicks. All you need to do is lay out the page the way you would like it to look with your Photoshop pictures pasted in. You do have to make sure that they're in a compatible format, though. Because web pages can be viewed on all kinds of computers, the graphics have to be in a format that's common to as many as possible.
Jumping into ImageReady
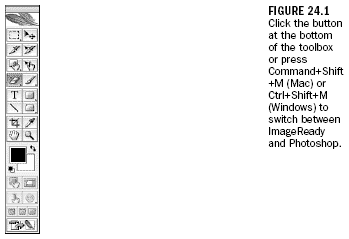
One of the best features of Photoshop CS2 is the program that comes along with it, ImageReady CS2. This is the latest and greatest version of this web graphics program. You can move an image back and forth between Photoshop and ImageReady just by clicking the button at the bottom of the toolbox.
ImageReady is Adobe's web graphics program. ImageReady includes many of the basic color correction, painting, and selection tools that you've already learned in Photoshop, plus a powerful set of web tools for optimizing and previewing images and creating GIF animations and rollovers.
Figure 24.1 shows the ImageReady toolbox. As you can see, many of the icons are familiar. A few of the new ones let you create and view image maps, rollovers, and slices. (You'll learn about these interesting terms later on this hour.) The button with the browser icon opens your browser, displaying the image you're working on, so you can check to see that the actions you're inserting will work as expected.


File Formats and File Size
The first thing you need to learn about preparing web graphics is the type of file format to use. There are two standard choices: GIF (Graphics Interchange Format) and JPEG (Joint Photographic Experts Group). There's also a third format known as PNG (Portable Network Graphics). It's actually been out for several years and promises to be the best choice of all three, but it has never really caught on. Use it if you like it, but be aware that there might still be a few folks out there whose software can't read PNG files.
The most important thing to remember, regardless of the file format you decide to use, is that the Web has limited bandwidth. This means that if you create an absolutely beautiful image and it weighs in at something like 4MB, it will take forever to download on a 56K modem - better than 10 minutes. This is not to say that you can't create images with as large a file size as you want. I am just suggesting that few Web surfers out there will have the patience to sit and wait while your 4MB image downloads. If you know that your primary audience is surfing from home with slower modems, you might want to keep your web page images under 30KB apieceÂa size that a 56K modem can download in a comfortable six seconds. This is an area where ImageReady can be a big help. It lets you decide how small you can save a file without sacrificing quality.

JPEG (Joint Photographic Experts Group)
Depending on your needs, JPEG could be the best file format for you. It is great for photographs and other continuous tone (full-color) images, primarily because it lets you use 16 million colors. JPEG maintains color information but does, however, employ a lossy compression scheme, which means that you can adjust and reduce the file sizeÂat the expense of the image quality.
If you're creating JPEGs for the Web, you need to work in RGB mode within Photoshop. This is reasonable because RGB is the "monitor" viewing mode, and Web images are going to be seen on, guess what: an RGB monitor. ImageReady has only one mode, RGB, which is all it needs. (You can't print from ImageReady.)
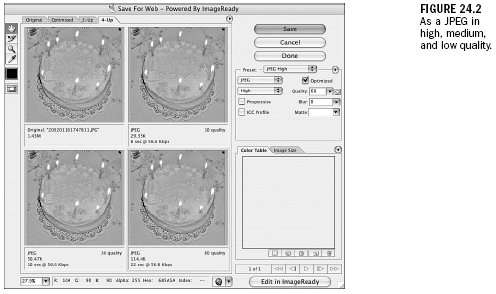
When you're working in Photoshop, choosing File>Save for Web will open the dialog box shown in Figure 24.2. I selected JPEG Low from the Preset pop-up menu in the upper-right corner. I could have chosen GIF or PNG, as well. After a short calculation, and because I had clicked the 4-Up tab at the top of the window, I can see my original image, plus the image with three different JPEG settings. The file size and download time are displayed for each image.
The original Photoshop file for this image was 1.43MB. As a low-quality JPEG, it's 29.35KB and will take about six seconds to download on a phone modem - and much less time to download on a broadband connection. At medium quality, the file size increases to 50.47KB and the download time increases to ten seconds. At high quality, it's a 114.4KB file and loads in about 22 seconds. Is the quality difference worth the download time?
On the other hand, we've gone from 1.43MB down to 114.4KB. That's a tremendous difference with a relatively small loss of quality.


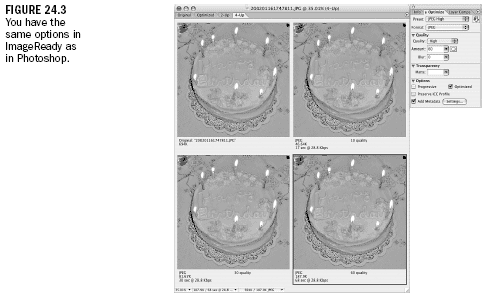
To save your file, click on the version you want to save, then click OK. The usual Save As dialog box will open, enabling you to name your document and save it where you want it, presumably in the same folder with other web page items. Opening your file as a JPEG in ImageReady opens a similar window and the Optimization palette (see Figure 24.3). After you've selected a JPEG quality level and your other settings, click the version of the image you want to save and choose File>Save Optimized.
If you are saving a JPEG file directly from Photoshop with the File>Save As command, the first thing to remember is this: Don't. Save for Web gives you much more power and control. However, if you're in a hurry and determined to just save and go, choosing JPEG in the Save As dialog box gives you a second dialog box, like the one in Figure 24.4.

Created: March 27, 2003
Revised: January 09, 2005
URL: https://webreference.com/graphics/ps_cs2/1


 Find a programming school near you