Building a Weblog | Page 4
[previous]
Building a Weblog
Displaying a Blog Entry
You are now ready to begin crafting some code that actually resembles a blogging application. With your database already loaded with sample content, the first logical step is to display the contents of the most recent blog entry. This involves creating a simple SQL query and then displaying the results of the query (the latest entry) on the page.
Before you create the query, however, you need to add the code to connect to the database. Within this particular application, database access occurs on every page; therefore, adding the database connection code to the main header.php file makes sense. This file is included in every page, so it is a logical home for the connection code.
After the require("config.php") line of header.php, add the following lines (which were explained in Chapter 2):
Building the Query
To build the SQL query, think about the kind of information you want the database to return. For the latest blog entry, you want all the information from the entries table (such as the subject, body, and date the blog was posted), but you also need to get the category to which the entry belongs.
The name of the category isn't stored in the entries table, however; only the cat_id is. With this in mind, you need to ask for all the information from the entries table and also ask for the category name in which the category id matches the cat_id from the entries table.
Here is the SQL you need:
One of the great benefits of SQL is that you can read it fairly easily from left to right. Additionally, if you lay out your SQL on separate lines, you easily see the four main parts of the SQL query:
|
If you read the SQL from the beginning to the end, this is what happens:
Select (SELECT) every field from the entries table (entries.*) and the cat field from the categories table (categories.cat) with the condition (WHERE) that the cat_id field from the entries table (entries.cat_id) is equal to (=) the id field from the categories table (categories.id). Order the results by (ORDER BY) the dateposted field in descending order (DESC) and only show a single result (LIMIT 1).
The aim of the query is to limit the results that come back and return only the last entry that was added to the database. Without the ORDER BY clause, the query would bring back every entry in the order that it was added. By adding the ORDER BY line, the results come back in descending date order (the last date is first). Finally, to return only the latest entry (which is the first result from the query), you use LIMIT 1 to return only a single record.
To run the query in your Web application, you need to first construct the SQL query code inside a variable and then send it off to the database. When you get the data back, you can access the row(s). Between the two require lines, add the following code to the index.php file:
The first added line constructs the SQL query and stores it in a variable called $sql. To actually send the data to the MySQL server, use the mysql_query() function, which puts the result of the query in the $result variable. On the final line, the mysql_fetch_assoc() function pulls the row out of $result and stores it in an array.
Because only one row is coming back, there is no need to use a while() loop to iterate through the rows returned from the query. Recall that more details on iterating through results are found in Chapter 2.
Displaying the Entry
With the query result stored in the $row array, you just need to crack open the array, pull out the data, and display it on your Web page. Refer to each field inside the square brackets in the array (such as $row['subject'] for the subject field).
Add the following code after the mysql_fetch_assoc() line:
This code creates a second-level heading tag and, within it, a link to a page called viewentry.php (which will be created later to view specific blog entries). To show a blog entry, the page needs to be passed the id of the specific blog entry to display. To achieve this, you add a question mark to the end of the filename and then add the variable (such as id=1). This process results in a link such as viewentry.php?id=1.
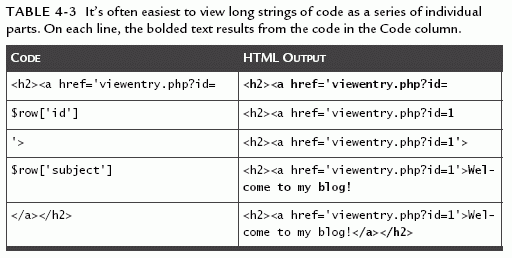
Instead of hard coding the value of the variable, however, use the contents of $row['id'] (from the query) as the value. After you close the first part of the link tag, append the subject from the query and then add the closing link tag. You will see a number of these long, concatenated link tags in your programming, which can be better understood with the aid of a table.
Table 4-3 shows how the HTML is gradually built, step by step. Remember that the . glues these different parts together.

On the second line of code, another link is built in the same way; this link points to a page called viewcat.php. Instead of the entry id being passed as a variable, the category id is passed.
Next, the date is displayed. If you output an unformatted date from the database, the date would look something like this:
2005-08-01 18:02:32
Notice that the preceding result is not in the most useful of formats. Use strtotime() and date() to clean this up for human consumption.
The strtotime() function converts the date into a UNIX timestamp. This timestamp refers to the number of seconds since 12:00 a.m. on January 1, 1970. The time is known as the Epoch, and when you have this number of seconds, you can then feed it into the date() function to format those seconds into something more useful.
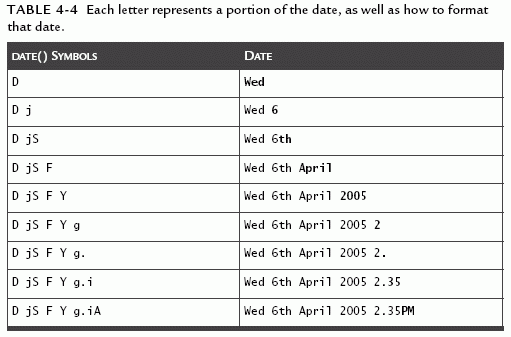
The date() function converts this number of seconds into a readable date, using several special format symbols (D jS F Y g.iA in this example). Each of these symbols formats a particular part of the date and time. You can find out more about these and other symbols in the PHP manual entry for dates.
Table 4-4 gives an example for 2:35 p.m. on April 6, 2005.

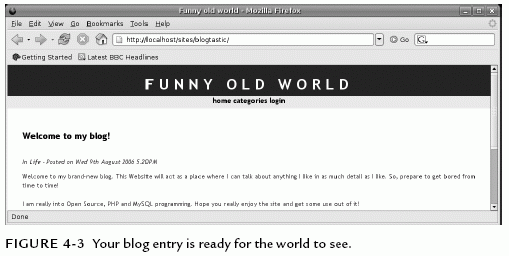
Finally, in the last bit of the code, the body of the blog entry is presented. The first of these three lines opens a paragraph tag, and the second actually outputs the content of the blog posting. You need to pass the contents of the database entry through nl2br(). This useful little function converts any empty lines into legitimate HTML <br /> tags. The final line closes off the paragraph tag. See the final result in Figure 4-3.


This chapter is excerpted from the book titled, Practical PHP and MySQL: Building Eight Dynamic Web Applications, authored by Jono Bacon. Copyright 2007 Pearson Education, Inc., published by Prentice Hall Professional, November, 2006. ISBN 0132239973.
[previous]
URL:


 Find a programming school near you