Introducing WML and WMLScript: WML Crash Course - Part II
Introducing WML and WMLScript
A Crash Course in WML - Part II
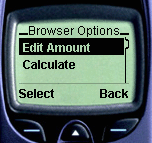
When you navigate with the up and down arrow keys, the cursor moves from one entry field to another. You fill entries or modify them with the Options soft key. Let's assume the cursor is in the Amount: entry field and you click the Options soft key. You get the following display:

The Options card is a derived card. It is not specified directly by the WML code. The header is always Browser Options. Be sure to navigate the different options, as some of them are hidden. In this particular case, you have three options:
- Edit Amount
- Calculate
- Help
The Edit Amount option is derived from the fact that the cursor stood in the <input> field. As shown on the previous page, this field is defined with title="Amount:". The WML compiler uses the value of the title attribute to construct the option name, by appending it to the string Edit, generating the option Edit Amount. As strange as it sounds, the WML compiler drops any colons from the end of the title value. The value of title in the original WML code is Amount:, while what is being displayed is just Amount. So far, we have found it to happen only in <input> tags, as opposed to <select> tags where the colon stays in tact.
The other two options displayed above are Calculate and Help. Browser Options are created via the <do>. Here is the <do> tag for the Calculate option:
<do type="accept" label="Calculate">
  <go href="currency.wmls#convert('conversion','$(from)',
                                       '$(to)',$(amount))"/>
</do>
And here is how the Help option defined:
<do type="help" label="Help">
  <go href="#card1_help"/>
</do>
Next: How to program in WML - Part III
Produced by Yehuda Shiran and Tomer Shiran
Created: May 8, 2000
Revised: May 8, 2000
URL: https://www.webreference.com/js/column61/5.html


 Find a programming school near you