Introducing WML and WMLScript: WML Crash Course - Part I
Introducing WML and WMLScript
A Crash Course in WML - Part I
A WML code includes a header and a body. Here is the header of our currency.wml example:
<?xml version="1.0"?>
<!DOCTYPE wml PUBLIC "-//WAPFORUM//DTD WML 1.1//EN"
    "https://www.wapforum.org/DTD/wml_1.1.xml">
As you can see, the header specifies two links and the WML version as well as that of XML, on which WML is based.
The body of WML code is enclosed within a pair of wml tags (<wml> and </wml>). You'll often read and hear about a WML deck - the metaphor used for WML code is a deck of cards. User agents are capable of displaying and navigating between cards. A card starts with a <card> tag and ends with a </card> tag. In our example, there are two cards: card1 and card1_help. The <card> tag specifies the ID of the card and its title. The title is displayed on the user agent's screen. Here is the first card tag in our example:
<card id="card1" title="Currency" newcontext="true">When you show a card in the user agent's display, it will show all strings and input fields defined in the WML card. Here is the first card:
<card id="card1" title="Currency" newcontext="true">
  <p>
	Amount: <input format="*N" name="amount" title="Amount:"/>
	From: <select name="from" value="USD" title="From:">
		<option value="DEM">German Mark</option>
		<option value="FRF">French Franc</option>
		<option value="FIM">Finnish Markka</option>
		<option value="USD">US Dollar</option>
	</select>
	To: <select name="to" value="FIM" title="To:">
		<option value="DEM">German Mark</option>
		<option value="FRF">French Franc</option>
		<option value="FIM">Finnish Markka</option>
		<option value="USD">US Dollar</option>
	</select>
	<br/> = <u>$(conversion)</u>
	<do type="accept" label="Calculate">
    <go href="currency.wmls#convert('conversion',
     '$(from)','$(to)',$(amount))"/>
	</do>
	<do type="help" label="Help">
		<go href="#card1_help"/>
	</do>
  </p>
</card>
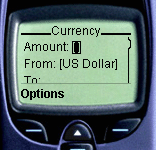
Look carefully and find all strings that are not part of any wml tag. You should identify the following words: Amount:, From:, To:, and =. When you show this deck in the user agent, you'll see these strings:

Use the up and down arrow keys to navigate to hidden parts of the card. Notice the header of the card, Currency. Use the card tag's title attribute to specify this header.
Also visible in the display above are the entry fields. This example demonstrates two types of entry fields: <select> and <input>. The entry fields are enclosed in square brackets. The <input> field is empty. The shown value for each <select> field is determined by the value attribute of the <select> tag. The From field above is defined with value="USD". If you examine the different options for this field, you see that it is associated with the option US Dollar.
Next: How to program in WML - Part II
Produced by Yehuda Shiran and Tomer Shiran
Created: May 8, 2000
Revised: May 8, 2000
URL: https://www.webreference.com/js/column61/4.html


 Find a programming school near you