Web Photos that Pop 5 pg 2: Production Graphics with Wendy Peck at webreference.com
 |
Web Photos that Pop: Boosting Contrast and Brightness | |||||||
|
Image is muddy and dull.
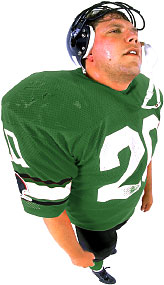
Increasing contrast brings out the color and detail, creating a more exciting image. The final image is shown at the bottom of the page with adjusted midtones, enhanced green color and sharpening applied after the increase in contrast.
|
Let's start the discussion on improving photos by looking at what is wrong with the first image at the left. At first glance, if you are new to photo enhancement, and cannot see the corrected image, it may not look too bad. However, there are several problems with the image that take away the impact and make what should be a dramatic photo fade into oblivion. Compare this image to the enhanced version at the bottom of the page. Notice how the first one seems dull and uninspired compared to the second. The enhanced image pops off the page and really grabs your attention. The transition from the image at the left to the one at the bottom of the page is accomplished in steps. The steps I have learned to follow are contrast, tone, color and finally sharpening. Occasionally an image only needs one or two minor adjustments, and really bad, or specialty photos, like jewelry, require more than this list of enhancements. However, it is a good starting point. The difference between the first and second images at the left is entirely accomplished by increasing contrast and brightness. Take a look at the first image and let your eye absorb the difference in color from the lightest to the darkest color. Then observe the enhanced image and do the same. Note how the numbers on the jersey are gray in the first and white in the second. The color range in the first image is from CCCCCC (light gray) to 333333 (dark gray). The range in the enhanced image is FFFFFF (white) to 000000 (black). The table below shows the dark and light colors side by side, dramatically showing the difference in contrast levels.
When you increase the contrast, the dark colors become darker and the light colors become lighter. Because our eye finds detail by differences in color, increasing contrast brings out the detail in almost every image. I find that I must usually adjust brightness at the same time as I increase the contrast. It is a good idea to move in small increments, checking the original image often, not just the preview. Color will usually improve with a contrast adjustment as well. That is one of the reasons that I most often adjust the contrast before I move to any other enhancing tool. Notice how the green of the jersey is much brighter once the contrast is increased. Also, look at the detail at the back of the helmet. In the original image, you can barely tell that there is purple detail, yet with increased contrast, that detail jumps out. Hint: If you are enhancing a series of images that came from the same scanner or digital camera, with similar photos taken in similar lighting, you will find that the contrast and brightness settings are often similar from one image to the next. Make note of the numbers for the first few photos, and start with those values for subsequent images. If the numbers you are using turn out to be exactly the same every time, you may wish to create an action (Photoshop) to enhance your images with one click. |
|||||||
|
|
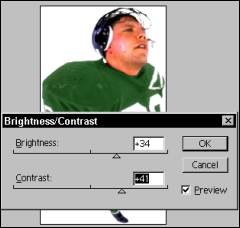
Contrast/Brightness in Photoshop There are times that you wonder if you have improved the image or not. Just uncheck the Preview option, and you will be able to see the original appearance again. Toggle back and forth, adjusting the values until you are satisfied that you have improved the look. Click OK to accept the settings. |
|||||||
|
|
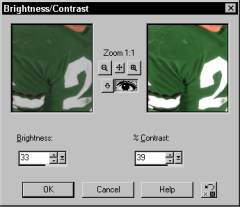
Contrast/Brightness in Paint Shop Pro If you wonder whether you have improved the image, click on the the Preview button, and you will be able to see the original appearance again. Toggle back and forth, adjusting the values until you are satisfied that you have improved the look. Click OK to accept the settings. To reset both values and start over, click on the Reset button at the bottom right of the screen. |
|||||||
|
|
Contrast/Brightness in Fireworks There are times that you wonder if you have improved the image or not. Just uncheck the Preview option, and you will be able to see the original appearance again. Toggle back and forth, adjusting the values until you are satisfied that you have improved the look. Click OK to accept the settings. |
|||||||
|
The final image with color, tone and sharpening adjustments added to the contrast and brightness changes. |
Web Photos that Pop: Tutorial IndexDon't Be Scared by Print Instructions |
|||||||
Created by Wendy Peck,
URL: https://www.webreference.com/graphics/column49/
Created: July 10, 2001
Revised: July 10, 2001


 Find a programming school near you