Look Ma ... No Pixels pg 2: Production Graphics with Wendy Peck at webreference.com
 |
Look Ma ... No Pixels: Creating Simple Paths in Photoshop | |
|
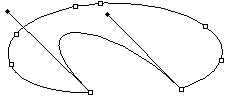
It is a beginner task to create the ellipse selection here, but to add the inner curve is very difficult without calling on paths. The path that created the ellipse with an inner curve is shown below.
|
Paths in Photoshop are at their simplest form, another way to make a selection. We will look at some of the special characteristics of paths a little later, but fix in your mind that we are using a new way to create a selection for this first part. When I was struggling to understand paths, I would invariably try to use paths in the same way as I created vector objects in an illustration program. My Eureka! day was when I said, "You mean these are just selections?" For the most part, that is what a path is - a flexible method to create a selection. So what does a path have that a regular selection does not? In a word nodes. Nodes are the single most important reason to learn to work with paths. If you have ever tried to create a freehand selection with a nice smooth curve, but were not using paths, you are in for a treat. Bezier lines are the best graphic tool for smooth and flexible curves, and only paths can offer them. The two selections shown at the left illustrate the power of paths. The first selection is easy to create. But using regular selections, the lower sample would be almost impossible, unless you have a very steady hand and pure talent with Quick Mask. That is certainly beyond my talent or patience. Yet, by creating a path, adjusting the ellipse by adding control points and using the control handles t"o" shape the inner curve, I was able to create this selection in minutes. The path I used is shown below the selections. |
|
|
Tools in the Path Component Selection tool flyout menu.
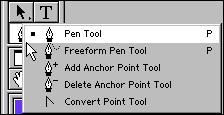
Tools from the Pen tool flyout menu.
|
Tool of the Paths Trade
The Pen tool and its variations are used to create and paths and remove or add nodes, as well as convert the nodes to a different type. The Pen tool and the Freeform Pen tool are the drawing tools. The remainder of the tools in this menu are used to edit nodes once the path is created. |
|
|
Toolbar settings for creating a path in this exercise.
Closing a path. The cursor will have an "o" shape beside the pen when the path can be closed.
|
Creating a Path Note: We will look at creating shapes in the next paths article. This time I am focusing on paths alone, since you need a full understanding of how paths work to make the best use of shapes. Once we have the paths down pat, I will show you how to really have some fun creating custom shapes. Select the Pen tool and make sure the options in the tool bar are as shown at the left. Click on the canvas and release the mouse button. Position the cursor where you would like the end of the first line, and click again. Repeat as often as needed to create your shape and position your cursor over the starting point. An "o" shape will appear beside the cursor, telling you that the shape will be closed on click. Click to complete the path. Congratulations, you have just completed a path. Before we move onto creating more sophisticated paths, let's take a look at a few housekeeping items so you truly understand what we can do with this new skill. |
|
|
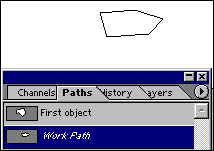
Paths palette listing for a new path.
Original path is named "First object" and a new path created. |
Saving Paths To name the path, activate the Paths palette (default position is with the Layers palette). Double click on the Work Path listing and name the path. Now, click off the listing for the named setting. The listing will not be highlighted, and the path disappears from the screen. Select the Pen tool and repeat the drawing exercise to create a new path. Note how the new path is called Work Path. Highlight the named path and the new path disappears. You could name the new path and continue creating new paths as required. Unlike selections, paths do not add much weight to a document, since the information is stored as math coordinates. There is no reason to restrict the number of paths you create. Just make sure that you name the paths well to make them easier to find later. Now that we have our simple path saved, let's put it to work. |
|
Look Ma ... No Pixels: Tutorial IndexPaths in Raster Programs |
URL: https://www.webreference.com/graphics/column45/
Created: April 2, 2001
Revised: April 2, 2001


 The
two tools for creating and editing paths are highlighted in the sample
to the right and expanded at the left. The first tool at the right contains
the Path Component Selection tool and the Direct Selection tool. These
are both used to edit the path once it is created. The Path Component
tool is used to move the entire path, and the Direct Selection tool
is used to edit individual segments on the path.


 Find a programming school near you