3D Animation Workshop: Lesson 5: Lights, Camera, Render! | 3
|
|
Lesson 5 - Lights, Camera, Render! - Part 3
There are many other aspects of assigning surface properties to objects that we will address in later tutorials. For example, objects can be made transparent or translucent, so that light passes through them. They can be made to glow like a neon sign, so that they appear to give off light from within themselves. They can be made reflective, like a mirror, so that the images of other object in the scene appear to reflect off their surfaces. These effects are so remarkable that one feels like a magician when playing with them. For the present, we will conclude by pointing out that the basic surface color need not be a single choice (as powder blue was in our example). A color bitmap image can be assigned to the surface, and "mapped" across it. This process is typically called "texture mapping" even when it is not used to create the impression of a textured surface.
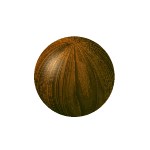
For example, a photograph of a polished wood surface is wrapped around the sphere to create a very convincing impression of a wooden ball. The specular effect contributes to the realism. Below are both the ball and the bitmap that was used to as the texture map.

The texture map need not be a photograph, but can be a painted image drawn in a bitmap editor.
Keeping with our policy never to venture too far from animation, let's consider an animation that relies entirely on surfacing for its appeal. A simple icosohedron, a primitive generated by the program, is assigned powder blue as its basic color. A bitmap of the Hebrew letter aleph (with lots of transparent area) is mapped all around the object, both decorating it and allowing the underlying blue to show through. Then a second small red version of the bitmap as applied only to a small area of the object. Notice that as the object turns, carrying the big texture map with it, the little bitmap is kept separate, as though it floats detached from the surface. This is the kind of striking effect that is unique to 3-D animation.
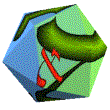
Notice that there are two lights, and that the one coming from the right side is yellow (as in our earlier example). The different color lights in the same scene allow the viewer to perceive the color changes and gradients as coming from the lights. A striking specular reflection occurs in each cycle as a facet glances at just the right angle against the yellow light.
| To Return to Parts 1 and 2, Use Arrow Buttons |
|
Created: March 25, 1997
Revised: March 6, 1998
URL: https://webreference.com/3d/lesson5/part3.html
 Find a programming school near you