3D Animation Workshop: Lesson 48: Picture Perfect webreference.com
|
|
Lesson 48 - Picture Perfect - Part 2
Let's add a nice round serving plate to the table in our scene. The plate geometry is right out of one of the Lightscape libraries, and the wireframe looks like this.

Here's a render with ray tracing. All of the examples in this lesson will use ray tracing because the wood table, the tiled floor and the glazed ceramic dish are all reflective surfaces. The radiosity solution alone will not be satisfactory, but the ray-traced refinement produces some impressive results.

We're using a combination of weak daylight coming in the window and an overhead bulb. It's a nice morning kitchen atmosphere. Everything looks pretty good, except for the plate. Its original geometric structure is evident. Our first guess might be to increase the meshing density of the plate in the radiosity process. We used this method in the previous lessons to sharpen up shadow and lighting gradients on floors and ceiling. Will it work here? We select all of the polygons in the plate and then increase the meshing setting from the default level of 3 up to about 50. Look at this result.


The finer meshing parameters add plenty of extra detail, but only within the flat planes already existing in the original geometry. The object is no smoother or rounder than it originally was. If this dish will play only a minor role in the rendered scene, we can probably get by with the rough geometry. But if, as in the layout we are now using, the object takes center stage, we need a model that comes into Lightscape with a lot more geometric detail to start with.
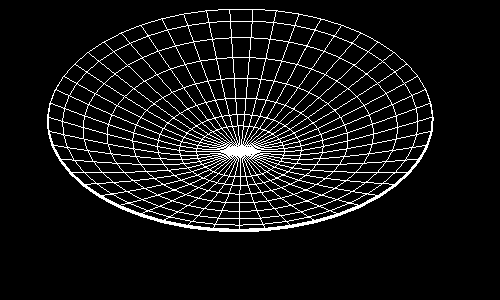
So I went into 3D Studio MAX and created a similar dish of my own, but with a lot more segmentation to keep it looking rounded. I exported it directly from MAX in Lightscape's own .blk (block) format. There are many ways of getting geometry out of modeling programs and into Lightscape, but exporting to Lightscape's native file format allows us to add the new objects to the existing Lightscape libraries. The model looks like this in wireframe.

So how will it look when it renders?
| To Continue to Part 3, or Return to Part 1, Use Arrow Buttons |
|
Created: Sept. 1, 1998
Revised: Sept. 1, 1998
URL: https://webreference.com/3d/lesson48/part2.html


 Find a programming school near you