3D Animation Workshop: Lesson 25: Lightwave Metanurbs | 2
|
|
Lesson 25 - Lightwave Metanurbs - Part 2
Think about that spherical spline cage just described. If the splines are composed of NURBS or other B-splines, the control points float above the surface like a cloud, or in this case, an atmosphere. Pushing and pulling these control points will shape the underlying object. (Notice the unavoidable use of NURBS as both plural and singular. Some people use NURB for the singular, though this is technically incorrect.)
The problem with this powerful form of modeling is that it is very difficult to master, and it is especially difficult to build out the general structure of an object by just pulling control points that float above its surface. This is where Lightwave Metanurbs comes in.
Metanurbs modeling does not use true NURBS at all, because Lightwave doesn't even support Bezier splines. It is rather a method that achieves, with remarkable ease, most of what true NURBS or B-spline modeling can do, using a cage of editable control points to shape a curved surface inside. If simplicity is genius, Metanurbs is a work of genius.
The following are not final renders, but rather screen-shots of the shaded (OpenGL) preview as displayed in Lightwave Modeler.
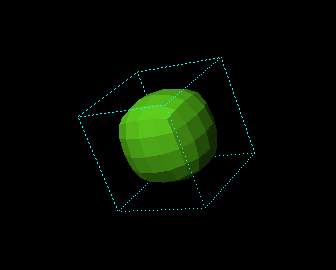
We start with a simple cube.

Then we hit the Tab key to Metanurb the object.

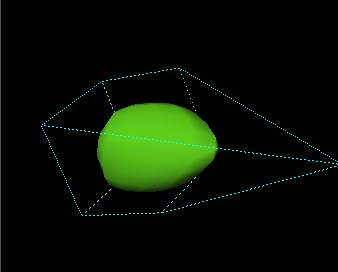
The eight points that first defined the vertices of the cube have suddenly become control points surrounding a curved surface.
Moving these "cage" points will reshape the curved surface inside much as true NURBS control points would have done. For example:
How is this considerable magic achieved? With remarkable simplicity. If we take away the smooth shading, the flat polygonal faces of the Metanurb object are revealed.
This device is worth understanding. Each face of the original cube was subdivided, in this case into 16 rectangles. These rectangles (or "quads" because 4-sided polygons will often not be rectilinear) are angled in a precise way so that they appear rounded when smooth shading is applied. The division into 16 was my choice. It could have been greater or less, according to my needs for smoothness and detail.
Thus, although we appear to be working with curved surfaces, we never leave basic polygonal geometry.
All this is quite impressive, but the real magic starts when we use simple modeling tools to build our cage.
| To Continue to Part 3, or Return to Part 1, Use Arrow Buttons |
|
Created: October 14, 1997
Revised: October 14, 1997
URL: https://webreference.com/3d/lesson25/part2.html
 Find a programming school near you