3D Animation Workshop: Lesson 12: Getting Started With Surfacing | 3
|
|
Lesson 12 - Getting Started With Surfacing - Part 3
Thus far we have been treating diffuse color as a simple value, a constant for the whole surface to be colored. As is usual in computer graphics, it is typically expressed as an RBG value, with our red sphere being set at 255,0,0.
But the diffuse color is very often handled in an entirely different manner. Different points on the surface are assigned different diffuse color values by means of a map. Although such a map controls the diffuse color of the surface, is it traditionally called a TEXTURE MAP. This is because the original use of the technique was primarily for creating the impression of a textured surface without actually changing the geometry of the object. For example, an image made from the photograph of a basketball is mapped around a sphere, giving the impression of the pebbly surface texture. This term is confusing, but we are stuck with it and will continue to use it. The reader should understand clearly from the start that a texture map controls the diffuse color of a surface. In some cases (like the basketball surface) it may suggest a texture to the viewer. In other cases it will not. The situation is even more confusing because there are surface mapping techniques (called bump maps and displacement maps) that directly control the apparent texture of an object. We'll get to these important surfacing techniques later. For the present we are only concerned with mapping the diffuse color of the surface, which, I must repeat, is called texture mapping regardless of whether it affects the apparent texture of the surface.
There are two basic approaches to texture mapping (and, indeed, to surface mapping of all kinds). One approach is to use a specific bitmap image obtained from some source outside the 3-D application. This is commonly called image mapping. The origin of the image is very often a photograph of a natural surface. Here, a simple cube is texture mapped with a photograph of a brick wall.
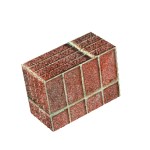
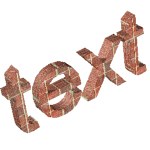
The practical importance of this kind of texture mapping cannot be overemphasized. Many objects with simple geometries become completely convincing when mapped with photographs of realistic surfaces. But such photorealistic surfaces can take on completely new value when used in unexpected ways, as on text.
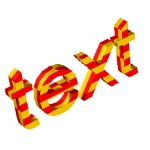
Texture maps can be decorative rather than realistic. A simple repeating geometric pattern can make an outstanding texture map.
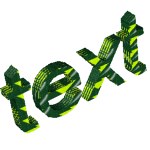
Note how interesting and sophisticated the simple text looks after the application of the map. Here's the same texture map on a sphere.
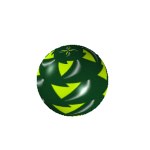
The entire issue of how a flat image can mapped around varying types of geometries is a big one that we will address in future lessons. A simple comparison of the last two images, though, will alert you to both the obvious difficulties and artistic opportunities involved.
The second approach to texture mapping is through the use of procedural textures. Unlike the image mapping we have just been discussing, procedural texturing makes use of the 3-D application's own tools to create texture maps. These are typically either highly random patterns or very regular geometric ones, and they can be developed custom to the image. They are often called 3-D textures because they can generate a pattern through the apparent interior of an object in a logical way, as where a block of wood is cut open and the wood grain is exposed on the "inside."
Here is a two-colored checkered pattern created as a procedural texture. The user sets the colors and the number of rows and columns to be created, and the application creates the texture map.
By contrast with the regularity of the checks, the following procedural texture blends colors to create a cloud-like, random effect. The users sets the colors, the spots sizes, and blending parameters. Even the inexpensive 3-D applications generally have excellent procedural texture tools and many a nice piece of 3-D animation is founded on the animation of the textures themselves. This is possible because the application can recompute the texture with each frame, permitting the blending of one texture into another.

| To Return to Parts 1 and 2, Use Arrow Buttons |
|
Created: June 16, 1997
Revised: June 16, 1997
URL: https://webreference.com/3d/lesson12/part3.html


 Find a programming school near you