3D Animation Workshop: Lesson 1: 3D Space--Through the Looking Glass | 3
|
|
Lesson 1 - Through the Looking Glass - Part 3
We have been treating our little construction as a physical object, but now let's change our perception a bit. Let's treat the object as a reference that defines a 3-D space. The point at the intersection of the three axes is the center of our space. And each axis now defines a direction to use when placing real objects in the scene. We have created a 3-D COORDINATE SPACE.
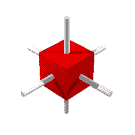
To make it clearer that the structure is now just the reference that defines our space, we'll change it all to white.

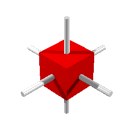
Let's place an object in our space. A red cube is set right at the center, with all its sides square to the white axes.
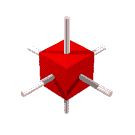
Next we rotate the cube around the vertical axis. Notice that our reference structure stays constant while the cube turns.
Take a deep breath, because this is a big step. What if the space itself rotated, taking the cube with it?
The space rotating? What could that mean? But the idea that we can move the space, meaning the reference by which all the objects in our space are located, is a very important idea to grasp right away in 3-D animation. It doesn't seem to make any difference here, but what if we move the cube away from the center of our space?

Now we clearly see the difference between rotating the cube and rotating the entire 3-D coordinate space in which the cube is placed. Clever, huh?
Notice something new as well. We not only moved the cube, but shrunk it. We manipulate objects in 3-D coordinate space by moving (translating), rotating, and resizing (scaling)them. These three processes together are called TRANSFORMATION.
Finally, we get rid of the white axes, which were only for our use in constructing the little animation, and we see the final result--the red cube in eternal orbit.
There's quite a bit to ponder here, certainly enough for a start. In the next lesson we'll learn to create a simple object.
| To Return to Parts 1 and 2, Use Arrow Buttons |
|
Created: Feb. 24, 1997
Revised: April 22, 1997
URL: https://webreference.com/3d/lesson1/part3.html
 Find a programming school near you