3D in Depth: Materials, Pt. 1.
3D in Depth: Materials, Pt. 1.
In 3D, there are many elements that make your scenes come to life. Some of these involve camera angles, materials, lighting, and composition. This week we’re going to have a look at basic Materials in 3D and how you can use them in a scene. Textures, whether computer created or from a source outside of the computer, allow you to develop realistic imagery.
Essentially, geometry defines the structure of your object and the materials you use will determine what your object will look like when it’s rendered. As an example, in real life, a shiny object will reflect light, while a matte object absorbs light, giving the surface the appearance of being dull. In 3D, none of this actually takes place, but through software, you can simulate conditions to appear as though they are real.
A quick rule of thumb is that if you’re working with Polygons, you want to make sure that you have good UVs. If you’re working in NURBS, you want to make sure that your surface parameterization is uniform. The amount of detail that you will use in a texture depends on several variables, such as how close the model is going to come to the camera. The quality of your finished model will result from a combination of how it was modeled and the quality of the texture(s). Finding the right combination is important.
The detail level determines whether the model will be built quickly or whether it will take a considerable amount of time. To elaborate, the greater the amount of detail, the more complex the model becomes and the longer it takes to build. And this also creates other issues, such as textures, painting on the model and rendering.
A good way to begin is to work with models that have as few points a possible, such as primitives, which are good for creating base shapes. If you need to add points you can do so, but you don’t want to make the shape unnecessarily complicated.

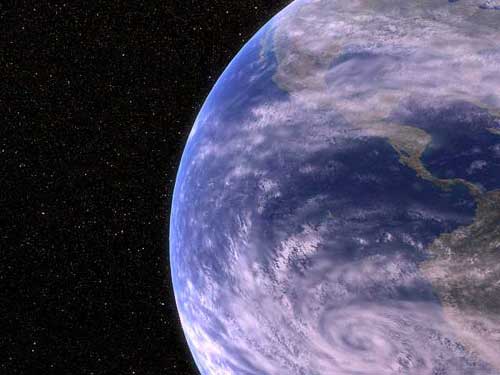
An example of a simple shape is a sphere to which you would apply an Earth texture. How many segments you would use depends on how close the sphere is to the camera. If the edge appears faceted, you would need to add more segments until it appears smooth. Likewise, if the sphere is in the distance, you can reduce segments. This may sound like a small thing, but in complex scenes with many elements, managing your points judiciously can reduce your rendering time.
In 3D, there are many instances where a model will benefit from textures In the screenshot below, what makes this shape appear realistic is the combination of textures; how they are placed on the sphere and the level of transparency between them and whether a bump map is used or not.
And of course, how effective the materials are depend on their composition,
whether manmade, procedural, photographic or painted. In addition, the use of
lighting is critical. When working with computers, it’s very tempting
just to use the textures that come with a software program, or to pick up CD’s
that contain various types of texture libraries. But in some cases, these don’t
work as well as one would like and you may be faced with the prospect of creating
custom textures from scratch. In that event, you can make use of several programs
such as Photoshop, Painter, or Deep Paint 3D, to name a few. Even then, sometimes
you’ll want a more organic type of texture. This is where photography
becomes useful as does the ability to create custom textures by painting them
yourself.
Created: June 5, 2003
Revised: February 9, 2004
URL: https://webreference.com/3d/column9
 Find a programming school near you