3D in Depth: Lighting, Part 2
3D in Depth: Lighting, Part 2.
This month, we're going to look at lighting in more depth. Because of the environment, 3D lighting lends itself to a wide variety of situations that would be difficult, expensive or impossible in real life. On the other hand, in 3D, nothing comes for free. If you want a highly realistic scene, you have to create that; you don't have the advantages of real life. You have to create reflectivity, atmospheric effects, etc.; they're not there for the taking. However, carefully executed, you can create a 3D scene that mimics life or appears to be better than life.
And this brings us to the first topic of todays tutorial, 3 Point lighting. Often, when someone is new to 3D and they see an object that's well lit, they assume that all they need to to is to apply enough light to the object to make it visible from all sides. But that doesn't mean that the object will retain a 3D appearance. Instead, you may have a brightly lit object that's almost totally flat, as in the image below.
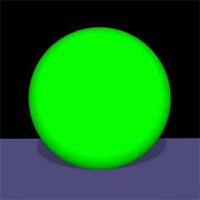
In this example, the sphere has been lit by one directional light. Due to the angle and closeness of the light, the shape is almost entirely obscured.
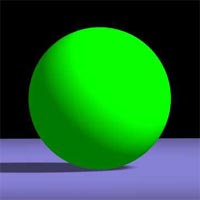
Here is the same sphere, but lit from a different angle and with the light positioned further away. Note the shape and shadowing.
As you can see from the above examples, even the placement of a single light can have a dramatic effect on the appearance of an object.
When lighting an object, one other temptation is to make use of Ambient light (the effect of light being scattered by numerous surfaces as in the real world - an approximation in the world of computer graphics) to raise the overall effect of light in the scene.
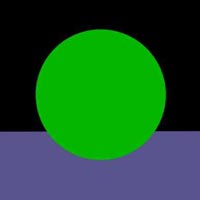
One common mistake is to use too much Ambient light, which can wash out the scene (as in the image above). As I had mentioned in the previous tutorial, Ambient light is most often used for exterior scenes, when the sky creates an even distribution of light. This is not the case with indoor scenes, where multiple lights are in use. In this case, try setting the Ambient light to black. If you choose to use Ambient light, keep it at a low value such as RGB 6 and no more than 12.
3 Point Lighting
To get the most out of your scenes, you need to learn to model with light, which is where the 3 Point lighting system comes into play. With 3 Point lighting, each light plays a different role in your scene. These different lights are referred to as the Key, Fill and Backlight. Before positioning lights in your scene, it's important to set the subject position and camera angle first. Once you have that, you can use 3 point lighting to best effect. And if you change the position of the subject and/or camera position, you'll probably need to change the positioning of your lights as well.
Note: To see the effects of 3 Point Lighting, do test renderings as you move the lights in your scene.
The Key Light is the main source of illumination in the scene and is the brightest. It also tends to create the darkest shadows.
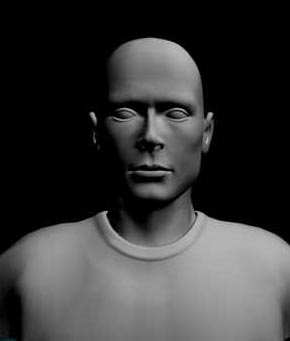
In this example, the Key Light is positioned to the top right and slightly in front of the subject. Note the strong shadows. In actual practice, the Key Light can be placed in a variety of positions in your scene.
Created: June 5, 2003
Revised: July 2, 2004
URL: https://webreference.com/3d/column14/1
 Find a programming school near you