Create Your First Windows Presentation Foundation Application [con't]
Create and Restore the Database
Using the backup file found in the code download, follow these steps to create and restore the database:
- Copy the backup file mwd_FirstWPF.bak to
C:\Program Files\Microsoft SQL Server\MSSQL\Backup. - From the desktop, click Start→Programs→Microsoft SQL Server <ver>.
- Where <ver> corresponds to your version.
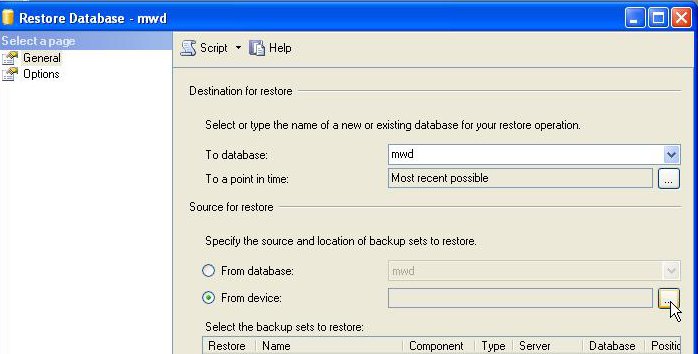
- Choose From device
- Click on the ellipses
- In specify backup, click Add:
- Select the appropriate backup file, mwd.bak.
- Click OK.
- Click OK.
- Click the checkbox Overwrite the existing database.
- Click OK.
When finished, click OK.
Examining the Database
Let's briefly examine the database:
- One table called WPFApp
- Five stores procedures:
spWPFDeletespWPFInsertspWPFListViewspWPFUpdatespWPFViewEntry
- Because the SQL code is executed against the database, it's already indexed on the database and knows the tables it needs, which means performance is enhanced.
- Because we're calling the function in our application, we aren't executing a SQL query from our application, which is faster than embedding SQL.
- If a change is needed to the query, you change it in the saved SQL file rather than in our business layer.
Handling Insert, Update, Delete and Search Functionality
We could easily write this code where it applies in each XAML file, but that wouldn't scale well to future changes or additions to this application. Furthermore, it isn't a good design idea to write specific functionality in each code behind file.
Because WPF takes advantage of object-oriented design principles, let's go ahead and create a class to handle this functionality. This way, if we need to add additional functionality we'll add it to our class file and reference it from our object. Follow these steps to create the class:
- Right click the solution and select Add→New Item.
- In the add new item window, select class.
- In the name text field, type MyClass and then click add.
In our class, we need to add the following namespaces:
As you can see from the code above, we added three:
- System.Configuration for working with our application configuration file
- System.Data for working with stored procedures
- System.Data.SqlClient for working with a SQL Server database. Inside the class, add the following class-level variables as shown from the projects download files.
As you can see from the code archive we created a region named declarations, followed by six variables with their appropriate data types.
Now, let's write the insert functionality for our initial form which you can get from the projects download files.
As you can see from the code archive, we do the following:
- Create a connection object and pass in our configuration key.
- Create a command object and pass in our stored procedure and our connection object.
- Set our command object to accept a stored procedure.
- Create SQL parameters for each variable and pass in the appropriate data types.
- Set the value of each SQL parameter to the appropriate variable.
- Add SQL parameters to our command object parameters.
If for any reason we can't connect to our database or can't execute our query, we wrap that inside a try/catch block and do the following:
- Call the open method of our connection object.
- Call the execute non query method of our command object.
- Catch the exception and capture the error message.
- Call the dispose method of our command object.
- Call the close method of our connection object.
Save your file. From the solution explorer, left click the plus sign (+) next to MainWindow.xaml and double click MainWindow.xaml.cs to open it and insert the code from the project downloads file.
As you can see from the code archive we did the following:
- Create a region and create an instance of our my class object, named mc.
- Inside our constructor method, we add a call to ViewEntries and set our stack panel's visibility to hidden.
- Create a private method ViewEntries and set the data context of our list view to the list object.
- Inside the submit event handler, we set each of our objects to the appropriate control text's properties.
- Then we call the
insertmethod from our object. - If there's an error, we create a new instance of our error window and set the text property to the object's error message variable.
- We clear out the form fields, set the visibility of our form elements, and call
ViewEntires. Before we can compile, let's add that method (ViewEntires) to our class file as shown from the project downloads file.
Notice a couple parts from the code archive in regards to our class:
- We make this a static method so that we can call this method directly from our code behind file.
- We create a generic list object and while we iterate through the loop, we create a new object for each entry and add that to our list object, and then return that list object.
Save your file(s) and preview the functionality.
Reset and Exit Functionality
When clicking the reset button on the main form, if our controls contain any existing data or selections, we want to clear that out by adding the following code found in the code download: btnReset_Click. As you can see from the code archive, we reset our controls to the defaults. Save your file.
When clicking the exit menu item, we'll close our application by adding this code found in the code download: mnuExit_Click. As you can see from the code archive, we call the close method of the particular class, in this case, the main window.
Edit and Delete Functionality from Main Window
From the point of view of our main window, edit and delete functions the same by adding the following found in the code download: mnuEdit_Click and mnuDelete_Click.
As you can see from the code archive, we create an appropriate instance of the window we need to work with, either edit or delete entry. We then show our dialog. Now the specific functionality for each window comes into play.
Edit Functionality from Edit Entry Window
This page will allow us to search for a specific entry ID, and if a record exists, we'll hide the search panel and show the edit fields. As a result, a user can edit the fields and update the information. Add the following code as shown from the code download: editentry.xaml.cs.
As you can see from the code archive, we check to confirm that the search field ID is entered:
- If it is, we pass in the value supplied, call our
ToggleGUImethod (shown next) and fill in the appropriate fields. - If it is not, we show an error message.
- Our
ToggleGUImethod is a simple show/hide functionality.
For the actual update to occur, we add this code inside the submit event handler shown in the project downloads file.
As you can see from the code archive, we set our object's variables to their appropriate XAML controls and then call the update method. Then we close the window.
Delete Functionality from Delete Entry Window
This page will allow us to search for a specific entry ID, and if a record exists we'll hide the search panel and show a checkbox to confirm that the user wants to delete the record. As a result, a user can delete a record from the table. Add the following code as shown from the code download: deleteentry.xaml.cs.
As you can see from the code archive, we verify that the search field ID is entered:
- If it is, we pass in the value supplied, call our
ToggleGUImethod (shown next) and fill in the appropriate fields. - If it is not, we show an error message.
- Our
ToggleGUImethod is a simple show/hide functionality.
As you can see from the code archive, it's a simple show/hide functionality. For the actual delete to occur, we add this code inside the submit event handler shown in the project downloads file.
As you can see from the code archive, we verify whether the checkbox has been selected:
- If it is, we set our object's variable to the ID entered from our search field.
- Call the delete method from our object
- If it is not, we show an error message.
Save your file(s). Compile your application and give it a test run. If you need to compare code, please do so using the code download for the sample files.
Summary
In this article you were introduced to Windows Presentation Foundation (WPF). You learned about its markup, XAML, and how it aims to separate the GUI layer from the business layer. Take the knowledge gained in this article and use it to meet any requirement or need you may have.
If you have questions, please contact me.
Code Download
About the Author
Ryan Butler is the founder of Midwest Web Design. His skill sets include HTML, CSS, Flash, JavaScript, ASP.NET, PHP and database technologies.Original: Oct. 7, 2010
 Find a programming school near you
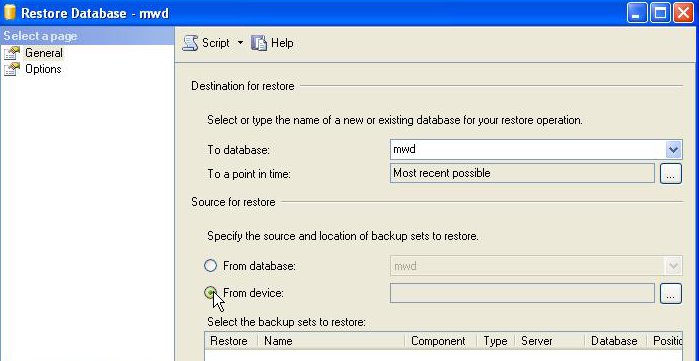