Building a Weblog: Part 4/Page 3
[previous] [next]
Building a Weblog: Part 4
Update a Blog Entry
The final page is for updating blog entries. Earlier, when you added session support to Blogtastic, you went through some of the pages and added links to edit a particular blog entry. The link to edit blog entries was for a page called updateentry.php, which is passed an id variable. This ID indicates which record to update.
Instead of adding the form first, on this page you will work from the top to the bottom.
First, add the boilerplate code:
The next block of code is identical to the validation code written earlier:
Add the code to process the form:
The SQL query implements an UPDATE command that will update each field in the database that has the id of validentry (the validated id variable). The UPDATE query indicates which table to update (UPDATE entries) and then provides a number of database field = form element sections. When the query is complete, another header redirect takes the user to the viewentry.php page with the correct id variable.
If the Submit button has not been clicked, the details of the entry are grabbed from MySQL so you can populate the form fields, starting with a query:
Next, begin creating the form:
The first part of the form is the category field. You will need to have the chosen category automatically selected when the page is loaded. To do this, add selected at the end of the tag to be selected. An example of this in HTML is shown here (this is not actually in the project code, so don't add it):
To accomplish this, add the following code to your form:
The query is run, and then the while loop iterates through each record. Inside the while loop, the <option value=<id from the record> is first printed and then a check is made to see if the category ID of the entry (fillrow['cat_id']) is the same as the current category row ID (catrow['id']). If the values match, " selected" (notice the space before the word) is added. After this, the rest of the line is created: >category</option>.
In the remaining parts of the form, small PHP blocks add the information from the query to the value attributes and between the <textarea> tags to populate the form:
Finally, close else and insert the footer:
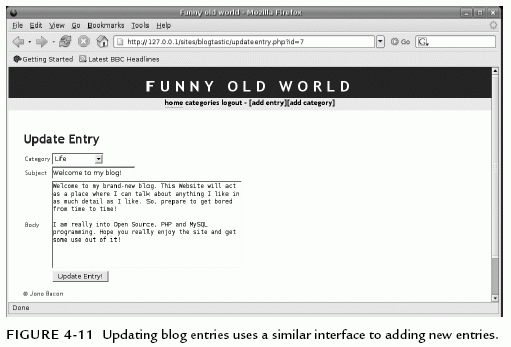
You can see the updated page in Figure 4-11.

Summary
In this project, you created your first full-featured, database-driven Web application. This application flexed your programming muscles, and covered an entire range of essential techniques. This included using database queries, adding data to the database, joining tables, updating records, performing validation, managing archived data, separating code across different pages, and ensuring interface usability.
Aside from providing a fun project to work on, this project also provided a base in which the rest of the projects in the book are based upon. You learned a number of skills that will be refined and built upon as you continue though the book. This is the start of an exciting journey, and reading this means that you have completed a large and important step. Stretch your fingers, dust off your keyboard, grab a cup of something hot, and get ready for the next project.

This chapter is excerpted from the book titled, Practical PHP and MySQL: Building Eight Dynamic Web Applications, authored by Jono Bacon. Copyright 2007 Pearson Education, Inc., published by Prentice Hall Professional, November, 2006. ISBN 0132239973.
[previous] [next]
URL:


 Find a programming school near you