Building a Weblog: Part 2 / Page 5
[previous]
Building a Weblog: Part 2
Build the Comment Form
Allowing a user to add comments involves three distinct actions:
|
This functionality is a little more complex than the previous sections, largely because you need to add some code to various parts of the page, instead of just adding one line at a time to the end of your page.
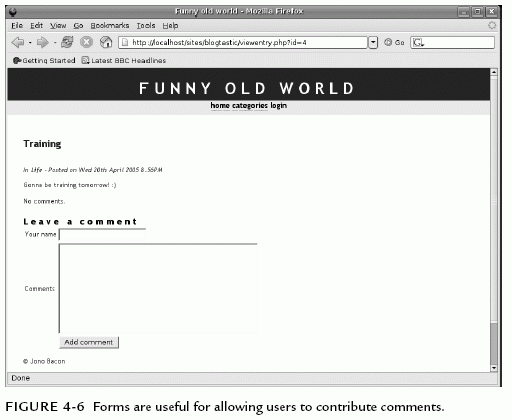
First, add the main form shown in Figure 4-6.

To do this, close off the PHP block at the bottom of the page with ?> and add the following HTML:
This code creates a table that contains a number of form elements. In the <form> tag, action specifies the page that will process the data from this form. As shown here, you can use a special PHP variable called SCRIPT_NAME to reference the name of the current file (in this case, viewentry.php). This reference is useful if you later decide to change the filename of your script; you then don't need to change your code. The method attribute in the tag indicates whether you want to submit your variables as POST or GET variables.
Inside the action attribute, the validentry variable is added as a GET variable. When you process the data from the form, you need to indicate the ID of the blog entry to which you are posting the comment.
The HTML in the preceding form itself is pretty self-explanatory.
GET Variables Versus Hidden Form Fields
Another technique of sharing a variable between the form and the script that processes it is to use the hidden form element:
The value attribute of the form can then be accessed as a normal variable with _GET or _POST in your PHP code.
Processing forms on Web pages works in a rather backwards fashion. At the top of your page—before showing any HTML—you need to check to see if the Submit button has been clicked by checking for the _POST['submit'] variable. If this variable exists, the user has submitted a form. If the variable does not exist, you should assume that the user has not actually seen the form yet and, therefore, need to display it. It sounds crazy, but hang in there—it will all make sense momentarily.
Insert the following code after your validation code, before you include the header.php file:
The first line checks if the submit POST variable exists. For explanation purposes, assume that the Submit button has been clicked and the variable exists. The code then connects to the database. (Remember, you have not included header.php yet, so no database connection is available.)
Don't Blow Up Your Headers
When you use a header redirect, always ensure that no data is displayed on the page before the header is sent—this includes white space. As a simple example of how important this is, add a single space before the <?php instruction and reload the page. You should now get a lot of "headers been sent" errors. Whenever you see these errors, check that there are no erroneous letters or white space either in the page itself or within the files that are included (such as config.php).
The next line is the SQL query. This query inserts the data into the database with an INSERT statement. A typical INSERT statement looks like this:
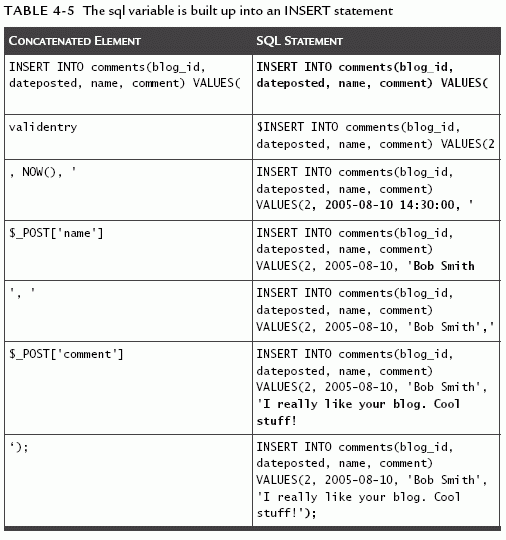
sql variable, you concatenate the various variables from the form that are accessed with _POST. To demonstrate how this fits together, imagine that you are adding a comment to the blog entry with 2 as an ID, at 2:30 p.m. on August 10, 2005. Assume that the user types "Bob Smith" as the name and "I really like your blog. Cool stuff!" as the comment. Table 4-5 demonstrates how the query is built.

The left column lists each part of the code; the right column shows how the content of the page is built up in the query. As you read the table, remember that numbers don't need single quotes around them (such as the number in validentry) but strings (letters and sentences) do.
One part of the code that will be new to you is NOW(). This is a special MySQL function that provides the current date and time, and you will use NOW() to automatically fill the dateposted field.
Built-In MySQL Functions
MySQL provides a range of these functions, and you can explore them from the comfort of phpMyAdmin. When you insert data, a Function drop-down box lists these different MySQL functions. Experiment with them to get a better idea of what they do.
The next line in the code—mysql_query($sql);—performs the actual query. You may have noticed that the line does not include a variable in which to store the result, such as $result = mysql_query($sql). The reason is that the query is only sent; no results are returned. The final line uses the header() function to redirect to the current page.
Finally, the if block is closed, and the else begins (for cases when no Submit button has been clicked). At the bottom of the page, add the closing code:
In effect, then, the entire page of HTML is shown if the user didn't reach viewentry.php via clicking the Submit button (on the form on that same page!).

This chapter is excerpted from the book titled, Practical PHP and MySQL: Building Eight Dynamic Web Applications, authored by Jono Bacon. Copyright 2007 Pearson Education, Inc., published by Prentice Hall Professional, November, 2006. ISBN 0132239973.
[previous]
URL:


 Find a programming school near you