Time for Action: Handling more than One Request Parameter
- Create a new controller
MathsControllerwith the following code: - Create its corresponding view file
add_digits.ctp(/app/views/maths/add_digits.ctp) using the following code: - Now visit the following links and see what shows up in the browser:
https://localhost/applogic/maths/add_digit/1/2/3https://localhost/applogic/books/index/1/2
What Just Happened?
We first created a new controller named MathsController. Inside the controller, we wrote an action called add_digits(). The add_digits() action takes 3 parameters. Each having a default value 0. When this action is requested through URL, it would sum up the digits and pass the result to its view file. We created a very simple view file to display the sum supplied from the controller action. Now, if we visit the URL https://localhost/applogic/maths/add_digits/1/2/3 it should display the sum of the three numbers 1, 2 and 3, like this example.
How Cake Handles an Incoming Request?
Cake automatically routes to the appropriate controller and action. It also loads the appropriate model class and displays the correct view file. If all the conventions are followed correctly, it always does the right thing for us without any extra configuration. We will now skim through the whole process to have a clearer understanding of how Cake handles incoming requests. Let's take the BooksController example and assume a request has arrived in the URL https://localhost/applogic/books/index/123. Now, let's see what Cake will basically do with this request:
- Cake accepts an incoming request from a browser. It determines the target controller's name that should handle this particular request from the first request parameter. In this case, the target controller is the
BooksController. - It instantiates an object of class
BooksControllerfound in the filebooks_controller.phpin the directory/app/controllers/. - It loads the related model class
Booksfrom the filebooks.phpfound in the directory/app/models/. In our case, the target controller is 'configured' to use no model and hence actually it does not load or look for any related model class. - The next request parameter suggests the action to be invoked in the target controller. If no second request parameter is provided, it routes to the default action that is
index(). In this case, there is a second parameter and it suggests the target action isindex(). - Cake invokes that target action of the target controller, that is the
index()action of ourBooksController. If some additional parameters are supplied with the request, Cake passes them as parameters while calling the target action. In our case, one additional request parameter is provided with value 123. So, 123 is passed to theindex()method ofBooksControlleras parameter. - It locates the appropriate view file from the target controller and target action's names that is the file
index.ctpinside the directory/app/views/books/. It passes view variables that were set in the controller action to that file. It then renders that view file and the rendered view is sent to browser as a response.
So, this is how an incoming request is generally handled by Cake. We can, though, override the default behavior by configuring our controllers, models or routes. We will learn about them all through this book. So keep reading...
Getting Post Data from the View
FormHelper. In this section, we will see how to access the submitted form data from a controller action. Let's dive into it...
Time for Action: Getting Post Data from the View
- Create a controller class
UsersControllerusing the following code and save it asusers_controller.phpinside the/app/controllers/directory. - Create a view file named
index.ctpinside the/app/views/users/with the following code: - Now visit the following links and see what shows up in the browser:
https://localhost/applogic/users/
What Just Happened?
Before going through the code, let's first learn about a special controller attribute $data. This attribute is used to store the POST data sent from HTML forms to the controller. When some data is submitted from an HTML form, Cake automatically fills up the attribute $data with the posted data. That's all we need to know. Now, we are ready to step forward and check out what the above piece of code is actually doing.
In the first line of the index() action, we checked if $this->data attribute is empty. If $this->data is not empty, this means some data is submitted from an HTML form. In that case, we will execute the codes inside the if{} block. Let's ignore what's going on inside this block for now and check out what's going to happen if no data is submitted. In that case, we will skip the if{} block and directly render the corresponding view file (/apps/views/users/index.ctp).
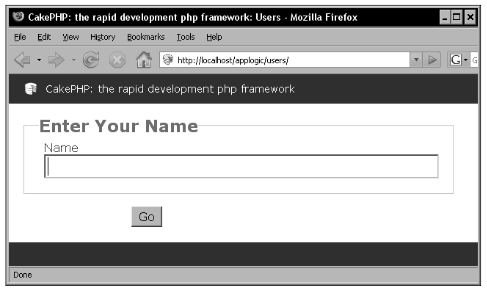
Inside the view, we created a simple form using CakePHP's built-in FormHelper. We will learn more about the FormHelper in Chapter 7. For now, just understand that we can define the model name through the first parameter of the FormHelper's create() method. In our case, we defined it as null, which means the form fields do not belong to any model. And in the second parameter, we specified that the form is to be submitted to the index() action of the current controller.
We then created a text input field using the input() method of the FormHelper. As we want to take user's name using this field, we supplied name as a parameter to this input() method.
This input() method will generate an HTML input element like this:
At the end of this view file, we ended the form with a submit button called Go created using the FormHelper's end() method. Now, if we visit the page https://localhost/applogic/users/ it will display a form like this example.
Now, if a name is entered in the input field and the form is submitted, the controller attribute $data will be filled up with the submitted POST data. The condition if (!empty($this->data)) will return a true. And the codes inside the if{} block will get executed. Inside the block, we directly printed out the value entered in the input field:
Notice how we accessed the value entered in the input field through the $data attribute. The key name of the $data array simply returns the value entered in the field named name.
The next line sets the $autoRender attribute of the controller to false:
It tells the controller that it does not have to render any view. One important thing to be noted: generally, it is not possible to print outputs from a controller action. To do that we have to set the $autoRender attribute to false. It is not recommended to generate output from controller either, but it sometimes helps for quick debugging.
 Find a programming school near you
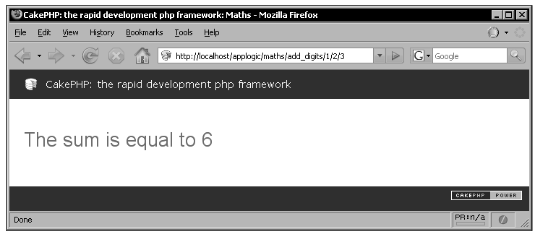