How to Create Interactive Web Programs with Java | 3
How to Create Interactive Web Programs with Java
Java Web Start
One of the issues you must deal with as a Java programmer is how to make your software available to the people who will be using your work.
Applications require a Java interpreter, so one must either be included with the application, or users must install an interpreter themselves. The easiest solution is to require that users download and install the Java Runtime Environment from Sun's web site at https://java.com.
Regardless of how you deal with the requirement for an interpreter, you distribute an application like any other program, making it available on a CD, website, or some other means. A user must run an installation program to set it up, if one is available, or copy the files and folders manually.
Applets are easier to make available, because they can be run by web browsers. There are several drawbacks to offering applets instead of applications, most importantly the default security policy for applets, which makes it impossible for them to read and write data on a user's computer, among other restrictions.
Java supports another way to make applications available to users: Java Web Start, a method of downloading and running applications by clicking links on web pages. Java Web Start, which requires the Java Plug-in, offers a way to install and run applications as if they were applets. Here's how it works:
|
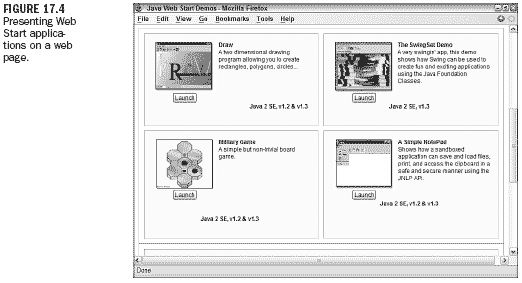
To see it in action, visit Sun's Java Web Start site at https://java.sun.com/products/ javawebstart/demos.html. The Web Start Demos page contains pictures of several Java applications, each with a Launch button you can use to run the application, as shown in Figure 17.4.

Click the Launch button of one of the applications. If you don't have the Java Runtime Environment yet, a dialog box opens asking whether you would like to download and install it.
The runtime environment includes the Java Plug-in, a Java interpreter that adds support for the current version of the language to browsers such as Internet Explorer and Mozilla. The environment can also be used to run applications, whether or not they make use of Java Web Start.
When an application is run using Java Web Start, a title screen will be displayed on your computer briefly and the application's graphical user interface will appear.
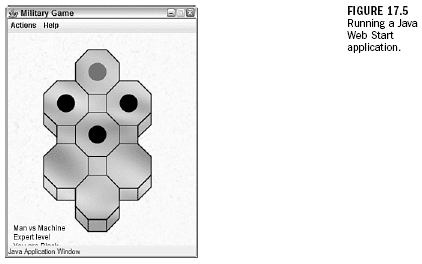
Figure 17.5 shows one of the demo applications offered by Sun, a military strategy game in which three black dots gang up upon a red dot and attempt to keep it from moving into their territory.

As you can see in Figure 17.5, the application looks no different than any of the applications you created during the preceding 16 hours. Unlike applets, which are presented in conjunction with a web page, applications launched with Java Web Start run in their own windows, as if they were run from a command line.

One thing that's different about a Java Web Start application is the security that can be offered to users. When an application attempts to do some things such as reading and writing files, the user can be asked for permission.
For example, another one of the demo programs is a text editor. When you try to save a file with this application for the first time, the Security Advisory dialog box opens (see Figure 17.6).

If the user does not permit something, the application will be unable to function fully. The kinds of things that would trigger a security dialog are the same things that are not allowed by default in applets: reading and writing files, loading network resources, and the like.
Once an application has been run by Java Web Start, it is stored in a cache, enabling you to run it again later without installation. The only exception is when a new version of the application has become available. In this circumstance, the new version will be downloaded and installed in place of the existing one automatically.
Using Java Web Start
Any Java application can be run using Java Web Start, as long as the web server that will offer the application is configured to work with the technology. To prepare an application to use Java Web Start, you must save the application's files in a Java Archive (JAR) file, create a special Java Web Start file for the application, and upload the files to the web server.
The special file that must be created uses Java Network Launching Protocol (JNLP), an XML file format that specifies the application's main class file, its JAR archive, and other things about the program.

The next project you will undertake is to use Java Web Start to launch and run the
LottoMadness application from Hour 15, "Responding to User Input." To get ready,
put a copy of that project's files in your main Java programming folder. The files
you need are LottoEvent.class and LottoMadness.class, though you might also
want LottoEvent.java and LottoMadness.java, in case you decide to make any
changes to the application.
The first thing you must do is package all of an application's class files into a Java Archive (JAR) file along with any other files it needs. If you are using the Software Development Kit, you can create the JAR file with the following command:
jar -cf LottoMadness.jar LottoEvent.class LottoMadness.class
A JAR file called LottoMadness.jar is created that holds both of the class files.
Next you should create an icon graphic for the application, which will be displayed when it is loaded and used as its icon in menus and desktops. The icon can be in either GIF or JPEG format, and should be 64 pixels wide and 64 pixels tall.
For this project, if you don't want to create a new icon, you can download
lottobigicon.gif from the book's website. Go to https://www.java24hours.com and
open the Hour 17 page. Right-click the lottobigicon.gif link and save the file to
the same folder as your LottoMadness.jar file.
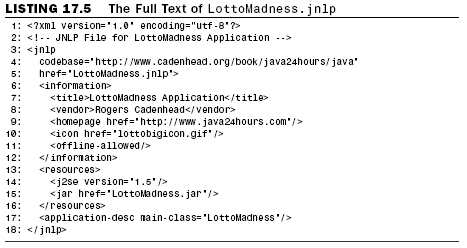
The final thing you must do is to create the JNLP file that describes the application. Listing 17.5 contains a JNLP file used to distribute the LottoMadness application. Open your word processor and enter the text of this listing, then save the file as LottoMadness.jnlp.

The structure of a JNLP file is similar to the HTML markup required to put a Java applet on a web page. Everything within marks is a tag, and tags are placed around the information the tag describes. There's an opening tag before the information and a closing tag after it.
For example, Line 7 of Listing 17.5 contains the following text:
<title>LottoMadness Application</title>
In order from left to right, this line contains the opening tag <title>, the text LottoMadness Application, and the closing tag </title>. The text between the tags—LottoMadness Application— is the title of the application, which will be displayed when it is loaded and used in menus and shortcuts.
Created: March 27, 2003
Revised: February 13, 2006
URL: https://webreference.com/programming/java_24/1


 Find a programming school near you