WebReference.com - Part 4 of chapter 5 from Beginning Java 2 SDK 1.4 Edition, Wrox Press Ltd (2/8)
[previous] [next] |
Beginning Java 2 SDK 1.4 Edition
Compiling a Package
Compiling the classes in a package can be a bit tricky unless you are clear on how you go about it.
We will illustrate what you need to do assuming you are using the JDK under Microsoft Windows. The path
to the package directory has to be explicitly made known to the compiler, even when the current directory
is the one containing the package. If we have stored the Geometry package source files in the
directory with the path C:\Beg Java Stuff\Geometry, then the path to the Geometry
directory is C:\Beg Java Stuff. You can tell the compiler about this path using the
Âclasspath option on the command line. Assuming that the current directory is the
Geometry directory, we could compile the Line.java source file with the command:
C:\JavaStuff\Geometry>javac Âclasspath "C:\Beg Java Stuff" Line.javaThis will result in both the Line.java and Point.java files being compiled,
since Line.java refers to the other class. Since the directory in the path contains spaces,
we have to enclose the path between double quotes.
Accessing a Package
How you access a package, when you are compiling a program that uses the package, depends on where
you have put it. There are a couple of options here. The first, but not the best, is to leave the
.class files for the classes in the package in the directory with the package name.
Let's look at that before we go on to the second possibility.
With the .class files in the original package directory, either the path to your
package must appear in the string set for the CLASSPATH environment variable, or you must
use the -classpath option on the command line when you invoke the compiler or the
interpreter. This overrides the CLASSPATH environment variable if it happens to be set.
Note that it is up to you to make sure the classes in your package are in the right directory. Java
will not prevent you from saving a file in a directory that is quite different from that appearing
in the package statement. Of the two options here, using the Âclasspath option on the
command line is preferable, because it sets the classpaths transiently each time, and can't interfere
with anything you do subsequently. In any event we will look at both possibilities.
If you elect to use the CLASSPATH environment variable, it only needs to contain the
paths to your packages. The standard packages supplied with Java do not need to be considered as the
compiler and the interpreter can always find them. For example, you might set it under Windows 95
or 98 by adding the command,
set CLASSPATH=.;C:\MySource;C:\MyPackagesto your autoexec.bat file. Now the compiler and the interpreter will look for the
directories containing your packages in the current directory, as specified by the period, and the
directories C:\MySource and C:\MyPackages. Of course, you may have as many
paths as you want defined in CLASSPATH. They just need to be separated by semi-colons
under Windows.
Under Unix, the equivalent to this might be:
CLASSPATH=.:/usr/local/mysource:/usr/local/mypackagesIf you are using the Sun Java Development Kit, you also specify where your packages can be found
by using the -classpath option when you execute the Java compiler or the interpreter. This
has the advantage that it only applies for the current compilation or execution so you can easily set
it to suit each run. The command to compile MyProgram.java defining the classpath as in
the environment variable above would be:
javac Âclasspath ".;C:\MySource;C:\MyPackages" MyProgram.javaIf you don't set the classpath in one of these ways, or you set it incorrectly, Java will not be able to find the classes in any new packages you might create.
A new feature introduced with Java 2 provides you with a second way to make your packages available once you have compiled them. This provides a way of adding extensions to the set of standard packages.
Using Extensions
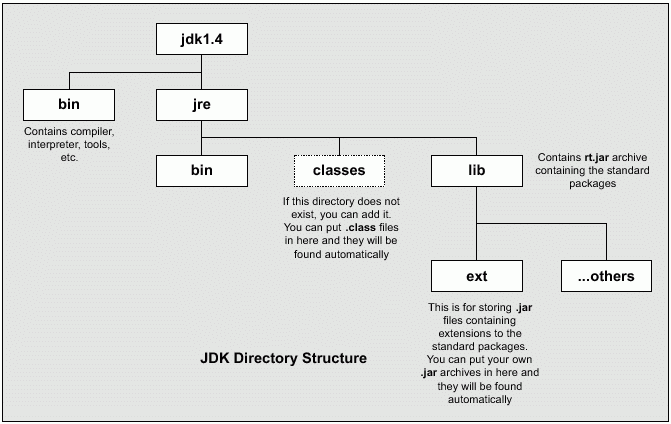
Extensions are .jar files stored within the ext directory that is created
when you install the JDK. For more information on the use of the JAR tool to create
.jar archives, see Appendix A. The default directory structure that is created is shown
below.

The classes and packages in the .jar archives that you place in the ext
directory will automatically be accessible when you compile or run your Java programs, without the need
to set the CLASSPATH environment variable, or to use the Âclasspath command
line option. When you create a .jar file for a package, you need to make sure that you
add the .class files with the directory structure corresponding to the package name--you
can't just add the .class files to the archive. For example, suppose we want to store our
Geometry package in an archive. Assuming we have already compiled the package and the
current directory contains the package directory, the following command can be used to create the archive:
C:\JavaStuff>jar cvf Geometry.jar Geometry\*.classThis will create the archive Geometry.jar, and add all the .class files that
are in the Geometry directory to it. All you now need to do, to make the package available
to any program that needs it is to copy it, to the ext directory in the JDK directory
hierarchy.
The diagram above also shows the classes directory, which may not be created by default. You can put
.class files in this directory and they will be found automatically when a program uses
the classes they contain.
[previous] [next] |
Created: July 29, 2002
Revised: July 29, 2002
URL: https://webreference.com/programming/java/beginning/chap5/4/2.html


 Find a programming school near you