Creating an ASP.NET Registration and Confirmation System [con't]
Creating Your Method
Due to the way your system works, your method doesn't expect any parameters except what the stored procedure needs. Your method simply needs to insert the data, which is done by adding the following code:
- Create a connection object and pass in your configuration key.
- Create a command object and pass in your stored procedure and your connection object
- Set your command object to accept a stored procedure.
- Create SQL parameters to each of your database table columns, specify a parameter name and a database data type
- Set each parameter's value to the appropriate variable.
- Add each SQL parameter to the parameter's collection of your command object.
If for any reason you can't connect to the database or execute your query, you wrap that inside a try/catch block and do the following:
- Call the open method of your connection object.
- Call the execute non query method of your command object, which inserts the record.
- Catch and throw an exception if necesarry.
- If everything succeeds, call the dispose method of the command object, and the close method of your connection object.
Creating Your Registration Object and Writing Your Submit Functionality
Switch back to default.aspx.cs, and create your registration object as shown below:
In the code above, you do the following:
- Set first, last and email variables to the appropriate Web control's text property.
- Create a string variable for attending and dinner, and capture the selection the user made.
- If the visitor has selected yes to attending, then:
- You capture their mailing address, dinner choice, and how many are attending; calculate their total cost; and then set why they are not attending to an empty string.
- If the visitor has selected no to attending, then:
- You set the why they are not attending variable to the text property of the control.
- The rest are set to an empty string.
- Call the insert registration method of your registration object.
- Set your initial form's visbility to false and your success to visible.
The reason you set some variables to an empty string is your stored procedure is expecting values for each one. So, you set it to an empty value where you don't have a value selected from your form.
Create the Stored Procedure for Employee Directory
If you still have the database on your task menu, simply restore it. From the object explorer, follow these steps to create the procedure for recording the registration:
- Expand the plus sign (+) next to your database, mwd.
- Expand the plus sign (+) next to programmability.
- Expand the plus sign (+) next to stored procedures.
- Right click on stored procedures and select new stored procedure.
Modify the generated code with the following as shown:
As you can see from the code above, you create a procedure named spRegistrationInsert, give it parameters that correspond to each column in the database, and then write your insert statement. Before running the stored procedure on the database, from the main menu follow these steps to save the stored procedure:
- From the main menu, choose File : Save As.
- In the Save As dialog, type "spRegistrationInsert" and then click OK.
When completed, run the stored procedure by clicking execute right below the main menu. If ran succesfully, SQL Server will report "Commands executed successfully." Minimize SQL Server Management Studio for the time being.
Restore Visual Studio, and press F5 to run the project. Demo the functionality and press submit to ensure both toggle options work. You will get two records inserted in the database. When finished, press the stop button in Visual Studio.
Writing the Clear Fields Functionality
You could write this functionality server-side but it's a hit you don't need to incur. You can do it client-side with JavaScript. Create your JavaScript file by following these steps:
- From the solution explorer, right click the project and select Add : New Item.
- In the add new item window, select Jscript.
- In the name text field, type "clear" and then click Add.
In the JavaScript file, add the following code as shown below:
As you can see from the code above, you do the following:
- Create a function named "clear_Fields."
- Set the value of your first, last, email, and how many are attending controls to an empty string by grabbing their unique IDs.
You create two variables, which in JavaScript is done by using the keyword var, followed by the name of the variable. You then grab the element name of your radio button and checkbox controls and do the following:
- If the radio button for attending is yes:
- Set the radio button for attending to false.
- Set the mailing address text box to an emtpy string.
- Set the dinner list checkboxes to false if any are checked.
- If the radio button for attending is no:
- Set the radio button for attending to false.
- Set the why not text to an empty string.
Before previewing the functionality, you need to create a reference to the JavaScript file. Open default.aspx and add the following code:
As you can see from the code above, you create a reference to your file by using the script tag and setting the following attribute/value pairs:
- Setting type to text/javascript, which tells the browser this file contains JavaScript code
- Setting src to clear.js, which tells the browser where to find the file
Save your file and give it a test run to make sure clearing out the fields works as intended.
Writing the Email Notification
Even though you have a record of the visitor registrating for the event, you need a way to email them a confirmation. You'll do this from your code-behind file. Open default.aspx.cs and add the following name spaces:
As you can see from the code above, you added two name spaces: the first is for working with mail objects in .NET 2.0 and the second is for using the string builder class (you'll understand why in a little bit).
Expand the region that contains your declarations and add one new one as shown below:
As you can see from the code above, you create a new instance of the string builder class. You'll use this to build the email message for your registrant. Right below your submit event handler, write a method that will build your email message, as shown below:
In the code above, you do the following:
- Create a method named "BuildEmailMsg".
- Use your string builder object sb and its append line method, and pass in:
- A literal string, followed by the appropriate registration object property
- Create two string variables for capturing the attending and dinner choice your visitor selects.
- Create a switch statement for attending:
- If the visitor is attending dinner, append the appropriate information, including a nested switch statement, which determines which dinner choice they selected.
- If the visitor is NOT attending dinner, append the appropriate information.
You are using a string builder object instead of concatenation because performance tests have shown that anytime you need to concatenate five or more lines, string builder is faster and more efficient than manual concatenation.
In your submit event handler in between your call to the registration object and toggling your placeholder's, you need to create a mail message object that will capture your email message and send it to the appropriate recipient as shown below:
As you can see from the code above, you do the following:
- You create an instance of the mail message object, msg.
- You then add the recipient's email address to the object.
- In order for your recipient to know who sent the email, you create an instance of the mail address object from and pass in the email address of the email sender, as well as the display name.
- Set the from property of the msg object to the from object from your mail address class.
- Set the subject and body HTML properties of your msg object to the appropriate values.
- Call your build email msg method.
- Set the body property of your msg object to the contents of your string builder object.
Before we're able to send the email, you need to create an instance of the SMTP class as shown below:
As you can see from the code above, you do the following:
- Create an instance of the SMTP client, named "smtp".
- Set the host to localhost, which serves as your transport mechanism. You could also set this to a mail server, which you would do in a production environment.
- Send the email by using the send method and passing in the msg object.
Before you can use localhost to send the email, you need to configure Internet Information Services (IIS) -- your webserver in this case -- to accept email relays from localhost (better known as 127.0.0.1) or the loopback address of a computer. Follow these steps to do that:
- From the desktop, click Start : Control Panel.
- In Control Panel, double click Administrative Tools.
- In Administrative Tools, double click Internet Information Services.
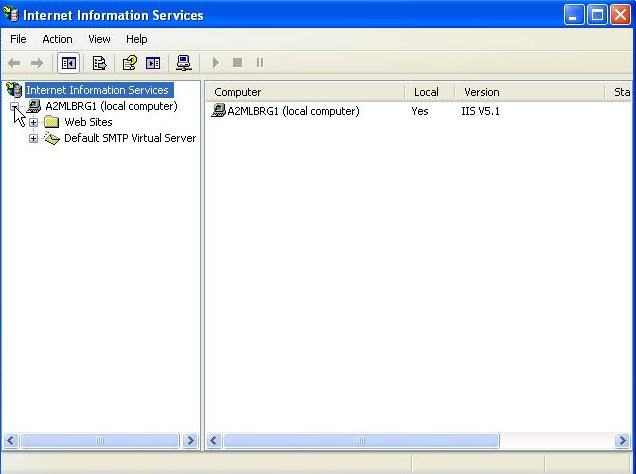
- In Internet Information Services, click to expand the node next to your computer name as shown below:

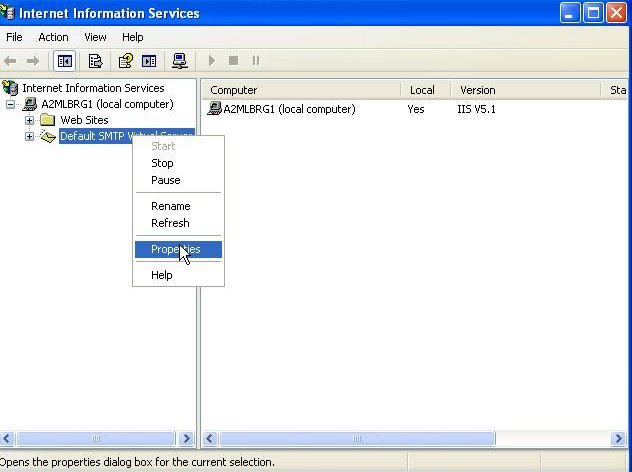
- Right click on Default SMTP Server and select Properties as shown below:

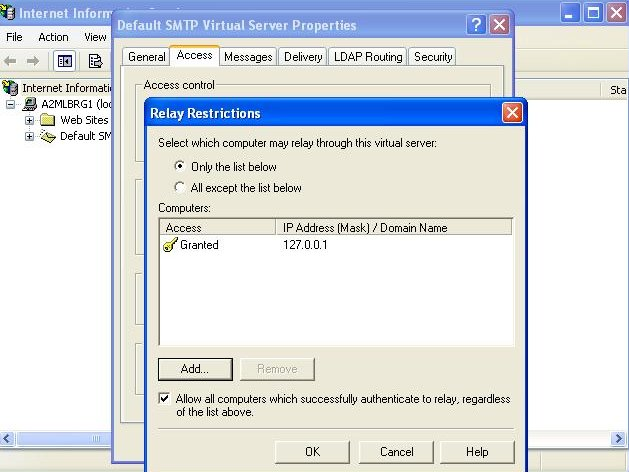
- In the properties window, select the Access tab.
- Click Relay button.
If 127.0.0.1 isn't listed, add it and then make sure your settings are as shown below:

Click OK and OK again to return to IIS, and then close IIS. Return to Visual Studio and make one final adjustment. Right above the page load event, add a region named "methods" and then end that region after your build the email msg method. When completed, run the project and submit another registration. You should receive a new record in the database and an email confirmation.
Summary
In this article you learned how to create a registration event system, as well as a confirmation email message. Take the knowledge you gained in the article and use it to meet any requirement or need you may have. If you have questions, please contact me.
About the Author
Ryan Butler is the founder of Midwest Web Design. His skill sets include HTML, CSS, Flash, JavaScript, ASP.NET, PHP and database technologies.Original: Aug. 12, 2010


 Find a programming school near you