Suppose you work for a small to midsize company that employs 50-100 workers. The Help Desk -- a subsidiary of the Information Services Division -- is in charge of trouble tickets regarding general PC issues such as email, viruses, network issues, etc. Initially, the Help Desk team stored this information in Excel spreadsheets, but as the company has grown, managing these spreadsheets has become tedious and time consuming.
The Help Desk has asked you to devise a more efficient solution that could be developed internally, saving the company money. As you start to think about it, the following requirements are apparent: fields for the submitter's first and last name, as well as their email address. You'll also need combo boxes for indicating ticket severity (low, medium, high), department, status (new, open, resolved), employee working on the issue, as well as an area for comments. Of all the solutions available, creating an internal help desk Web application with ASP.NET is relatively simple.
In the following article, we'll see how to implement these features in an ASP.NET help desk Web application using a database-driven approach, while keeping maintenance and scalability in mind. If you would like to learn how to implement a Web application like this, please follow along. You'll need Visual Studio 2008 or Visual Web Developer, SQL Server 2005 or 2008, and the demo application source code.
Create the Database
- Start>Programs>SQL Server <ver>
- Connect to your local database server.
- When connected, create your database by following these steps:
- Right click on Databases and select New Database as shown below:
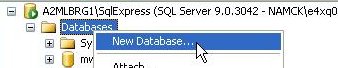
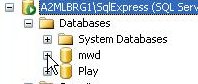
- Name your database mwd and click OK.
- Right click on Databases and select New Database as shown below:
Create the Main Table
To create your tables, follow these steps:
- Click the plus (+) sign next to your database as shown below:
- Right click on Tables, and select New Table as shown below:
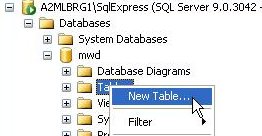
Let's create the main table helpdesk first. We need the following columns as outlined below:
- ID
- Primary key
- Data type: int
- Not null
- FName
- Data type: varchar(50)
- Null
- LName
- Data type: varchar(50)
- Null
- Email
- Data type: varchar(50)
- Null
- SeverityID
- Data type: int
- Null
- StatusID
- Data type: int
- Not Null
- DepartmentID
- Data type: int
- Not null
- EmployeeID
- Data type: int
- Null
- Comments
- Data type: varchar(50)
- null
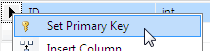
Before continuing, make sure to set the primary key by right clicking the column and choosing Set Primary Key as shown below:
While we're at it, let's set the seed on this column as well by setting the Identity Specification to Yes as shown below:

Create Child Tables
I'll explain why we need four additional tables shortly, but let's proceed to create the severity, status, department and employee table using the same steps as previously outlined. Just change the table column names as outlined below:
Severity
- ID
- Primary key
- Data type: int
- Not null
- Severity
- Data type: varchar(50)
- Null
Status
- ID
- Primary key
- Data type:int
- Not null
- Status
- Data type: varchar(50)
- Null
Department
- ID
- Primary key
- Data type:int
- Not null
- Department
- Data type: varchar(50)
- Null
Employee
- ID
- Primary key
- Data type: int
- Not null
- FName
- Data type: varchar(50)
- Null
- LName
- Data type: varchar(50)
- Null
Make sure you set the primary key and seed on the ID columns for these tables as well.
Relational Databases
When learning about databases, one of the toughest concepts to understand is relationships in data. In relational databases you shouldn't duplicate data, and you especially shouldn't leave your database vulnerable to scalability or maintenance issues. We get around this by relating our data to other tables. This way, we don't duplicate data and our database remains scalable, which usually alleviates the maintenance pain point.
For example, think of a family tree hierarchy. Let's start with the parents:
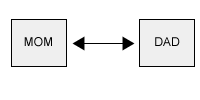
The parents have children:
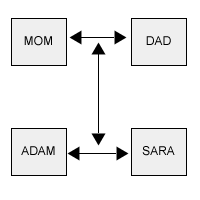
As you can see, the children are related to each other as brother and sister, and they are also related to each parent. So in our example, mom and dad (parents) is our parent table, while the children are our children table(s). As a result, we know these tables are related through DNA. Applying this concept to our help desk example, we can think of the help desk table as being our parent table and our additional tables as our child tables. The only difference is they are related through a primary foreign key.
By creating four additional tables we can store a reference or relationship of these records in our help desk table. By doing this, we gain the following benefits:
- Duplicate data is eliminated because help desk will hold a unique key reference (foreign key) to each status, department, severity and employee that comes from each parent table.
- Scalability is enabled and maintenance is reduced. If an employee or department changes, you change the details in the employee or department tables (children), and the unique reference in help desk (parent) automatically reflects that change.
- You enforce referential integrity of the records, ensuring that a deletion from department or employee doesn't adversely affect any records in help desk.
Figure 1 offers an illustration to help visualize the relationships in the data.
Figure 1. Help Desk Relationships
Create a Database Diagram
In order to enforce referential integrity on our database, let's create a database diagram by following these steps:
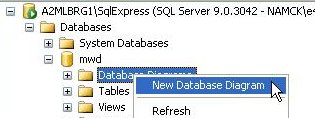
- Right click Database diagrams and select New Database Diagram as shown below:
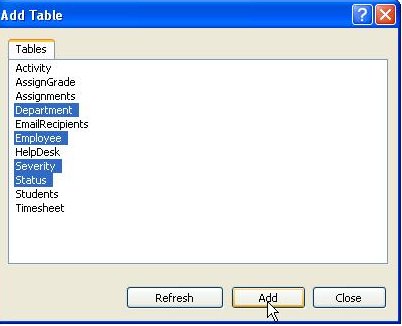
- In the Add table window, select severity, department, employee and status, and click Add as shown below:
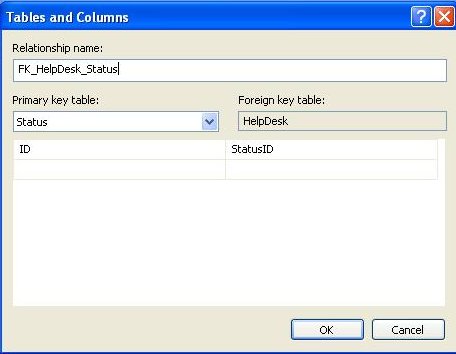
Place the help desk table in the middle with status in the top left, department in the bottom left, severity in the top right, and employee in the bottom right as shown in the previous section.
Next, proceed with these steps:
- Left click the ID column in status and drag it to the status ID column in help desk. In the window that pops up, make sure your settings are as shown in Figure 2 and then click OK.
- Repeat this process for department, severity and employee, choosing appropriate column names.
- In the database diagram window, press Ctrl + S and give your diagram a name, such as help desk.
Populating Severity, Employee, Department and Status Tables
Let's proceed to populate the tables with some data by following these steps:
- Right click on severity, and select Open.
- Enter the following data:
- Low
- Medium
- High
- Right click on employee and select Open.
- Enter the following data:
- Record 1
- FName>Jeff
- LName>Jones
- Record 2
- FName>Monty
- LName>Python
- Record 1
- Right click on department and select Open.
- Enter the following data:
- IT Development
- IT Support
- IT Database
- Right click on status and select Open.
- Enter the following data:
- New
- Open
- Resolved
Minimize SQL Server Management Studio; we're done with it for the time being.
Open Visual Studio and Create the Project
Open Visual Studio from the desktop: Start>Programs>Microsoft Visual Studio. From the main menu, create a new project by following these steps:
- File>New>Project
- In the New Project window, under the Visual C# tree, choose Web and then ASP.NET Web Application.
- In the name text box, name our project HelpDesk.
- Leave Create a directory for solution checked.
- Click OK.
When the project is created, you'll have one .aspx file and a web.config file.
Open web.config
From the Solution Explorer, double click web.config and look for <connectionStrings>. Replace the default markup with the following:
Simply replace the value inside the double quotes for connectionString with your settings. When you are done, save your file.
Open default.aspx
From the Solution Explorer, double click default.aspx and replace everything inside the opening and closing <form runat="server"> tag with this:
As you can see from the code above, we nested two placeholder controls inside our form tag. A placeholder control is identical to any other ASP.NET control in that it's run on the server side. The only difference is whether it will show or hide the content inside. The control is made up of the following:
- ID
- This element gives our placeholder a unique name.
- Runat
- The control will be run by the Web server first and the resulting HTML output then will be sent to the browser.
- Visible
- This element sets the visibility of our control to true, meaning it will show initially.
The second placeholder control simply is a success message. I'll show how this works a little later.
Create the Style Sheet and the Markup
Take these steps to creat a style sheet:
- From the Solution Explorer, right click our project name and choose Add>New Item
- From the Add New Item window, select Style sheet.
- In the name text box, type "style.css" and click OK.
To focus a bit more attention on the code and other new aspects in this article, let's just copy and paste the markup below:
As you can see from the code above, we added div tags with a class name of row for each row of data. Note that the two button controls at the end serve two different purposes. The first button -- for submission help desk tickets -- has a server-side event handler, which is denoted by the onClick attribute. This means the event handler for this button will be placed in the code behind file default.aspx.
The second button is to reset our form fields to their initial values. We could reset them using a server-side event but we don't need that server-side event. As a result, we have used a client-side event handler, which is denoted by the OnClientClick attribute. This means the event handler for this button will be placed in a JavaScript file and be ran only on the client.
Let's add the neccessary CSS as shown below:
In our default.aspx page, add the reference to our style sheet as shown below:
If you haven't saved your file(s) yet, now is a good time to do so.
 Find a programming school near you