Community colleges and universities across the country and around the world are increasingly using their website as way to reach their students. As more students enroll, the demand for more dynamic applications including application for admission, contact forms, and registration for events becomes important. Another aspect for these websites that has become popular is the ability to show a Web-based schedule of classes. Within this schedule, they normally provide complete information about each class, including whether the class is full, or maybe whether it has a lab component.
You as the developer/programmer for the college or university have been tasked with creating a dynamic Web-based schedule that does the following: show all class information in a table, if a specific class has no remaining seats left, highlight the entire row in red, and if a specific class has a lab component, highlight the entire row in gold.
As one can imagine, developing a Web-based application such as this one with ASP.NET and SQL Server is relatively simple. If you would like to learn how to build an application like this, please follow along. You'll need Visual Studio 2008 or Visual Web Developer and SQL Server 2005 or 2008.
Create the Database
From the desktop, follow these steps to open SQL Server:
- Start→Programs→SQL Server→SQL Server Management Studio <ver> (Where
<ver>is your version of SQL Server. - Connect to your local database server.
- Create your database by following these steps:
- Right click on databases and select New database as shown below:
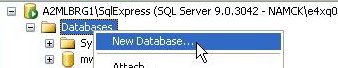
- Give your database a name of mwd and click OK
- Right click on databases and select New database as shown below:
Create the Main Table
To create our tables, follow these steps:
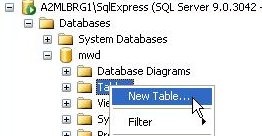
- Click the plus (
+) sign next to your database as shown below: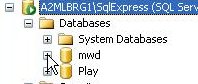
- Right click on Tables and select New Table as shown below:
Let's create the main table classschedule first. We need the following columns as outlined below:
- ID
- Primary key
- Data type: int
- Not null
- SectionNameId
- Foreign key
- Data type: int
- Not null
- SynonymID
- Data type: int
- Null
- CreditHrs
- Data type:int
- Null
- Title
- Data type: varchar(50)
- Null
- TotalSeats
- Data type: int
- Null
- RemainingSeats
- Data type: int
- Null
- MeetInformation
- Data type: varchar(50)
- Null
- RoomNumberID
- Foreign key
- Data type: int
- Not null
- Days
- Data type: varchar(50)
- Null
- StartTime
- Data type: varchar(50)
- Null
- EndTime
- Data type: varchar(50)
- Null
- InstructorID
- Foreign key
- Data type: int
- Not null
- LocationID
- Foreign key
- Data type: int
- Not null
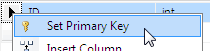
Before continuing, make sure to set the primary key by right clicking the column (ID) and choosing primary key as shown below:
While we're at it, let's set the seed on this column as well by setting Identity Specification to Yes as shown below:

Create Child Tables
We'll explain why we need four additional tables shortly, but let's go ahead and create the section name, room, location and instructors table using the same steps as outlined above, just change column names as outlined below:
SectionName
- ID
- Primary key
- Data type: int
- Not null
- SectionName
- Data type: varchar(50)
- Null
- Synonym
- Data type: varchar(50)
- Null
Room
- ID
- Primary key
- Data type: int
- Not null
- Room
- Data type: varchar(50)
- Null
Location
- ID
- Primary key
- Data type: int
- Not null
- Location
- Data type: varchar(50)
- Null
Instructor
- ID
- Primary key
- Data type: int
- Not null
- InstFName
- Data type: varchar(50)
- Null
- InstLName
- Data type: varchar(50)
- Null
Make sure you set the primary key and seed on the ID columns for these tables as well.
Relational Databases
When learning about databases, one of the toughest concepts to understand is the idea behind relationships in data. In relational databases you don't want to duplicate data, and you especially don't want to leave your database vulnerable to scalability or maintenance issues. We get around this through relating our data to other tables. This way, you don't duplicate data and your database remains scalable and the maintenance pain point is usually reduced.
For example, think of a family hierarchy tree. Let's start with the parents:
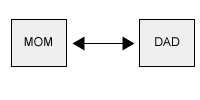
The parents have children:
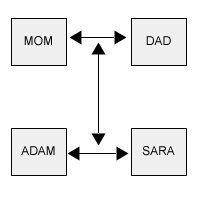
As you can see, the children are related to each other as brother and sister, and they are also related to each parent. So in our example, mom and dad (parents) is our parent table, while the children are our children table(s). As a result, we know these tables are related through DNA. Using our example above, we can think of the help desk table as being our parent table, while our additional tables can be thought of as our child tables. The only difference is they are related through a primary -- foreign key.
By creating four additional tables we can store a reference or relationship of these records in our help desk table. By doing this, we eliminate the following:
- Duplicate data, since class schedule will hold a unique key reference (foreign key) to each section name, room, location and instructor that comes from each parent table.
- Scalable and maintenance has been reduced. If a room or instructor changes, you change the details in the room or instructor tables (children), and the unique reference in class schedule (parent), automatically reflects that change.
- You enforce referential integrity of the records, ensuring that a delete from room or instructor doesn't adversely affect any records in class schedule.
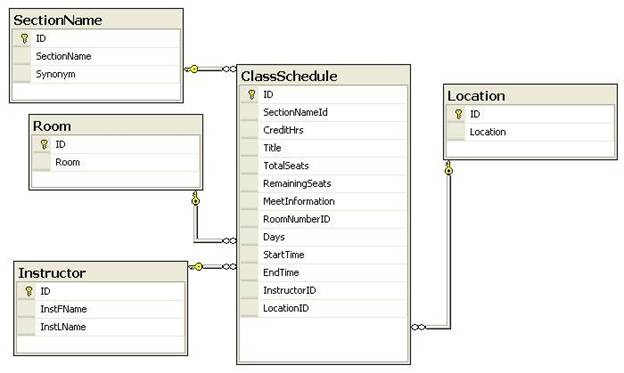
Let's use an illustration to help visualize the relationships in the data:
Create a Database Diagram
In order to help enforce referential integrity on our database, let's create a database diagram by following these steps:
- Right click Database diagrams and select New Database Diagram as shown below:

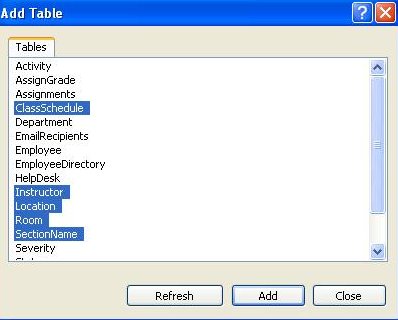
- In the Add table window, select class schedule, instructor, location, room, section name and then click add as shown below:
Place the class schedule table in the middle, with section name, room and instructor on the left, location on the right, as shown before the section Create a database diagram.
From this point, follow these steps:
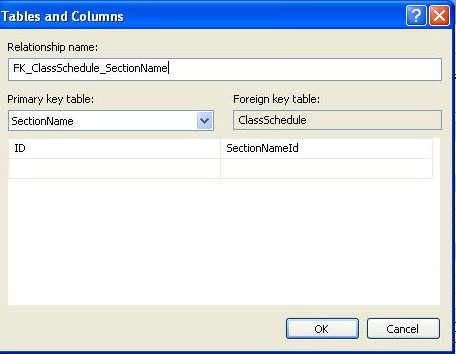
- Left click the ID column in section name and drag to the section name id column in class schedule. In the window that prompts, make sure your settings are as shown below and then click OK:
- Repeat this process for instructor, location, and room choosing appropriate column names where appropriate.
- In the database diagram window, press Ctrl + S and give your diagram a name, such as class schedule.
Populating Tables
Let's go ahead and populate our tables with some data by following these steps:
- Right click on Instructor, and select Open
- Enter the following data:
- Record 1
- InstFName : Ryan
- InstLName : Butler
- Record 2
- InstFName : Kelly
- InstLName : Brand
- Record 3
- InstFName : Tom
- InstLname : Stewart
- Record 1
- Continuing, right click on location and select Open
- Enter the following data:
- Record 1
- Location : SPG
- Record 2
- Location : LEB
- Record 3
- Location : RVC
- Record 1
- Continuing, right click on room and select Open
- Enter the following data:
- Record
- Room : TEC-104
- Record 2
- Room : RVC-230
- Record 3
- Room : SPG-123
- Record
- Continuing, right click on section name and select Open
- Enter the following data:
- Record 1
- Section Name : CIS-101
- Synonym : 062514
- Record 2
- Section Name : CIS-130
- Synonym : 632541
- Record 3
- Section Name : MAR-234
- Synonym : 741254
- Record 1
- Continuing, right click on class schedule and select Open
- Enter the following data:
- Record 1
- SectionNameId : 2
- CreditHrs : 3
- Title : Web Site Development 1
- TotalSeats : 18
- RemainingSeats : 0
- MeetInformation : LEC
- RoomNumberID : 1
- Days : TTH
- StartTime : 5:30PM
- EndDate : 7:20PM
- InstructorID : 1
- LocationID : 1
- Record 2
- SectionNameId : 1
- CreditHrs : 4
- Title : Intro to Computers
- TotalSeats : 18
- RemainingSeats : 5
- MeetInformation : LEC
- RoomNumberID : 2
- Days : MW
- StartTime : 1:00PM
- EndDate : 2:00PM
- InstructorID : 2
- LocationID : 2
- Record 3
- SectionNameId : 1
- CreditHrs : 4
- Title : Networking
- TotalSeats : 18
- RemainingSeats : 10
- MeetInformation : LAB
- RoomNumberID : 1
- Days : TTH
- StartTime : 4:00PM
- EndDate : 8:00PM
- InstructorID : 1
- LocationID : 1
- Record 1
Create Stored Procedure
Stored procedures in databases can be thought of as blocks of SQL code that have been executed against the database. This is great for multiple reasons including:
- Since the SQL code is executed against the database, it's already indexed on the database and knows the tables it needs, which means performance is enhanced.
- Since we're calling the function in our application, we aren't executing a SQL query from our application, which is faster than embedding SQL.
- If a change is needed to the query, you change it in the saved SQL file, rather than in our business layer.
Create the Stored Procedure for Class Schedule
From the object explorer, follow these steps to create the procedure for class schedule:
- Expand the plus sign (+) next to our database, mwd.
- Expand the plus sign (+) next to programmability.
- Expand the plus sign (+) next to stored procedures.
- Right click on stored procedures and select new stored procedure.
Modify the generated code, with the following as shown below:
As you can see from the code above, we do the following: create a procedure named spClassScheduleDisplay. Since our main table relates to four child tables, we need to query from all five tables. There are two ways to do this: (1) an implicit join, sometimes referred to as a Cartesian join, or (2) an explicit join. A Cartesian join isn't recommended because it will join all five tables together, look for the primary-foreign key relationship, and then bring back the entire result set-based on matching criteria, which for huge data results, can be a significant performance hit. An explicit join using the SQL keyword INNER JOIN, is the best option. It will explicitly join the five tables-based on the primary-foreign key reference, filter explicitly on that relationship and only bring back an exact result set.
As a result we've used INNER JOIN in our query. When using INNER JOIN, you simply match parent table -- primary key to child table -- foreign key. Once you have completed this, save your stored procedure by following these steps:
- From the main menu, choose File→Save As.
- In the Save As dialog, type spClassScheduleDisplay and then left click OK.
Minimize the SQL Server Management Studio; we're done with it for the time being.
 Find a programming school near you