Sending an HTML and Plain Text E-newsletter with ASP.NET [con't]
Working with images in emails
You may have noticed in the reference file that we linked directly to our images by using an absolute path. As mentioned earlier in the article, when sending newsletters in html format, you generally want to use images sparingly. For the contents of the email, you don't want to force the receipients to download multiple images, because they might have a slower Internet connection, or more importantly, most email clients, including Outlook by Microsoft, block images by default because they can contain malicious code. In this scenerio, once an image is downloaded that contains malicious code, the code can then be used to take over the computer and use it as a zombie to attack other computers, or do a variety of other tasks that you don't know about. Unfortnately, there's nothing from a code point of view to force receipients to unblock images, you're simply at the mercy of the person viewing the email.
From a code point of view, you have another option in ASP.NET other than the absolute method to send images in email. Instead of using an absolute path, you could embed the image in the email by creating a linked resource variable. In this case, the image becomes part of the actual email stream in memory. This may seem like a better alternative because you're instructing ASP.NET that the email will contain an image as part of the email, rather than relying on a hard coded path. However, this can become problematic when sending the email. In this case, since the image becomes part of the email, it will increase the overall size of the email being sent. While this may not appear to be a big issue, it can become one in certain situations.
For example, if you decide to send this email to 50 plus people, each time the mail server creates the email message, it not only creates enough memory to send the email, but it also includes enough memory to embed the image. In other words, an email message that may be 11 kilobytes (in our case) using the direct linking option, may end up being double that because you're embedding the image in the same memory stream as the email, which can cause time out errors. And to complicate matters, some hosts don't allow embedded images in code because of security limitations in a shared hosting environment. To complicate the issue further, .NET version 1.1 uses the System.Web.Mail name space, which doesn't include an option for embedding an image. This is one of many reasons you want to use the new mail space instead. As a result, this is why it's generally a better option to link directly to an image instead of embedding.
Create the alternative view
As you can see from the code above, we create an htmlView variable from the AlternateView class, and set it to the CreateAlternateViewFromString method that accepts three parameters: (1) the variable that you're creating the view on, (2) the encoding type, which can be null, and (3) the MIME type, which in our case is HTML. Next, we need to add this view to our mail message object as shown below:
As you can see from the code above, we use our mail message object, set its property, AlternateViews, and then call it's add method, and pass in our htmlView variable.
Creating the SMTP object, setting the port, host and sending the mail
At this point, we have everthing we need in preparation of actually sending the email. To send the email, we need to create an smtp object that will let us authenticate to our smtp server, set our port, host, and send our email to our receipients. We do this by adding the following code:
As you can see from the code above, we instaniated a new object of the smtp client class by using its constructor method. Next, we set the port to the standard 25 by using the port property of our smtp object. Continuing, we set the host to our mail server by using the host property of our object. Finally, we send our mail message by using the send method and passing in our mail message object as a parameter. It should be noted at this point to check with your host for specifics on how to send emails from a script, specifically if they require additional steps to authenticate to their SMTP server, since the above is a generic way of looking at it.
Before saving the file and closing it, we need to set our label control to a literal text string of "success" and clear out our text field after the email is sent by adding the following code:
Setting the text property of our label control serves as a visual indicator that our email was sent successfully. Setting the text property of our receipient text box control (our text field) to an empty value, gives a better visual experience to our user allowing them to send the newsletter to another email address.
Sending the email
For the purposes of this article, it's assumed you're sending this email from a remote host. With that, all we need to do is upload the finished file to your remote host, type the full address to request the page, and you should see the following display:
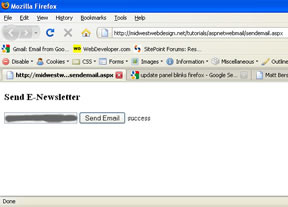
Type the desired receipient in the text field, and after clicking the "Send Email" button, you should see the success message appear after a few seconds:
If everything went right, you should receive an email in a few minutes. If you don't, and you received no errors when executing the script, follow a few simple steps before contacting your host:
- Verify the receipient email address is correct
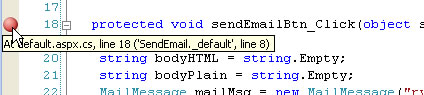
- Set a break point inside the send mail event handler and run the page from Visual Web Developer Express as shown below
The red dot shown in the image above indicates a break point. When clicking the "Send Email" button, if an error occurs in code, control of the page will revert from the browser back to Visual Web Developer Express showing you the error. As a last resort:
- Make sure you're authenticating properly, which may involve asking your host for further details
The results
After sending the email to Outlook, Gmail, and Hotmail, the results were as follows:
- Outlook: looked fine except the header and footer background color does not fill the entire area. In other words, there's some white showing, however, after debugging for awhile, it was decided it was good enough.
- Gmail: looked fine
- Hotmail: looked fine
One thing to note about Gmail and Hotmail is that due to their advertisments, the overall width of the layout may look reduced. There's nothing we can do to solve that issue. Also worth noting, as mentioned before, the images will be blocked initially in all three, unless you change your settings appropriately.
Houston, we have a problem...
At this point, if you refresh your browser, either by clicking the refresh button within the browser or by pressing F5 on your keyboard it would send another email to the receipient. The reason for this is a bit technical but understandable if we take it in steps. First, when we initially clicked the send email button, that caused a post back because the onclick attribute is associated to a server side event, which subsequently sends the email. However, since you're still in the "state" of a post back, refreshing your browser or pressing F5 on your keyboard causes the send mail event to execute again because refreshing the page is considered a "full" post back.
At this point, the only way to prevent the mail from being sent again is to use your mouse and left click in the address bar and press enter on your keyboard to return to an "original state". Obviously, this is an issue. If the person using the script kept hitting the refresh button thinking they would go back to the "original state", they would in fact send the email again to the same person. As a result, we need a way to refresh the page without sending the email again. We have two solutions that work: 1) create a database table with a date time column associated to the receipients email address. Then using Structured Query Language (SQL) we update the date time column with the current date from our C# script, or 2) use Ajax server side controls to control what part of the page we want to refresh without causing a full page post back. Since the first solution will be part two of the series, we'll go with solution two for this article.
Adding the Ajax server side controls
Double click default.aspx to open our web form and add the following code to the existing markup:
As you can see from the code above, we added two Ajax server side controls. Briefly, Ajax stands for Asychronous JavaScript and XML and is a way for developers to instruct a web page when to initiate between a client or server side request. This becomes very efficient when working with complex web applications and limiting when the application needs to make a server side request.
Continuing, from the above code, we can see that we first added a script manager control. In order to use any Ajax server side control in ASP.NET, you must have one script manager tag. This tag acts as a gate keeper for our page and manages all client side scripts (JavaScript) needed to handle asychronous calls from a server. Next, we added an update panel control. This control contains two children tags, content template and triggers. In our case, we added a content template tag, which essentially makes any content inside, such as our existing web form controls Ajax enabled. Save your changes, and we'll explain how this solves our problem.
So, here's how the Ajax server side control solves our problem: think of our entire page as a box, then think of our update panel as another smaller box within our larger box. When a visitor clicks the send email button, it causes the update panel to execute the click event associated to the button, which sends the email. After this, when we refresh our page, the only part of our page which refreshes is our update panel, known as a partial page post back. As a result, there's no full page post back, thus, no duplicate email is sent.
It should be noted, this is why we needed to create our web project with .NET version 3.5. By default, when the project is created, our web.config file is created with the necessary name spaces and assemblies needed to use the Ajax controls. You can make Ajax controls work with .NET version 2.0, but that would have made the article much more difficult to follow at this specific point. Save your file and use default_ajax.aspx as a reference if needed.
Providing a web version of the email
One additional detail you can do for users who have difficulty reading the html version in their email client, is to provide a link at the top of the newsletter that will point readers to a web version of the newsletter for easier viewing. If you want to implement this, view default_webversion.aspx.
Creating a plain text version of the email
You may be asking the question: what if my users will only accept plain text in emails? Fortnately, there's a way to accommodate this in ASP.NET. Let's create a plain text version in steps as follows using default_plaintext.aspx as a reference:
- First, right below our variable that holds our html content, create another variable to hold our plain text content as shown below:
As you can see from the code above, we create another variable, bodyPlain, and set its value to an empty string, which makes the variable read only.
- Second, right after ending our html content, we add our content to our plain text variable as shown below:
</body>
</html>'";
   bodyPlain = @"...plain text version here";
As you can see from the code above, we applied the same at (@) sign to our string as we did for our html content. Recall from earlier, the at (@) sign is treated as a literal (verbatim) string, allowing C# to read our plain text string exactly as we have it. Continuing, we needed a way to indicate navigation. We simply used hypens for this. Additionally, we need a way to separate our headings logically. The easiest way to do this is to use asterisks before and after each heading to denote a change in the flow of content. You can of course, use any logic or flow process you want. Finally, to account for the images, we provide the absolute link, that way, users can easily click the link if they choose to.
- Third, we need to create the plain text view for our email, which is shown below:
AlternateView plainView = AlternateView.CreateAlternateViewFromString(bodyPlain, null, "text/plain");
As you can see from the code above, we create a plainView variable from the AlternateView class, and set it to the CreateAlternateViewFromString method that accepts three parameters: (1) the variable that you're creating the view on, (2) the encoding type, which can be null, and (3) the MIME type, which in our case is plain text.
- Fourth and finally, we need to add this view to our mail message object as shown below:
mailMsg.AlternateViews.Add(plainView);
As you can see from the code above, we use our mail message object, set its property, AlternateViews, and then call it's add method, and pass in our plainView variable.
Testing the plain text version
If you want to see the plain text version of your email, comment out the line that adds the html view to the mail message object as shown below:
//mailMsg.AlternateViews.Add(htmlView);
Save your file and send the mail. You should receive the plain text version only.
Spam
Before finishing the article, it should be mentioned, in most cases, our email shouldn't be treated as spam or be blocked. However, there's no guarantee that wouldn't happen. Depending on the rules set on the firewall or router of the recipients account, our e-newsletter could be blocked or treated as spam. This could be especially true if the receiving email servers only accept emails from trusted senders. If this is the case, the only option you have is to talk with your system administrator to see what options you may have.
Summary
In this article you learned how to take a finished web page and integrate it into an ASP.NET page that's capable of sending an html and plain text newsletter to any specified receipient. Furthermore, you learned the following:
- How to structure the html version for maximized compatability of email clients
- How to create a send mail event and add the following code inside:
- Variables to hold html and plain text versions of the email
- Mail message object used to store who's sending the mail, the receipient, subject and indicating the mail message contains html
- How to include images in our email without creating additional file size
- How to create an SMTP object and set corresponding values
- How to work with Ajax server side controls to prevent sending multiple emails to the same person
In part two of this series, we'll look at how you can adjust the existing ASP.NET page to send the same email to multiple receipients using a database table, which will involve modifying our existing ASP.NET page and using structured query language (SQL). For now, take the knowledge gained in this article and use it to create any email newsletter of your dreams!
If you have questions, please contact me at the address below:
https://midwestwebdesign.net/tutorials/contact.aspx
Download the files for this article.
Ryan Butler is the founder of
Midwest Web Design. His skill sets include HTML, CSS, Flash, JavaScript, ASP.NET, PHP and database technologies.
Original: July 31, 2009
 Find a programming school near you
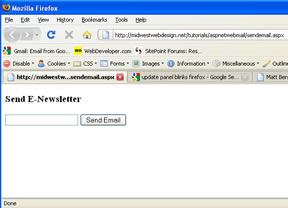