Most companies post their job openings on an internal intranet, as well as on outside job sites such as CareerBuilder or Indeed. However, the need for a company to post their jobs to their internal intranet promptly and efficiently presents a significant challenge. How do you allow non-technical personnel with no HTML skills to post new jobs to the intranet? How do you distinguish between active listings (that is, for jobs with an immediate need) and those that will not be active for another few weeks but need to be entered by the human resources (HR) department?
There are a few options, including migrating the entire company's website into a content management system. This way, non-technical personnel can create new job listings without the hassle of learning new technologies. A more viable option if you have technical developers on staff is to create your own custom solution. This approach offers limitless options and requires only time.
In this article, I'll explain how to build an application such as this with ASP.NET by creating:
- A database from a database backup
- An ASP.NET application with an administrative backend (minus authentication) that will allow non-technical personnel to create jobs and determine whether the jobs are active
- A homepage that will show all current job openings and will be accessible to all visitors.
Create the Database from the Backup
Open SQL Server: Start→Programs→Microsoft SQL Server 2008, and connect to your database server, whether it's local or remote. After connecting to your database, create a table by following these steps:
- Right click on Databases and select New Database.
- In the New Database window, type mwd_HR in the database name text field and then click OK.
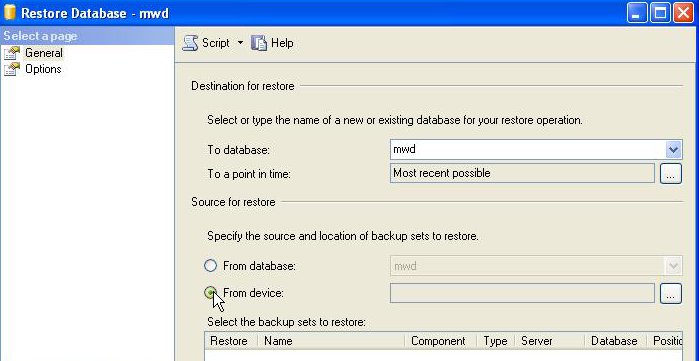
- Right click on your database and select Tasks→Restore→Database.
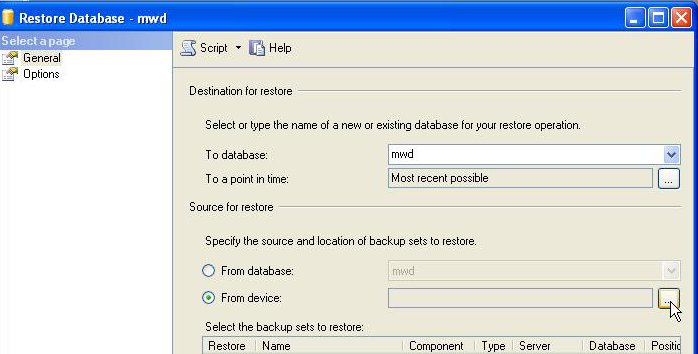
- In the restore database window, select From device as shown below:
- Left click the ellipses as shown below:
- In specify backup back up, left click the Add button.
- Select mwd_HR.bak.
- Click OK.
- Click OK again.
- Left click the check box for the backup you just selected in Step 6.
- From the restore database window, left click Options on the left side.
- Left click the first check box to overwrite the existing database and click OK.
- From the restore database window, left click OK.
Take a few minutes and explore the database table HR. If you open the table, you'll notice the following:
- Ten fields with varying data types and nullable fields
- Two records: one that's active, one that's not
- Four stored procedures:
- spHumanResourcesAddJob: Used for adding a job to your table
- spHumanResourcesViewAllJob: Used for viewing all active jobs from the home page that's accessible to everyone
- spHumanResourcesViewJob: Used for viewing a specific job in detail
- spHumanResourcesViewInactiveJob: Used for viewing all inactive jobs
- Active field: A Boolean field that determines whether you show the job as active
A quick note about stored procedures: In databases, you can think of them as blocks of SQL code that have been executed against the database, in other words, cached. This is great for multiple reasons including:
- Because the SQL code is executed against the database, it's already indexed on the database and knows the tables it needs, which means performance is enhanced.
- Because we're calling the function in your application, you aren't executing a SQL query from your application, which is faster than embedding SQL.
- If you need to change the query, you change it in the saved SQL file rather than in the business layer.
Create the HR Application with Visual Studio
Open Visual Studio (Start→Programs→Microsoft Visual Studio 2008) and from the main menu, follow these steps:
- File→New→Project
- In the New Projects window, left click Web on the left side and left click ASP.NET Web Application on the right side.
- In the name text field, type HumanResources.
- In the location text field, choose a directory and click OK.
Modify the web.config File
From the solution project, you need to modify your configuration file for your database connection. Double click web.config to open the file, and then add the following right after <appSettings/>:
As you can see from the code above, you added a connection string with a key named mwd, followed by your connection details. Modify this with your own settings. When you're finished, save the file.
Create an Admin Folder and Files for It
From the solution, let's create an admin folder:
- Right click on the solution and select Add→New Folder.
- Type admin and press enter.
From the admin folder, create two additional files by following these steps:
- Right click on the folder, and select Add→New Item.
- In Add New Item window, select Web Form from the right side.
- In the name text field, type addjob.aspx and click OK.
Repeat this process, but when you reach the last step, type default.aspx in the name text field. You will now have two web forms, addjob.aspx and default.aspx.
Modify the addjobs.aspx File
From your solution explorer, double click addjob.aspx and replace the default markup with the markup of the addjob.aspx file from the project downloads file (find it in the admin folder). As you can see from the code archive, you create two placeholder controls:
- Our first one contains a link to a stylesheet and JavaScript file (created next). It also holds the job posting detail fields. It has two buttons: one uses a server-side event that will call a class method for adding a job to your system. The other button has a client-side event, which will call a JavaScript method that will clear your form fields of any data they contain.
- Our second placeholder is a success message that will be toggled to show after a successful job has been added.
Add Stylesheet and JavaScript Files
Let's add a stylesheet and JavaScript to your solution by following these steps:
- From the solution, right click and select Add→New Item.
- In the New Item window, select stylesheet from the right side.
- In the name text field, type style.css and click OK.
Repeat the same steps for creating a JavaScript file, except choose Jscript and in the name field type clear.js.
Double click your style.css from the solution explorer and add the code from the style.css file in the project downloads. As you can see from the code archive, you added the following: a container for your form, font sizes for your field sets, labels, and paragraph tags. Save your stylesheet before moving forward. Next, double click your clear.js file and add the following code (clearFields) from the project downloads file.
As you can see from the code archive, you create a function named clearFields, with the following code:
- Document.getElementById: Used to grab each control by its ID
- Value: Used to set the value of each control to an empty string
Save your JavaScript file before moving forward.
Create a Human Resources Class
For us to be able to add a new job listing to your system, you need to write an insert functionality either within addjob.aspx or its code-behind file. Generally, the more you can abstract functionality out of designer files into classes that turn into objects, the less your code is coupled and the easier it will be to modify for enhancements. As a result, you'll code this functionality in a class.
Follow these steps to create your class:
- From the solution explorer, right click the solution and choose Add→Class.
- In class window name field, type HumanResources.cs and click OK.
Double click HumanResources.cs from the solution explorer and add the following namespaces:
As you can see, you added three. The first allows us to work with stored procedures in ADO.NET; the second allows us to reference a connection key from your configuration file; and the last allows us to connect to SQL Server. Next, let's add your declarations, which you can get from the project downloads file.
As you can see from the code archive, you create a region named declarations, and inside you create public variables (with appropriate data types for each column from your database table) with getters and setters. Next, let's add your add job method from the project downloads file, which will insert new jobs in your system.
As you can see from the code archive, you created a method named AddJob and did the following:
- Created a connection object and passed in your configuration key
- Created a command object and passed in your stored procedure and connection object
- Created a SQL parameter for each column from your database table and its data type
- Set the parameter's value to its appropriate variable value
- Added the parameter to your command object
If for any reason you can't open a connection to the database or execute the query, you wrap this inside a try/catch block, which handles exceptions, and do the following:
- Call the open method of your connection object
- Call the execute non query method of your command object
- If an exception occurs, catch it and throw the exception to the screen
Lastly, you call the dispose method of your command object and the close method of your connection object to clear resources.
Open the addjob.aspx.cs File
Since you have written the add job functionality, let's add the ability to call it. From the solution explorer, left click the plus (+) sign next to addjob.aspx and double click addjob.aspx.cs. Next, add the region named declarations and methods from the project downloads file.
As you can see from the code archive, you do the following:
- Create a region named declarations and create an instance of your human resources object.
- In the page load event, you set the posted date text field to .NET Date time function.
- On your add job button control, you set each of your object's properties to their appropriate form fields.
- We call the add job method.
- If successful, you hide your initial form and show your success message.
 Find a programming school near you