The Game Artist's Guide to Maya, Pt. 3
The Game Artist's Guide to Maya, Pt. 3
This book excerpt is from Michael McKinley's The Game Artist's Guide to Maya. ISBN 0-7821-4376-8. All rights reserved. Chapter 3 Texturing, is posted with permission from Sybex.
UV Mapping the Head
For UV Mapping the head, you can again delete half of the model in order to mirror the UVs. You can leave the ponytail whole. However, if you need the UV space later, you can mirror it as well.
Using the Average Vertices command (Polygons > Average Vertices) is a new technique you can use. Duplicate the head geometry, and move it to the side. Perform the Average Vertices command, and you should see the vertices shift. This command will make the head's different forms not quite as oblique. You can UV map this less distinct head and transfer the UVs to the original (Figure 3.32).
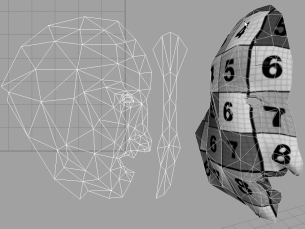
Figure 3.32 Using a duplicate with averaged vertices
Another method is to apply an Automatic Mapping projection to the head, and then apply a Planar Mapping projection to the front of the face (Figure 3.33). You can then use the Move and Sew command and manually UV tweak to connect the main part of the head to the face. This method is probably the better way because it can result in an easier-to-work-with UV layout. It does have some drawbacks in that you will need to meticulously tweak the UVs of the nose and eyes to make sure they do not overlap or stretch. Even so, you will probably see some stretching, but try to minimize it as much as possible.
- 1. Select the faces of the interior of the mouth and apply an Automatic Mapping
projection. Mirror the UVs on the top and bottom of the mouth to save UV
space and avoid having to somehow fit the mouth UVs with the rest of
the face.
- 2. Continue UV Mapping the head elements. Duplicate and mirror the halved
geometry when you finish. Figure 3.34 shows the finished product.
- 3. Using UV Snapshot, save a 512 Ã 512 image. The final image will be 256 Ã 256
when you are finished.
- In Figure 3.35, you can see the finished UV mapped model.
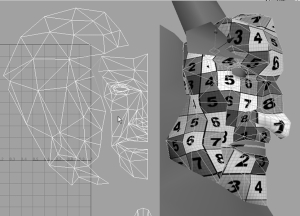
Figure 3.33 Planar Mapping the face
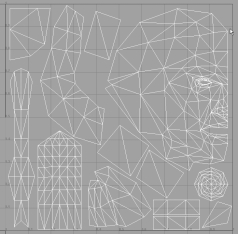
Figure 3.34 The finished head UV layout

Figure 3.35 The completed UV-mapped character
The Hypershade
They Hypershade window is Maya's primary editor for creating materials and textures for your models. You can navigate to this window by going to Window > Rendering Editors > Hypershade. The Hypershade is capable of creating quite a large variety of very complex materials. For game development, however, our needs for the Hypershade are not nearly that demanding.
Maya comes with a variety of materials. A material can be described as a representation of the general surface properties of an object: how shiny it is, how glossy it is, how luminescent it is, etc. Texture files can be applied to a material's different attributes to control these factors to an exact degree. There are any number of ways that a game engine can use textures and materials. Sometimes, all you have to do is apply your main color texture, and the game engine will apply any other maps (bump map, spec map, etc.) automatically by referencing the file name. Other times, you may need to apply the maps to particular material attributes for it to work. Your Art Director should be able to let you know how you need to handle material usage at a job.
However, because we are working totally in Maya, we will do things very traditionally. We will apply the bump map to the bump attribute and the transparency map to the transparency attribute.
Applying a Material to a Model
On the left side of the Hypershade is the Create Bar. It lists the available materials, procedural textures (textures provided by Maya), etc.
- 1. Left-click on a Lambert material in the list. A new Lambert material will appear
in the large window on the right. Click this button two more times, creating
three Lambert materials.
- A Lambert material is a material without any specularity. If you decide to change
this material later, you can change it in the Attribute Editor (Ctrl+A while it is selected).
- 2. Rename these materials to Head, Body, and Sword.
| Note: There are many ways to rename a material.The easiest way is to double-click on each material and enter a new name at the top of the Attribute Editor that opens. |
- Now you want to apply these new materials to the geometry that will correspond
to the three textures you will create for the sword, the body, and the head.
- 3. Select all the objects that will have a single material applied, right-click on the
material in the Hypershade, and choose Assign Material to Selection from the
marking menu that appears. Do this for each material.
- Do not forget that you will apply the hair planes on the legs to the head material.
Created: March 27, 2003
Revised: January 17, 2005
URL: https://webreference.com/graphics/game3/1
 Find a programming school near you