The Game Artist's Guide to Maya, Pt. 2
The Game Artist's Guide to Maya, Pt. 2
This book excerpt is from Michael McKinley's The Game Artist's Guide to Maya. ISBN 0-7821-4376-8. All rights reserved. Chapter 3 Texturing, is posted with permission from Sybex.
UV Mapping the Body
Now that the easy sword is UV mapped, it is time to try your new skills at something complicated. Characters are about as complicated as it gets. Because the sword is finished, unhide the character mesh (Shift+Ctrl+H if you are still working in the same session. If not, go to Display > Show > Show Geometry > Polygon Surfaces) and hide the sword and the armor. With just the body selected, take a look at the UV Texture Editor (Figure 3.14).
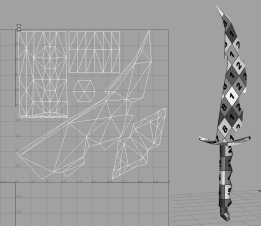
Figure 3.13 Final UV map of the sword
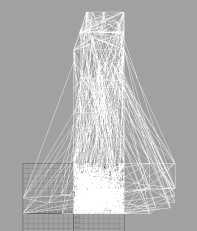
Figure 3.14 The mess of UVs before mapping
Wow! That is quite a mess. (Remember, your results may vary from mine.) So, let's see about cleaning up this mess.
UV Mapping the Torso
We'll first UV map the torso, working our way around the body until the entire model has UVs applied.
- 1. Detach the head geometry from the body. Select the faces of the head (do not
forget the ponytail) and use Edit Polygons > Extract. The Extract command will
remove the geometry you have selected from the model and turn it into a separate
object. Hide it for now.
- If you examine the concept image of Silenus, you can see that his body is very
symmetrical. Because the available texture space is limited, we will mirror the texture
on one side of the body to the other. Doing so will save a lot of texture space. The easiest
way to do this is to actually delete one half of the model, UV map the remaining
half, and then duplicate and mirror the geometry. The duplicated geometry will retain
the UV coordinates, thereby mirroring the UVs.
- 2. Delete half of the model's faces. Select the torso geometry, as shown in Figure 3.15.

Figure 3.15 Delete half of the model, and select the torso geometry.
- 3. Use Automatic Mapping to initially lay out the selected geometry's UVs (Figure
3.16). Move these UVs away from the upper-right grid square in the UV
Texture Editor to separate them from the rest of the model's UVs. (They are
hidden because only our selection is visible.)

Figure 3.16 Auto Mapping the torso causes multiple UV shells to be laid out across the UV Texture Editor.
- 4. In the UV Texture Editor, select corresponding edges and use the Move and Sew
command to start to piece together the torso UVs. Make sure you deselect edges
that correspond to geometry that you do not want to map (for example, that of
the legs and arms). (You can apply the colored grid texture to the model if you
have not done so.) Once the UVs are sewn together, manually adjust the UVs by
hand. Use the grid image as a guide to get the image as straight as possible.
| Note: What do I mean when I say "manually adjust the UVs" or "tweak the UVs"? No mapping command or button will produce a perfect UV shell.You will almost always need to manually adjust a UV's position to get the results you need.To do this, use the Move, Rotate, or Scale tools to literally position a UV where you want it. If an edge is sewn somewhere and you want to change it, you will need to select the edge and use the Cut UVs command and then Move and Sew the edge where you need it to go. |
- There are a couple of ways you can choose to lay out the UVs of the torso. You
can have the torso connect at the shoulder or at the side (Figure 3.17). We will
sew the UVs at the side because it keeps the UV shell a bit more compact.
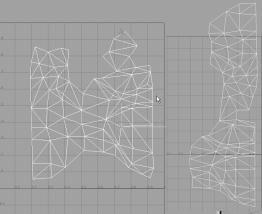
Figure 3.17 Two ways to map the torso: sewn at the side (left) or the shoulder (right)
- 5. For now, move the UV shell of the torso to the side, away from the main working
area.
Created: March 27, 2003
Revised: January 10, 2005
URL: https://webreference.com/graphics/game2/1
 Find a programming school near you