Mastering Digital Photography and Imaging, Chapter 1: Essential Digital Imaging | 7 Equipment. Pt. 2. By Sybex
Mastering Digital Photography and Imaging, Chapter 1: Essential Digital Imaging Equipment. Pt. 2.
This book excerpt is from Mastering Digital Photography and Imaging ISBN 0-7821-4290-7. All rights reserved. Chapter 1: Essential Digital Imaging Equipment, is posted with permission from Sybex.
Professional Studio Cameras
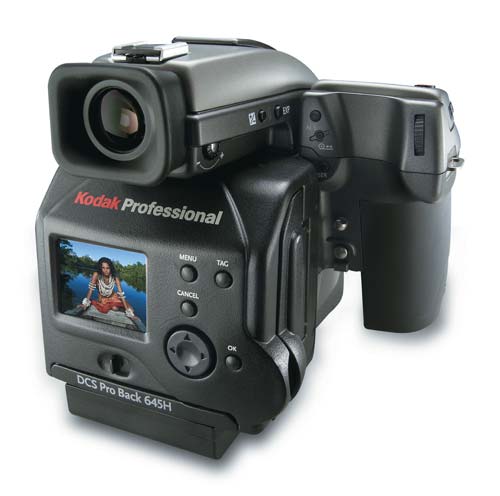
Professional photographers working in a studio often use medium- and large-format film cameras that accept interchangeable lenses and digital backs (see Figure 1.10) with 11 to 20+ megapixel resolution for making massive image files for commercial purposes. In addition to the high cost of the cameras and lenses, the digital backs are prohibitively expensive for the majority of photo enthusiasts. If you are interested in learning more about such equipment, visit the websites of manufacturers such as Creo (www.creo.com), PhaseOne (www.phaseone.com), Kodak (www.kodak.com), Fujifilm (www.fujifilm.com), and Mega Vision (https://acme.mega-vision.com).

Figure 1.10: Some medium-format film cameras accept a digital back. This type of equipment is expensive and is designed to meet the needs of portrait and commercial studio photographers.
Courtesy Eastman Kodak
Choosing the Right Compact Digital Camera
If you have decided that a compact digicam is the right choice, and you’re ready to shop for a new camera, which models should you consider? Frankly, far too many cameras are on the market to answer that question, with new models introduced every month and others discontinued. The answer also depends on your own needs, budget, preferences, and the types of subjects that you often photograph.
In this section, I’ll discuss many digicam capabilities and comment about the value of each feature. After reading the following, you should know which capabilities you consider most important. Make a list of these features. While reviewing the specifications of several models (within your budget) on a photo retailer’s website store, refer to the list; eliminate cameras that will not meet your needs. This process should help you to narrow the field to a few cameras that you’ll want to check out in person at a well-stocked retail store.
Popular Compact Digicam Features
Digital cameras with built-in lenses generally include most or all of the following capabilities. The high-end prosumer cameras often include some esoteric features as well, but these are not common and are of little interest to most photographers.
Resolution
Presumably, you have already determined the resolution that you will require, and can afford, so you know whether you want a camera with a 3, 4, 5, or higher megapixel sensor. Do note that some cameras, particularly a few Fujifilm FinePix models, include a mode that produces images with double the resolution: 6 megapixels with a 3 megapixel camera, for example. This is achieved through “interpolation”: adding extra pixels by copying existing pixels. Although this feature can be somewhat useful, the resulting images do not provide double the image quality.
Recording Options
As mentioned earlier, JPEG is the most common image-recording format. If you appreciate the benefits of the RAW format discussed earlier, and do not mind spending extra time at your computer converting RAW images, look for a camera that also includes a RAW capture mode.
Zoom Lens
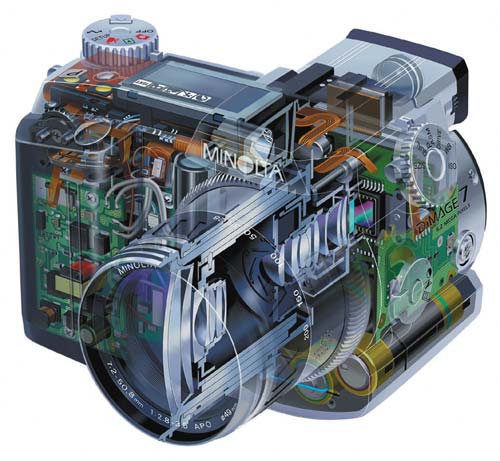
Most digicams include an optical zoom lens (see Figure 1.11), usually a 3x model such as a 38–114mm equivalent. This type is convenient because it allows you to switch from wide-angle to telephoto framing in a second or two. A few cameras include a 4x or 5x optical zoom lens, for greater effective “reach,” and an optical viewfinder. You can also find digicams with a much longer lens: a 6x or 8x zoom. These allow you to fill the frame with more distant subjects, but such cameras are larger, more expensive, and employ an Electronic Viewfinder (EVF). Frankly, unless you often photograph distant subjects, and find that you are comfortable with using an EVF, I would recommend sticking with a camera that includes a 3x, 4x, or 5x zoom lens and an optical viewfinder.

Figure 1.11: Digital cameras with a built-in zoom that extends to long focal lengths— like this Minolta model’s 28–200mm equivalent lens — incorporate an electronic viewfinder and not the more common optical viewfinder.
Focus Options
Autofocus is standard, and most current cameras employ a “wide area” or “multipoint” autofocus system that can set focus even on a subject that is not in the center of the frame. This useful feature allows you to shoot quickly, without first centering the subject. It also encourages better composition, with the subject placed off-center in more of your pictures. Many cameras offer another valuable option, allowing single sensor selection for more accurate control over the exact point of focus—on the eyes in a portrait photo, for example.
Many cameras also include autofocus options for “landscape” (for infinity focus) and “macro” (from 1~IN to 5~IN, for example.) Useful for subjects that are extremely close, or very far, from the camera, these are usually accessed with an analog control. If you select one of these, remember to reset the camera to conventional autofocusing afterward.
Still rare in compact cameras, Continuous Autofocus mode allows the camera to continuously change focus as you point the lens toward subjects at different distances. This feature is primarily used to reduce the time delay between pressing the shutter button and the instant of exposure. It is not the same as the Continuous “tracking” focus available with SLR cameras, for follow-focusing in action photography. A compact digicam’s Continuous focus system may be able to keep up with the motion of a slow-moving subject, such as a person walking, but it will not produce sharp images of faster motion.
More and more digicams also offer a rudimentary manual focus system that allows you to preset focus for any of several distances; such systems are not very versatile or convenient to use. This is not a feature you will need unless you often photograph landscapes, a situation in which the ability to set focus to a specific distance can be essential.
ISO Setting
Most cameras have an automatic ISO (for International Organization for Standardization) feature that adjusts sensitivity depending on the brightness of the light. In low light, it sets a high ISO (such as 400) in order to allow for shooting at fast shutter speeds to prevent blur from camera shake. In bright light, when a fast shutter speed can be set at any ISO, the system sets a low ISO (such as 100) for the best image quality.
ISO is a term that was intended for application to photographic film and denotes the sensitivity of a film to light. (The ISO system replaced the older ASA numbering system.) A low ISO film has low sensitivity to light, and a high ISO film has high sensitivity and can record a correct exposure at a faster shutter speed. The terminology has been applied to digital cameras as well, a logical step, because the concept is identical.
The majority of cameras also offer manual ISO control for making your own settings: ISO 100, 200, and 400, for example. As discussed in the following paragraph, this is an important control but not available with all cameras; I would not buy a camera that omits this feature. Higher ISO options are available with some cameras, but are not really necessary for most of us. They may be useful for those who must often shoot in very low light—without flash or a tripod—when high image quality is secondary to getting a sharp, well-exposed shot.
Select ISO 100 for the best image quality and ISO 200 for fast shutter speeds on cloudy days. Reserve the ISO 400 (or higher) settings for low-light situations. A high ISO setting will provide faster shutter speeds for sharper pictures, but image quality will be much lower due to digital noise caused by the need to amplify the signal at the sensor. This noise resembles grain in images made with film, but is generally more objectionable because of the random colors it produces within the image. If possible, use ISO 100, and mount the camera on a table-top tripod in low light; with nearby subjects, use electronic flash. Then, you won’t need to worry about camera shake, and you’ll get better image quality.
Created: March 27, 2003
Revised: March 17, 2004
URL: https://webreference.com/graphics/digital2/1


 Find a programming school near you