Masking with Channels in Photoshop
Masking with Channels in Photoshop
Excerpted from Photoshop Retouching Cookbook for Digital Photographers by Barry Huggins. ISBN 0-596-10030-2, Copyright © 2005 O'Reilly Media, Inc. All rights reserved.
Making Selections with Channels
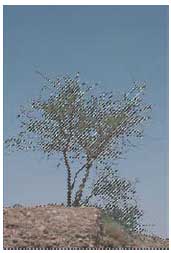
The spindly branches of this tree would make an excellent study in silhouette against a striking sunset, but making a good selection of those intricate fine twigs would test the power of Photoshop and its selection toolsÂnot to mention anyone's patience. A manual selection would be tortuous, and even the Magic Wand and Color Range selector pose problems. Luckily, there is an alternative, using channels.
Complex composites made easy

1 The secret is to find a channel that offers plenty of contrast between subject and background. Go to the Layers palette and click the Channels tab, then click each channel in turn to asses the contrast. In this image the Blue channel is the best candidate. We don't want to edit the blue information, so duplicate and rename the blue channel. This duplicate channel is where we will do all the work.
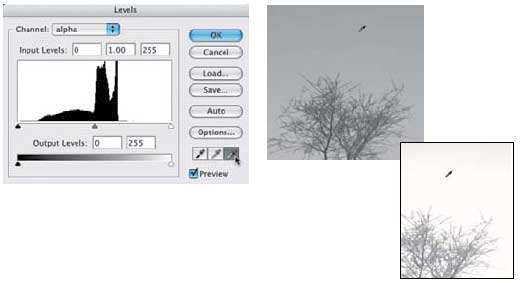
2 It's a good starting point, but we need to increase the contrast further. Press Ctrl/ Cmd + L to bring up Levels, then choose the White Point eyedropper in the bottom right of the dialog box. The idea is to make the backgroundÂwhich we don't wantÂpure white rather than the current range of grays. Use the eyedropper to click a medium-gray pixel towards the top of the image. Any pixels lighter than the one clicked will be converted to pure white.
3 Choose the Black Point eyedropper and click on a dark gray pixel from within the tree branches. This will make any pixels darker than the clicked pixel convert to pure black, creating the stark contrast that we need.

4 Depending on which pixel you clicked on, you may find some of the background areas that used to be white have now turned gray. Remove this by painting over it in white.

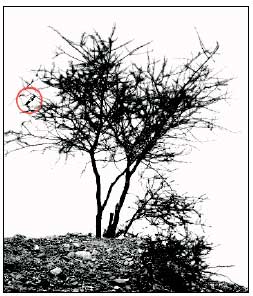
5 We'll keep the earth in which the tree is planted part of the selection. Use a black brush and paint out the earth area. The channel should now look like this:
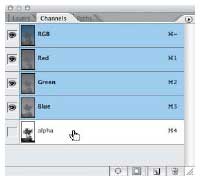
6 Our work on the Alpha channel is finishedÂall we do now is to load it as a selection. First, click the RGB composite channel so we can see the color image again. Now, press and hold the Ctrl/Cmd key and click on the Alpha channel to load it.
7 Click the Layer tab to return to the Layers palette. The marching ants show the initial selection, but it needs inverting. Go to Select > Inverse (Ctrl/Cmd + Shift + I).
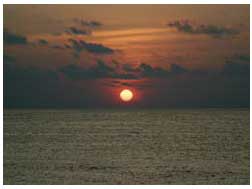
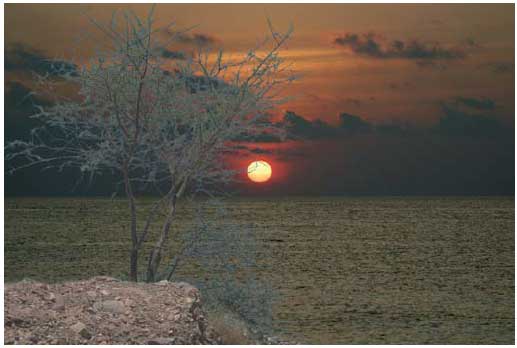
8 Open the sunset image, which will provide the new background. Return to the Tree document, and, as the tree is already selected, use the Move tool to drag it from its document into the Sunset document and position it in place. Sadly, one thing gives the game away: the blue "ghosting" surrounding the tree. The tree's original background was blue, and that blue light reflected from the tree becomes an integral part of the tree. To fix the problem we need to employ some advanced compositing techniques (see page 164).
Created: March 27, 2003
Revised: April 10, 2006
URL: https://webreference.com/graphics/channels/1
 Find a programming school near you