Uploading Images using HTML and ASP: Decoding the Upload/Manipulating Image
Decoding the Upload/Manipulating the Image
Uploading Images using HTML and ASP
Decoding the Upload
In which our server grabs the image out of
the data it's been sent.
From the ASP side we need to get the picture file out of the data we receive. Using ImageGoo the code to do this is pretty straightforward. We have already set the file 'photoupload.asp' as our form action. In this we include the following code.
Set mp = Server.CreateObject("ImageGoo.XMultipart")
data = Request.BinaryRead(Request.TotalBytes)
mp.SetData(data)
Set field1 = mp.Item("filefield")
Set field2 = mp.Item("textfield")
That's all there is to it! We start off by creating the object we're going to be using (the ImageGoo XMultipart object). We then read the raw data that's been sent to us and put it into the object.
To get the fields out we just ask for the Item with the same name as the form field. So we ask for the field called 'filefield' and then for the field called 'textfield'. Each of these is an object that holds everything we need to know about the contents of each field. We'll keep these field objects handy for later on.
Manipulating the Image
In which ImageGoo makes the picture all respectable.
Who knows what the image we have is like? It's probably the wrong size and shape. It's probably the wrong format. The only thing you can guarantee for sure is that it's not going to look good if we just insert it into our web page. So let's get ImageGoo to turn it into something more respectable.
First the size. We have a fixed amount of space for our image. Generally the height doesn't matter too much because a tall image will just push other content down the page, however the width does. If the image is too wide you won't be able to see all of it. If the image is too narrow your page will look plain silly and tables may slip into the space that's been left.
To keep things simple let's make the width fixed. If the image is too big we'll scale it down. If it's too small we won't scale it up (because it would result in horrible pixellation) but we'll center it. To do this we use the following code.
Set canvas = Server.CreateObject("ImageGoo.Canvas")
canvas.Width = 290
rect = canvas.DrawData(field1.Data, field1.Filename, "Fit=True VAlign=middle HAlign=middle")
First we create a canvas to draw on and set a width of 290 pixels. Next we draw the image onto the canvas. We pass DrawData both the raw data from the field object we obtained earlier and the filename. The filename is not strictly necessary but is useful as a hint to the type of image. Because the width has been fixed the height will be set automatically to fit with the shape (aspect ratio) of the image we are drawing.
The Fit parameter specifies that the image should be fitted into the canvas. This means it will be scaled down if it is too large but the shape (aspect ratio) will never be altered. When the image is drawn it is normally drawn at the top left of the canvas but by setting the HAlign and VAlign parameters we can ensure that it is drawn in the centre (useful if the image is small).
So now we have a canvas with our image on it. Let's put a frame round the edge.
canvas.DrawShape "rect", "Operation=draw"
Because the size has not been specified ImageGoo assumes that the rectangle should be the same size as the canvas. We use the draw operation to override the outline and fill that would normally be performed on the rectangle.
And now some rotated text up the right-hand side.
canvas.TextFont = "Arial"
canvas.TextSize = 7
canvas.TextColor = "gray"
canvas.Width = canvas.Width + 20
canvas.DrawText field2.Contents, "Rotate=-90 Translate=290," & (canvas.Height - 2)
First we set the style of text we're going to draw (Arial 7point Gray). Next we have to increase the width of the canvas to make room for the text. Finally we draw the text from the text field object we picked up earlier. By default the text is drawn at the top left of the canvas so we rotate the text 90 degrees anticlockwise and move (translate) it down to the bottom right.
So what might it look like? Here's one I prepared earlier.
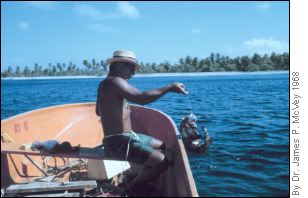
Original from the National Oceanic and Atmospheric Administration/Department of Commerce by Dr. James P. McVey, 1968.


Comments are welcome
Created: Aug. 19, 1999
Revised: Aug. 19, 1999
URL: https://webreference.com/dev/upload/decodeman.html
 Find a programming school near you