Rolling Texture Gathers No Moss - GIF Animation Studio
![[Rolling Texture Gathers N Moss]](graphics/head-rolling.gif)
|
by
Richard Koman
Songline Studios Editor, Web Review Studio series |
|
This is an excerpt from Richard Koman's new book, GIF
Animation Studio, due out in
mid-October from Songline Studios and O'Reilly & Associates. The
book is the first in a new series called the Web Review Studio series.
Upcoming books will tackle Shockwave, Java and streaming audio.
It's fairly simple to create scrolling text animations (just inch the type across the frame) or type effects (just incrementally apply Photoshop filters, as shown in Chapter 5). But here's a really cool type effect that's a little more complicated.
|
| Audrey Witters' Web page on the MetaTools site |
In this "rolling texture" effect, the type doesn't change, but what's inside does. Audrey Witters demonstrated
this technique on her Web page on the MetaTools site, and her
explanation provides the basis for this chapter.
| |
|
To create the effect, we used the Texture Explorer module from Kai's Power Tools 3.0 a powerful set of
plug-ins for Photoshop and compatible programs. Although we did this project on a Macintosh, both
KPT and Photoshop are available for Windows as well
as Macintosh.
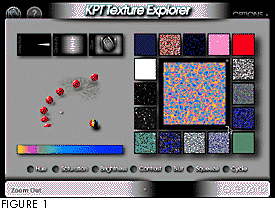
Texture Explorer generates random textures algorithmically. In Figure 1, the currently selected texture appears in the large square on the right. Variations of the texture appear in the smaller tiles surrounding the large square. Texture Explorer calculates the variations based on the amount of "mutation" you ask for by selecting one of the balls on the tree to the left. The lowest ball gives the least amount of variation, the highest ball the most. In this case, we've selected maximum mutation, and you can see that the variations are quite different from the active texture.
To create the texture you want, you pick one of the variations as the new active texture. This generates a new set of variations. By gradually reducing the amount of mutation, you create more and more subtle variations. Eventually you get just the right look. You can also control the direction, opacity and apply mode (the method for combining pixels of two layered images).
Run Photoshop and create a new file (File/New). You need to make this file larger than your final image. We made this file 600 x 400 pixels for a final image of 240 x 120. Then choose the KPT Texture Explorer (Filters/KPT3.0/Texture Explorer) and you'll see the interface shown in Figure 1. Kai's Power Tools includes a feature called presets. Once you have a texture you like, you can save it as a preset. Over 100 presets come with Kai's Power Tools. We used one of those factory-installed presets, Seussian fribbldigniggets, so-named for the Dr. Seuss-like shapes and colors in the texture. There are two modes for selecting presets a graphical mode and a text list. The graphical list lets you preview the actual textures but is really difficult to navigate. The text list is somewhat unwieldy since it's not divided up into categories (a feature that did exist in earlier versions of the program), but is in general an easier way to navigate. To use the text mode, press Command-P (Control-P in Windows) to bring up the Preferences dialog box. Once in the Preferences dialog box, uncheck the Graphical Presets option. Now, to load the texture for this example, click on the arrow in the middle of the bottom bar to bring up a list of all the presets. Scroll down and select Seussian fribbldigniggets. Of course you don't have to use any preset texture. Feel free to muck about in Texture Explorer until you find something you like. When you've chosen your texture, click on the checkmark to apply the texture.
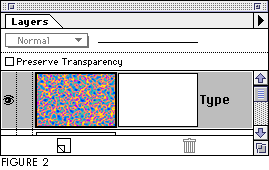
An empty thumbnail box will appear to the right of the texture thumbnail, as shown in Figure 2. That's the layer mask icon.
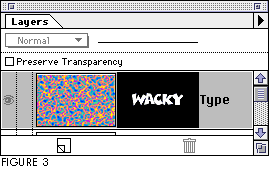
To see what's going on while the layer mask is selected, option-click on the layer mask icon. This will display just the layer mask, so the image will turn white. Now, using the type tool, set a font and point size and type in your text. We used Comics Car Toon, 100 pt. After you set the type, you may have to resize it with the Image/Effects/Scale function. The text should be white on a black background. Option-click on the layer mask again to return to regular view. Figure 3 shows the text mask.
Next, add a new layer behind the masked texture layer. Fill this layer with the same color as the color of the page: in this case, white.
Next, we'll move the texture around in increments to create the component frames of the animation. To create the second frame, duplicate the image (Image/Duplicate) and click the Merge Layers box. Select the texture layer in the Layers palette (make sure you select the actual texture icon, not the type icon) and select the entire image (Select/All). Then, using arrow keys, move the texture 5 to 10 pixels in the direction you'd like it to roll. We moved the texture down 5 pixels and to the right 5 pixels for each frame. Once you've moved the texture, save a new version of the file ó 02.psd. Repeat this process for each frame of your animation. How many frames should this sort of animation run? Probably somewhere between 12 and 20. If there are too few frames, the animation will seem jumpy. If there are a lot of frames, the file size will be too big. To recap the procedure: * Duplicate the image. * Move the texture. * Save a new file. The next step is to crop these large files down to just the size you want for your GIF file. If you've centered the text, you can do this easily with the Canvas Size command (Image/Canvas Size). Use the Info palette to determine what size your final image will be. Select the marquee tool and select a rectangle as if you were going to crop the image. The Info palette will display the width and height of your selection. Once you know the width and height, you can use the Canvas Size command to quickly resize the images. Simply enter the width and height of the new size in the Canvas dialog box and click OK. Boom, the image is cropped. Once you've saved all the cropped images, you can save them as GIFs with the appropriate palettes and color settings. Or you can just import the Photoshop files directly into GIFBuilder, which will automatically convert them to GIFs.
| ||
|
Finally, import the frames into GIFBuilder and set the timing, transparency, etc. We gave all the frames a
delay of 25, except the last one which has no delay, in order to account for the loading of the image.
| ||
|
Audrey has more fun animation on her Web pages using other KPT tools. Check out the glowing button at
https://www.metatools.com/webtips/anitip/what.html.
|
Comments are welcome
Copyright 1996 Songline Studios, Inc., Miller Freeman, Inc., and


 Find a programming school near you