WebReference.com - Part 2 from Chapter 11 of Cascading Style Sheets A Beginner's Guide, from Osborne/McGraw-Hill (4/5)
[previous] [next] |
CSS: A Beginner's Guide
Project 11-2: Playing with Blocks
Absolute and relative positioning are not difficult to work with, once you have had the chance to experiment with them. In this project you will create and position several colored blocks or boxes, just to get a feel for working with positioning. It's also fun to experiment and see what you can do with positioning as well as apply some of the other things you learned in this module.
Step-by-Step
1. Create an HTML document and save it as absolute_and_relative.htm.
2. Create five ID selectors and name them: redbox, greenbox, bluebox, yellowbox, and cyanbox. Remember that an ID selector must have the crosshatch character, # (the pound sign), preceding the name, as in: #redbox.
3. Assign each of the ID selectors a height and width of 100 pixels.
4. Set the background color for each of the boxes to match its name. For example, the background color for #redbox should be red, for #greenbox green, and so on.
5. Set the text color for each box to a contrasting color, so the text will stand out. It doesn't matter which color you use, as long as it is visible against the colored background.
6. In the <body> portion of your HTML document, add five sets of <div> elements, and assign each an ID corresponding to one of the ones created in Step 2. For example, one should be <div id="redbox"> </div>.
7. In between each set of <div> tags, add some content. In Figure 11-3, the contents simply reflect the box's color. You can add whatever content you would like.
8. Save the page and display it in your browser. It should resemble Figure 11-3. This is the "static" positioning of these elements.
Note: For Figures 11-3 through 11-5 in this project, #greenbox was given a background color of "lime" to make it stand out better in the grayscale illustrations.

Figure 11-3 Five different-colored boxes in a "static" arrangement
9. Modify the style rules for each of the boxes by adding the position property, with a value set to "relative."
10. Position the boxes by using the top, right, bottom, and left properties with different combinations of values. Try using lengths, percentages, and combinations of both, along with different property combinations. Be sure to note how the various boxes reposition when you set the "coordinates" with these properties.
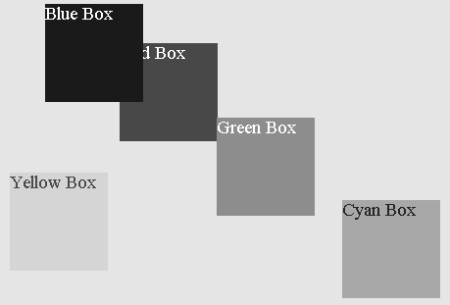
11. Save the page and view it in your browser. The values listed in the code that follows this project produced the results in Figure 11-4.

Figure 11-4 Relatively positioned boxes
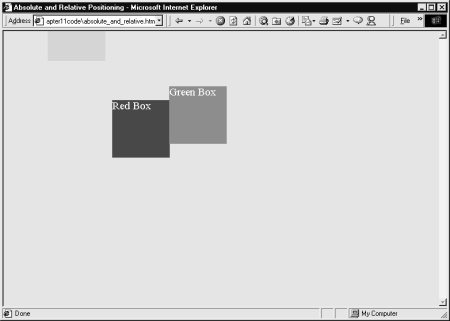
12. Experiment with the boxes by changing the value of the position property from "relative" to "absolute." The results of that change from the original settings are reflected in Figure 11-5. Two boxes have moved completely off the screen, one is halfway off, and the remaining two have moved closer to the top of the screen. This is because the frame of reference has now changed from the elements' static positions to borders of the containing block. The same values have radically different effects. Alter the values to bring the boxes all back onto the page.

Figure 11-5 Absolutely positioned boxes
Project Summary
This project allows you to learn about positioning through experimentation. Since you are not really trying to create any particular kind of layout, you are free to experiment and see what results you get. Try experimenting further with the positioning properties by trying to position a box in each corner of the screen and one in the center. You might also try to create a layout in which you stack or overlap the boxes. Try positioning the boxes in a stair-step arrangement. As you begin to become comfortable positioning boxes, you will be taking a long step toward being able to design page layouts with CSS.
[previous] [next] |
Created: July 22, 2002
Revised: July 22, 2002
URL: https://webreference.com/authoring/style/sheets/beginners/chap11/2/4.html


 Find a programming school near you