XML and PHP Simplified - Building an XML Reader [con't]
The createdoc.php script
The main.php
script gives us two choices, we can create a new XML document or we can choose
from already existing XML documents. The createdoc.php
script will enable a user to create a new XML document from scratch. Below is
the code for the script and also a screenshot:
Figure 2:Creating an XML Document
The html section of the page has the following code:
First, we check to see if the form has been submitted:
Then we initialize the error message variable:
Because all fields are required, we need to check and make sure that they are
not empty. We do this by using the empty()
function. More specifically, we check to see if the form values
are empty; if so we set an error message using the $msg variable:
Now, if all fields of the form are filled in and all is well, then we simply
continue to create the document. But first we use the $msg variable as a determining flag to
see that no errors occurred; only then can we continue:
if(empty($msg)){
The next step is to set the default directory. We want all of our XML documents to be located in one place. This makes handling them easy:
We then use the user defined name of the file and add the XML extension to it:
Now we use the DOM to create the XML document starting with the version line:
$doc = new DOMDocument('1.0');
Then we use the formatoutput
function to ensure that a well formed and valid XML document is created:
Next, we set the root element. The name for this element, like almost all others, is given by the user. In this case, we expect it to be "contact":
Then we set the name element of the contact:
Then the phone, address and email details. Notice that each time we create a new element we append it to the root element. Why? Because any element created after the root element becomes a child element of the root element, so you can describe all subsequent elements as children of the root element. For this reason, it has to be attached to the root element. Therefore, for each new element or textnode that we create after the root element, we have to append to the root element. So the name, email and address elements are all child elements:
That's basically all we needed to set up the internals of the XML document. Now
we need to make sure that we have access to the default directory. If we don't
have access to the directory then we get an error:Warning: opendir(/Inetpub/wwwroot/aspshopping)
[function.opendir]: failed to open dir: Result too large in
C:\Inetpub\wwwroot\XMLPHP\multitest.php on line 11
This kind of error simply means that we do not have the proper permission to
access the directory, in which case you should set the permissions in such a
way that the program can access it.
If we have no problems accessing the directory, then we simply go ahead and link the filename with the directory, append it to the directory name, so to speak:
Finally we save the document using the save()
function:
and store its name in the session variable then we send the user over to the editor:
In the next article, we will continue to discuss the code for the script. If you have any difficulties with what we have discussed so far please do not hesitate to email me.
Download the files for this series.
Original: September 2, 2009
 Find a programming school near you
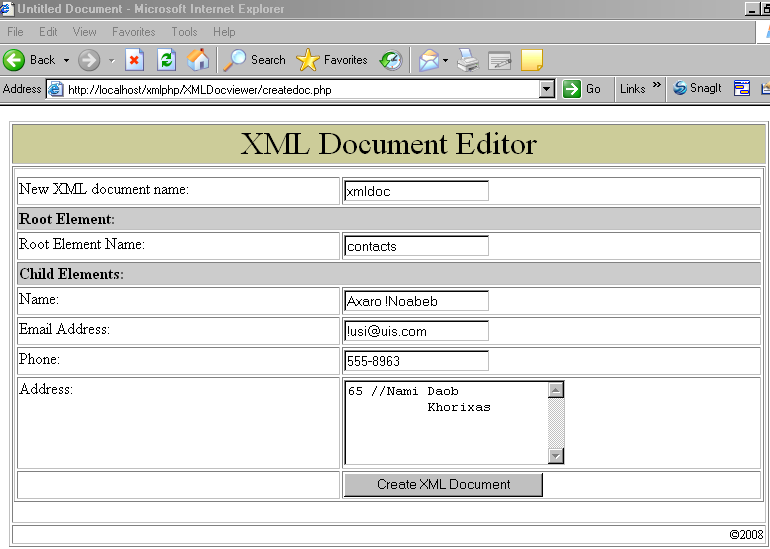