Look Ma ... No Pixels pg 3: Production Graphics with Wendy Peck at webreference.com
 |
Look Ma ... No Pixels: Working with Paths and Nodes | |
| We have succeeded in creating a simple path, and now we can use the path to create objects. We will fill and stroke the path, plus move the path on the canvas, and then go on to editing our nodes. | ||
|
Filled path: The path is deselected, but the filled object remains on the canvas.
|
Filling, Stroking and Moving a Path Click on the named path again, and it will appear again on the canvas. We will use this same path to create a selection, but let's move it first. |
|
|
The Path Component tool is used to move a path.
Path is repositioned and stroked using the Airbrush option.
|
To move an entire path, select the Path Component tool. Click on the path, and the nodes along the path will appear. Click and drag the path to a new location. Note: The named path will change to reflect the new position when you move the path on the canvas. If you wish to retain the path with the original position, select Duplicate Path from the right-click menu, or through the side menu in the Paths palette, and assign a new name. Now let's stroke this path. Through the side menu in the Paths palette, or the right-click menu, select Stroke Path. I have used the Airbrush option for the stroke shown in the sample at the left. The stroke for the path will be taken from the settings for the chosen tool. Adjust the settings for the tool you will use before you create the path stroke.
|
|
|
|
Copying Paths Between Documents Activate the path you wish to copy in the original document. Click on the path and drag it to the new document canvas. You now have the path, with the same name as part of the new document. Alternately, you can click and drag the desired path from the Paths palette listing as shown at the left. Again, the path will be copied, complete with the name. I wanted to slide a few of the neat tricks you can do with paths in before we started on our node work. Paths are one of the functions in Photoshop that seem to be shrouded with mystery. Now that you have worked a little with a simple path, I am guessing that you have relaxed a little. Now let's start having some fun with changing nodes. The true power of paths will be in your hands within minutes. |
|
|
Path selection with the Direct Selection tool shows hollow nodes.
Nodes selected with the Direct Selection tool are represented by a solid rectangle at the node.
Selected node is dragged to a new position. |
Moving Nodes Duplicate your first named path as explained earlier in this article. Assign a name to the path I used the highly original name "Moving nodes path." With the new named path active in the paths palette, activate the Direct Selection Tool. Click anywhere on the canvas to deselect the path. Click on the path to select. Note how the nodes are hollow in this selection (see left). Note: It is good practice when working with nodes to deselect so that you are sure you are working with a clean selection. It is too easy to miss that one node is still selected from a previous action.
|
|
|
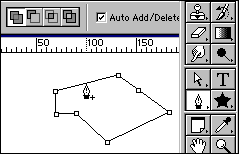
A + appears beside the cursor when a node can be added.
A appears beside the cursor when a node can be deleted.
|
Adding or Deleting Nodes
And now, the shortcut. If you select Auto Add/Delete from the toolbar when you are using the Pen or Freeform Pen Tool, you can add a node by clicking on any curve segment, or delete a node by clicking on it. In the sample at the left, note that the Pen tool is active, and there is a + beside the cursor, indicating that a click will add a node. This is a powerful shortcut, since it is usually when you are creating a path that you realize that a node must be added or removed. Switching tools, or even using a shortcut is much more cumbersome than the intuitive Auto Add/Delete. Feeling pretty comfortable with nodes now? If you are not confident in the methods we have discussed so far, spend a little more time working with simple lines and nodes. We are ready to move into curves, and creating more complex paths. With a solid understanding of how nodes work, you will not be overwhelmed by the options I am about to present. |
|
|
|
Look Ma ... No Pixels: Tutorial IndexPaths in Raster Programs |
URL: https://www.webreference.com/graphics/column45/
Created: April 2, 2001
Revised: April 2, 2001


 Drag
the selected node to reposition. You can also move more than one node
at a time. Multiple nodes can be selected by holding the Shift key as
you select nodes, or you can do a marquee select over the desired nodes
as shown at the right. With the nodes selected, simply click and drag
as for the single selected node.


 Find a programming school near you